I. Introduction to Press Braking
In the vast world of sheet metal fabrication, various techniques and processes are employed to shape, mold, and transform metals into functional and aesthetic pieces. Among these techniques, one stands out for its precision, versatility, and widespread use: press braking.
The press braking process is commonly used for shaping and bending sheets and plates in metal sheet manufacture. It has been adopted in numerous industries, such as manufacturing, automotive, aerospace, and construction. For many modern factories, especially those pursuing higher efficiency and repeatability, understanding traditional press braking together with CNC Press Brake Forming is essential to build a complete bending process system. To explore advanced models and specifications, you can also view our CNC Press Brake lineup.
This fabrication process is concerned with a machine called a press brake, which is made up of punches and dies, and forms a specific angle through exerting pressure on the workpiece to bend it. Sheets and plates are placed between the punch and die and can be shaped and bent via pressure exerting.
The punch exerts pressure on the workpiece, forces it to bend, and takes the shape of a die. By adjusting the position of the punch and die, the bending angle and length can be controlled. Compared with other metal forming methods, the press braking process has the following advantages.
It can bend metals precisely and repeatedly and can be applied to produce components with exact size. It can handle various sheets’ thicknesses and sizes. The process is flexible and can make both simple and complex bending shapes.
The press braking is used to produce assorts of components, such as brackets, enclosures, frames, panels, and structural parts. It is highly efficient, economical, and used to generate mass metal parts with high accuracy and consistency.
Whether you are experienced or have a green hand, it is of vital importance for you to know the press braking process to acquire precise and high-quality results. In this blog post, we will unveil the mystery press braking process — and if you’d like to understand how it compares with other forming techniques, check out Press Braking, Stamping, and Roll Forming Explained.
II. Components of Press Brake Machine
The press brake basically comprises a bed, press brake ram, top punch, bottom die, and back gauge. The bed and ram are essential for the press brake, which supports the whole machine structure and offers the stability and power required by the punching process.
The top punch is the ultimate tool of the press brake to exert pressure and form the workpiece. The bottom die is a bottom tool for supporting the workpiece and punching the shape. The back gauge is an essential assistant device for the industrial press brake, which plays a role in positioning and supporting the workpiece and ensuring precision and consistency during the punching process.
By collaborating with these components, the press brake can accomplish various punching tasks and be widely applied to metal fabrication and manufacturing industries. For a closer look at machine configurations and technical details, download our brochures.
Ⅲ. Core Understanding: Redefining the Modern Bending Process
3.1 The Essence of the Process: The Fusion of Art and Science
Redefining the Concept: Beyond Simple Physical Deformation — In many manufacturing settings, bending is often reduced to the mechanical act of “pressing a sheet into an angle.” Yet under world-class manufacturing standards, press braking is defined as a process of precisely reorganizing internal stresses within the metal—operating at the material’s mechanical limits—through the interplay of machine accuracy and die geometry. This is not brute-force shaping, but rather a sophisticated contest between a material’s “memory” and its “plasticity.”
Microscopic Mechanics: The Dynamic Balance of Tension and Compression — To truly master bending, one must look into the microcosm of the metal itself. When the punch descends to press the sheet into the die, the material’s cross-section undergoes intense physical differentiation:
- Inner Radius: Metal fibers are subjected to significant compressive forces, pushing them to deform laterally.
- Outer Radius: Fibers experience strong tensile forces, often approaching the point of fracture.
- Neutral Axis: Between the two extremes lies a theoretical plane that is neither stretched nor compressed.
- Key Insight: The neutral axis is not fixed at the sheet’s midpoint (50% of thickness). As the bend radius decreases, it shifts inward toward the bend. This shift is mathematically expressed as the K-Factor, and the ability to calculate it accurately determines the precision of flat pattern development — the critical bridge connecting CAD design to the finished part on the shop floor.
Process Positioning Spectrum: Why It’s the Irreplaceable “Surgical Knife” — Within the vast landscape of metal forming processes, the press brake occupies a unique niche. By comparing it with other methods, its true value becomes clearer:
- Compared to Stamping: Stamping is like a “photocopier,” built for speed and consistency but reliant on costly dedicated tooling. The press brake, on the other hand, is the “scalpel,” using standard tooling to meet highly variable demands.
- Compared to Folding: Folding machines resemble “origami masters,” excellent for protecting large sheet surfaces, but when it comes to thick plates or deep box structures, they cannot compete with the press brake’s tonnage and open-frame flexibility.
- Compared to Roll Forming: Roll forming excels in producing continuous profiles with uniform cross-sections (like rails), whereas press brakes are central to discrete manufacturing, enabling the creation of complex geometric parts.
3.2 Decision Framework: When to Choose Press Braking
For production managers and process engineers, choosing press braking should not rely on intuition alone—it must be guided by a rigorous cost-to-technology analysis matrix.
1. Volume–Cost Matrix (TCO-Based Decision Making) — The Total Cost of Ownership (TCO) is the anchor of all decisions.
- Low Volume / High Mix (HMLV, < 5,000 pcs/year): The absolute domain of the press brake. There’s no need to amortize costly stamping dies worth tens of thousands of dollars—standard V-dies can be quickly reconfigured for immediate production.
- Medium Volume (5,000–50,000 pcs/year): The “gray zone” of decision-making. Here, robotic bending cells often come into play. While cycle times are slower than stamping, the flexibility of just-in-time (JIT) production and lower die maintenance costs often make bending the more economical choice.
- High Volume (>50,000 pcs/year): Typically, this is the domain of progressive stamping—unless the part geometry is too complex to be formed entirely within a die.

2. Accuracy and Complexity Assessment — When encountering the following geometric conditions, the press brake is virtually the only viable solution:
- Complex Return Structures: Profiles with negative returns are difficult to eject from stamping dies, but press brakes can handle them easily using specialized gooseneck punches.
- Deep Boxes: With their large open height and multi-axis backgauge systems, press brakes can form deep box-shaped parts with ease.
- Custom Tolerances: Air bending allows operators to fine-tune bend angles by adjusting the Y-axis depth. This flexibility compensates for variations in material springback between batches—an advantage fixed-shape stamping dies cannot offer.
3. Applicable Materials and Industry Spectrum
- Aerospace and Medical: Ideal for processing expensive and hard-to-machine materials like titanium alloys and Inconel. These industries have near-zero tolerance for error; the “soft tooling” nature of press brakes minimizes costly scrap from trial runs.
- Electronics and Telecommunications: For example, 5G base station heat dissipation housings often feature dense perforations. Stamping or drawing such parts risks distortion, whereas the localized forming of a press brake avoids these issues and ensures functional integrity.
💡 Expert Insight: Beware the Hidden Killer — Grain Direction
Many experienced engineers, when nesting parts for maximum material yield, overlook the sheet’s rolling grain. Reality check: Metal sheets have a “wood grain.” If the bend line runs parallel to this grain—like splitting wood along its grain—micro-cracks may appear along the outer bend radius, especially in high-strength steels or aluminum alloys (e.g., 6061-T6). Golden Rule: For structural components under fatigue load, always orient bend lines perpendicular to the grain. If parallel bending is unavoidable, increase the bend radius or perform localized annealing beforehand. This subtle detail often marks the line between a standard part and a world-class component.
Ⅳ. Operating Principles: Deep Dive into the Three Core Bending Methods
On a press brake’s control panel, selecting the bending mode is not a mere parameter toggle—it determines the fundamental mechanical pathway of metal deformation. Air bending, bottoming, and coining represent three distinct pressure levels and plastic control strategies. Understanding their essential differences is the key step for process engineers transitioning from “instinct-based operation” to “scientific manufacturing.”
4.1 Air Bending: The Industry Standard
Air bending is the dominant process in modern CNC press brakes, accounting for about 80% of the global sheet metal forming market. Its essence lies in the principle of “partial contact”: the sheet metal touches only three points—the two shoulders of the lower die and the tip of the punch—while remaining suspended above the bottom of the V-groove throughout the operation.
- Geometric logic: depth defines angle In air bending, the V-angle of the lower die does not directly determine the final bend angle. Instead, the outcome depends entirely on the depth of the punch’s descent (Y-axis position). This allows for exceptional flexibility: with a single 88° or 90° V-die, the operator can produce bends at 90°, 120°, or even 150° simply by fine-tuning the Y-axis depth. This “one die, many angles” capability makes air bending the ideal choice for high-mix, low-volume production environments.
- Mechanical advantages and precision challenges Air bending requires the least tonnage among the three methods. Because it only needs to overcome the material’s bending strength rather than its compressive strength, it greatly reduces demands on machine capacity and die strength. However, this freedom is a double-edged sword. The lack of physical support at the bottom means bending accuracy depends heavily on the machine system. Even minor frame deflection, hydraulic cylinder desynchronization, or thickness variation can amplify into angular errors. Consequently, air bending places stringent requirements on the machine’s crowning system and linear scale feedback precision.
4.2 Bottoming: The High-Precision Solution
When the punch continues downward, forcing the sheet to conform to the sloped walls of the V-die and lightly touch (but not penetrate) the rounded bottom, the process enters the bottoming phase. This method leverages the die geometry to mechanically correct material springback.
- Process description: geometric conformity Unlike air bending’s “floating” contact, bottoming requires extensive physical contact between the sheet and the die walls. The final bend angle is now primarily dictated by the die angle. To counteract springback, operators typically select a die with a slightly smaller angle than the target (for example, using an 88° die to produce a 90° bend), applying the principle of overbending so the material elastically returns to the desired angle upon unloading.
- Application scenarios and trade-offs The key advantage of bottoming is consistency. Because the die walls provide physical constraint, it minimizes angle variation caused by material springback differences between batches—making it ideal for large-volume, single-spec production. However, this stability comes with costs:
- Increased tonnage: The required bending force is typically 2–3 times that of air bending.
- Reduced flexibility: Each target bend angle requires its own dedicated die, significantly increasing tooling inventory costs.
4.3 Coining: Precision at a Price
Coining is the “heavy artillery” of metal forming. The term originates from coin manufacturing, aptly describing the process: under extremely high pressure, the punch tip is physically pressed into the metal surface, forcing intense plastic flow at the microscopic level.
- Micromechanics: cold forging in action In coining, the applied pressure not only exceeds the material’s yield strength but approaches its compressive limit. The punch tip wedges into the metal, eliminating neutral-axis shift at the inner bend radius and effectively erasing the material’s elastic memory. The metal behaves like dough, completely filling every tiny cavity of the die. The result is astonishing precision: coining can achieve virtually zero springback and extremely small inner radii—making it the ultimate method for applications demanding extreme geometric accuracy, such as aerospace components.
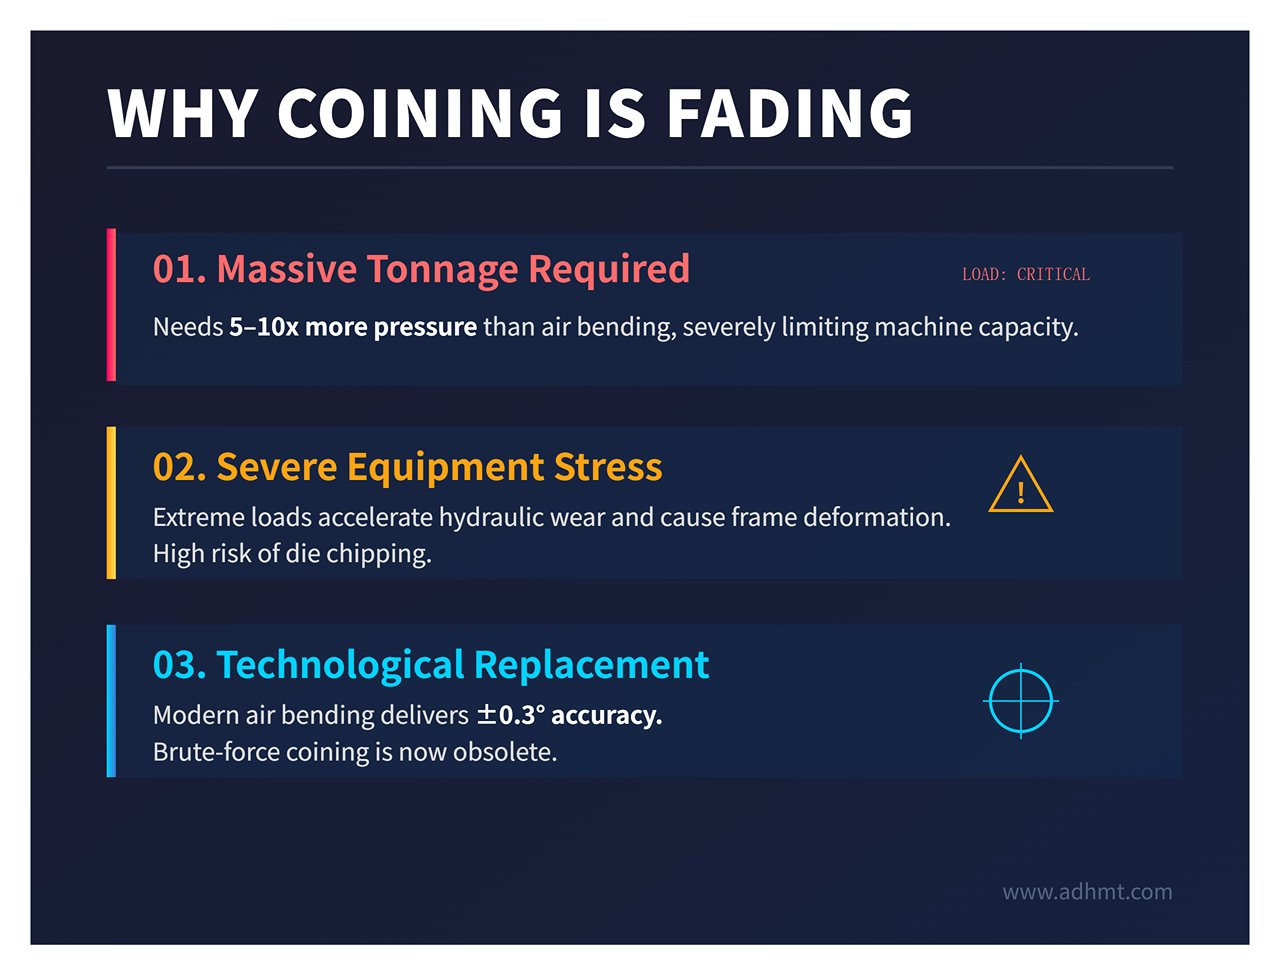
- Why it’s fading away Despite its precision appeal, coining has become increasingly rare in modern sheet metal workshops due to its destructive side effects:
- Massive tonnage: Required pressure can be 5–10 times higher than air bending. A 100-ton press brake may only coin 2 mm sheet metal, severely limiting machine capacity.
- Equipment stress: Prolonged operation at extreme loads accelerates hydraulic system wear, risks die chipping, and can even cause permanent frame deformation.
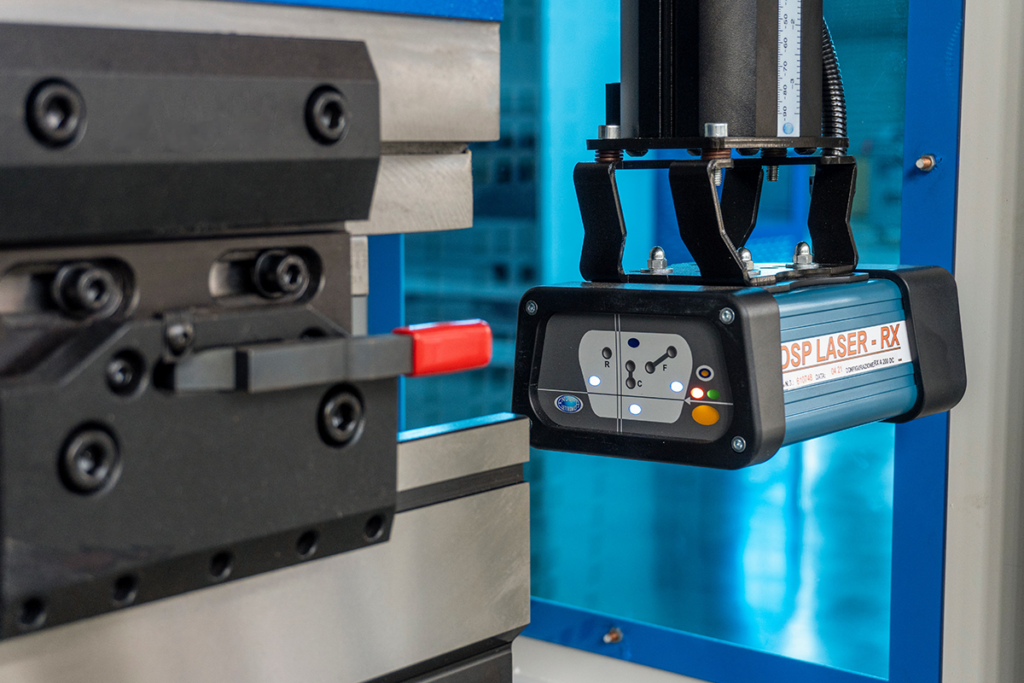
- Technological replacement: With modern servo-hydraulic press brakes achieving Y-axis repeatability of 0.005 mm and advanced laser angle measurement systems, air bending now delivers ±0.3° accuracy. For most industries, brute-force coining is no longer necessary to achieve precision.
💡 Expert warning: Don’t confuse bottoming with coining On the shop floor, many operators casually refer to any “bottomed-out” bend as coining—a dangerous misconception.
- Bottoming involves “contact and calibration,” characterized primarily by bending deformation.
- Coining involves “penetration and thinning,” accompanied by noticeable material thickness reduction.
Mixing up the two leads directly to tonnage miscalculations. If you attempt coining with tonnage parameters meant for bottoming, the best case is an incomplete bend; the worst case is die failure or even serious safety incidents. When defining process parameters, always clarify whether the goal is “contact alignment” or “forging deformation.”
Ⅴ. The Heavy Hardware: Equipment Selection and Tooling Systems
In the ecosystem of bending technology, operator skill defines the lower limit of performance, while hardware capability defines the upper limit. Many manufacturers fall into the trap of prioritizing tonnage alone, overlooking the interplay between drive systems, tooling compatibility, and auxiliary subsystems. This chapter presents a rigorous selection methodology to help you strike the optimal balance between equipment investment and production efficiency.
5.1 The Drive System Showdown: Performance and ROI Analysis
Modern press brake drives have evolved from mechanical to hydraulic, and now to fully electric servo systems. Choosing between them essentially involves balancing total cost of ownership (TCO) against process adaptability.
Hydraulic: The Unshakable Powerhouse
- Core strengths: The undisputed king of heavy-duty forming. For sheet thicknesses above 6 mm or machine lengths beyond 4 meters, hydraulic systems offer the most cost-effective solution thanks to their exceptional force-to-cost ratio.
- Pain points and compromises: Conventional hydraulic pumps must run even in standby, consuming energy continuously. Thermal expansion of hydraulic oil can cause angle drift during long operations (though modern CNC systems now compensate for oil temperature). Maintenance challenges include leaks and oil replacement costs.
- Best suited for: Steel structures, heavy machinery components, and operations dealing primarily with medium to thick plates where energy efficiency is not the top concern.
All-Electric Servo: The Precision Scalpel of Speed and Accuracy
- Technological Transformation: Completely eliminates hydraulic oil by using a servo motor paired with a ball screw or belt pulley to directly drive the ram.
- ROI Model: Although the initial purchase cost is 20%–30% higher than a hydraulic press of the same tonnage, its energy consumption is only 30%–50% of the hydraulic type (no power draw when the ram is idle). Combined with its much higher ram speed (both approach and return strokes can be twice as fast), the cycle time advantage typically offsets the price difference within 3–4 years.
- Ideal Applications: Thin sheets under 3mm, electronic enclosures, precision medical devices, and cleanroom environments that require oil-free operation.
Hybrid System: The Philosophy of Power Blending
- Operating Principle: Uses a servo motor to drive a bidirectional hydraulic pump, delivering only as much oil—and thus force—as needed. This design retains the high tonnage capability of hydraulics while inheriting the servo’s advantages in energy efficiency (idle-stop function) and rapid response.
- Strategic Value: Currently the best-balanced solution for general sheet metal fabrication. It overcomes the tonnage limitations of full-electric servo presses while avoiding the high energy consumption and lower precision typical of pure hydraulics.
Machine Selection Decision Tree:
- Thin sheets + high production frequency + high electricity cost regions → Choose Full Electric Servo
- Wide thickness range (1mm–12mm) + general-purpose processing → Recommended Hybrid System
- Extra-long workpieces + ultra-thick plates (e.g., shipbuilding, bridges) → Opt for Traditional Hydraulic
5.2 Tooling Anatomy: The Science of Punch and Die
Tooling isn’t a simple consumable—it’s the “teeth” of the press brake. A poorly configured set of tools can turn a million-dollar machine into little more than scrap metal.
- The Geometric Logic of the Punch
Straight Punch: Highly versatile and strong, though with a limited forming range.
Gooseneck Punch: Essential for forming complex profiles. Its recessed neck design prevents interference with the workpiece during second or third bends. Expert Tip: When budget allows, make a large gooseneck punch your standard tool—it covers roughly 90% of straight punch applications and solves deep U-channel bending challenges. - Acute Punch: Used for air bending. With a tip angle of 30° or less, it can form any angle from 30° to 180° (pre-flattening stage), offering exceptional process flexibility.
- Golden Rules for Dies
- The 8:1 Rule for V-Opening Width: For carbon steel with tensile strength around 400–450 MPa, the optimal V-opening width is eight times the material thickness (V = 8t).
- Why eight times? It’s the ideal balance point. Less than six times increases bending force sharply and risks surface damage; more than ten times reduces force requirements but enlarges the inner bend radius, distorting flat pattern calculations and causing slippage during large-angle bends.
- Specialized Dies:
- Offset Die: Performs two bends (Z-shape) in a single stroke, doubling efficiency for reinforcement ribs and overlapping joints.
- Mark-Free Dies: Equipped with rotating shoulders (rollers) or polyurethane pads, designed to bend mirror-finish stainless steel or aluminum without leaving surface marks.
5.3 The Hidden Key to Success: The Backgauge System
If the hydraulic system is the “muscle” of a press brake, the backgauge is its “hand.” In high-mix, low-volume production environments, the number of backgauge axes determines whether one operator can run the job or two are needed—and whether changeovers take one minute or ten.
Understanding Multi-Axis Control Logic
- X Axis: Moves forward and backward, defining the bend length—this is the most basic configuration.
- R Axis: Moves up and down. Key Advantage: When performing multiple bends where the flange from a previous bend blocks the next backgauge position, or when variable height positioning is needed, the R axis becomes indispensable. Without it, operators must manually prepare spacers of various heights—an inefficient approach.
- Z1/Z2 Axes: Move independently left and right. Crucial for parts with offset bends, stepped shapes, or alternating long/short edge bends in one operation—the Z axes automatically adjust finger spacing.

Positioning Strategy and Accuracy
High-end backgauge systems go beyond mechanical stops, integrating sensor-assisted positioning. For instance, contact sensors confirm full material seating, preventing scrap bends caused by skewed sheets.
- Selection Tip: For modern sheet metal shops, a 4-axis backgauge (X, R, Z1, Z2) should be standard. Compared with single-axis systems, multi-axis setups can reduce setup times for complex parts by over 70%.
- Chapter Summary: Don’t expect one set of tooling to handle every job, and don’t cut costs by downgrading your backgauge system. The logic of robust equipment selection lies in trading one-time capital expenditure (CAPEX) for long-term operational efficiency (OPEX). In the next chapter, we’ll use these tools to explore how mathematical precision governs every bend angle.
Ⅵ. The Mathematics of Process: The Core of Parameter Calculation and Precision Control
In a press brake workshop, the real difference between a veteran engineer and an average operator isn’t physical strength—it’s mastery of process mathematics. Bending isn’t just a physical deformation of metal; it’s a calculable, predictable engineering process. Without understanding the underlying math, a press brake is merely a compactor; with it, the machine becomes a precision surgical instrument. This chapter unveils the three mathematical pillars that define bending quality.
6.1 Taming the “Springback” Phenomenon
Springback is an inherent physical property of metal—and the biggest “enemy” in bending operations, yet also an inevitable “partner” to live with.
- Physical Principle: When the bending force is released, the metal’s internal elastic strain is instantly released, attempting to return to its original shape, while the plastic strain remains as a permanent deformation. The total deformation equals the sum of plastic and elastic deformation. The springback angle ($\Delta \theta$) largely depends on the ratio between the material’s yield strength (σy) and its elastic modulus (E).
- The Challenge of High-Strength Steel: With the automotive and aerospace industries pushing for lightweight designs, AHSS (Advanced High-Strength Steel) has become increasingly prevalent. Due to its exceptionally high yield strength, the amount of springback can be three to four times that of conventional low-carbon steel.
- Rule of Thumb: The harder the material, the thinner the sheet, and the larger the bend radius, the greater the springback angle.
- Compensation Strategy: Overbending — This is the most straightforward way to counteract springback. If the target angle is 90°, the control system must drive the ram slightly deeper so that the sheet reaches 88° or even 85° under load. When the punch retracts and springback occurs, the part settles precisely at 90°.
- Air Bending vs. Bottoming: In air bending, compensation for springback depends entirely on the CNC system’s depth-control algorithm. In bottoming, the mold’s physical constraint forces the material into shape, greatly reducing springback—though a small degree of overbend is still required.
- Digital Solutions: Modern high-end press brake controllers come equipped with extensive material databases. Once the material grade (e.g., SS304) and thickness are entered, the system automatically applies an elastic recovery model to calculate the necessary Y-axis correction. For manufacturers striving for perfection, building a springback database based on in-house supplier data is the key step toward achieving “zero trial bends.”
6.2 Core of Flat Pattern Calculation: The K-Factor and Bend Deduction
Accurate flat pattern dimensions are the foundation of all sheet metal fabrication. Even if the laser-cut blank is perfect, an incorrect flat pattern calculation will result in dimensional errors after bending.
The Secret of the Shifting Neutral Axis: During bending, the inner surface of the sheet is compressed while the outer surface is stretched. Between them lies a theoretical layer that experiences neither tension nor compression—the neutral axis.
Defining the K-Factor: K = t / T, where t is the distance from the neutral axis to the inner surface, and T is the total sheet thickness.
Shift Pattern: For a flat sheet, K = 0.5. As bending occurs, the compression side restricts material flow, causing the neutral axis to shift inward. Typically, mild steel has a K-factor around 0.44, while hard materials with tight bend radii may see it drop to about 0.3.
Core Formula System: Engineers must be fluent in two interrelated calculation approaches:
Bend Allowance (BA): The arc length of the neutral axis.
(where R = inside bend radius, A = bend angle).
Expert Reference Table (Typical Values)
| Material Type | K-Factor Range | Notes |
|---|---|---|
| Mild Steel / Cold Rolled Steel (SPCC) | 0.44 - 0.50 | Common standard value |
| Stainless Steel (SS304/316) | 0.38 - 0.45 | Higher hardness; neutral axis shifts inward |
| Aluminum Alloy (5052/6061) | 0.35 - 0.45 | Watch for cracking during bending |
6.3 Tonnage Calculation
Calculating bending force is not only about whether the machine can make the bend—it’s also critical for equipment longevity and safety.
General Air Bending Formula:
- P: Required bending force (tons)
- C: Material strength coefficient (for example, for 450 MPa carbon steel, approximately 1.42, depending on unit system)
- S: Sheet thickness (mm) — Note: the relationship is squared; doubling the thickness quadruples the required tonnage!
- L: Bend length (m)
- V: Die opening width (mm) — The wider the V-die, the less tonnage required, in an inverse relationship.

Safety Margin: The 20% Redundancy Rule — The calculated P is only the theoretical minimum. When selecting or scheduling equipment, always allow at least 20% additional capacity.
For example: if the calculation shows 80 tons are required, never use a press brake rated exactly at 80 tons. Choose a 100-ton machine instead. Operating continuously at full load accelerates hydraulic wear, leading to seal leaks and pump damage.
- Off-Center Loading Risk — A commonly overlooked “machine killer.” When bending short parts, if the operator places the workpiece on one side rather than at the center, the resulting unbalanced force can twist the ram and frame.
- Consequence: Minor cases lead to uneven angles (e.g., one end 90°, the other 92°); severe cases cause guide rail wear or even ram fracture.
- Countermeasure: The standard operating procedure (SOP) must explicitly require centered loading for single-part operations. If off-center bending is unavoidable due to tooling limitations, place a piece of scrap of equal thickness on the opposite side for a “dummy bend” to balance the load.
Ⅶ. Practical SOP: Standardized Operating Procedures and Techniques
Theory defines the upper limit of process capability, while SOPs define the lower limit of shop-floor performance. In world-class manufacturing environments, bending no longer depends on a veteran operator’s intuition—it’s broken down into measurable, repeatable steps. This chapter builds a closed-loop workflow from blueprint analysis to final inspection, eliminating human variability and ensuring that the first and ten-thousandth parts meet the same precision standards.
7.1 Preparation Stage: From Blueprint to Machine
Before touching the machine controller, 80% of potential errors should already be prevented during the preparation stage.
- Blueprint Decoding: Identifying Hidden Traps
- Grain Direction Review: This is the number one cause of cracking when bending high-strength steel and aluminum alloys (such as 6061-T6). If the drawing doesn’t specify it, the process engineer must verify it from the layout: Is the bend line parallel to the material’s rolling direction? If so, and the inside radius (IR) is less than three times the sheet thickness, issue an immediate alert and recommend either changing the layout orientation or increasing the design radius.
- Tolerance Classification: Use a highlighter to mark all angular tolerances ≤ ±0.5° and dimensional tolerances ≤ ±0.2 mm. These critical features determine whether advanced machine compensation functions (such as laser angle detection) or special die calibration are required.
- Datum Verification: Identify which edge or hole serves as the reference for subsequent operations (welding, assembly). The backgauge fingers must always rest against the functional datum surface, not just any sheet edge.
- Bending Sequence Planning
- Anti-Interference Logic: Follow the golden rule of “inside to outside, small to large.” Bend internal, fine features first (such as tabs or stiffeners), then move on to the outer contours. For complex box structures, process the short edges before the long ones to make use of the machine’s clearance between columns.
- Minimizing Flips: Every time the part is flipped, operator fatigue and error risk increase. A well-designed process should minimize reorientation by using combination or offset dies, completing as many bends as possible in a single setup.
- Unfolding Simulation: Digital Error Prevention
- Before any physical trial, use CAD/CAM software (such as BendSim or AutoPol) for 3D collision detection. Pay special attention to whether the part might hit the upper die clamp, backgauge beam, or lower die base during bending. This step can prevent costly die damage incidents.
7.2 Operation Execution: Step-by-Step Guide
From parameter setup to the first approved part, every action should be driven by data—not intuition.
- Tool Setup and Calibration: The Physical Basis of Accuracy
- Cleaning and Inspection: Wipe the worktable and die mounting surfaces with a lint-free cloth. Even a small metal chip (0.1 mm) trapped under the lower die can cause a noticeable angular deviation along the entire bend line.
- Alignment and Tightening: For single-machine operation, always mount the die along the centerline of the worktable to ensure balanced frame loading. When using segmented dies, align all sections precisely with a dedicated calibration ruler to avoid leaving marks at the joints.
- Reference Return and Axis Calibration: After powering up, perform a full-axis reference return and verify the X-axis parallelism of the backgauge fingers.
- First Article and Fine Tuning
- Trial Bending Strategy: Never perform the first trial on production material. Use scrap strips of the same material, thickness, and grain direction for test bends.
- Y-Axis Depth Adjustment: After the first bend, measure the angle at the center and both ends using a digital protractor.
- If both ends show the same deviation but are larger than the target (e.g., target 90°, measured 92°), increase the Y-axis penetration depth evenly in the CNC system (typically in 0.05–0.1 mm increments).
- If the angle is wider in the middle and smaller at the ends (a “barrel” shape), the machine’s crowning compensation is insufficient—raise the compensation value; if the opposite, reduce it.
- Full First Article Inspection: Only after the sample meets both angular and dimensional requirements should the first production part be made, followed by a complete First Article Inspection (FAI) covering all dimensions.
- Process Control: Human–Machine Collaboration
- Standardized Handling: For long sheets, the operator’s support technique is critical. The sheet’s own weight can distort the bend line and alter the angle. Use a sheet follower or two-person operation to ensure the sheet moves tangentially with the lower die throughout bending.
- Safety Light Curtain: Never disable the safety light curtain during operation. The machine’s mute point should be set 2–5 mm above the sheet surface to balance efficiency and operator safety.

7.3 Quality Inspection and Feedback Loop
Quality is not inspected into a product—it is built into it. However, inspection is the key step that transforms temporary experience into permanent data.
- Measurement Toolbox Setup
- In-Process Quick Checks: Each workstation should be equipped with a high-precision universal protractor or digital angle gauge. Operators must perform self-checks at defined sampling frequencies (e.g., one piece every 20 parts).
- Offline Precision Checks: For complex bent parts, use dedicated checking fixtures or optical measurement systems to verify spatial dimensions and hole position relationships quickly.
- Common Defects: Root Cause Analysis and Countermeasures
- Unstable Angles: Check for hydraulic oil overheating that may cause pressure fluctuations, or verify whether sheet thickness tolerances exceed specification.
- Cracks on Outer Bend Surface: Typically caused by too small a bend radius or incorrect grain direction. Countermeasures include switching to a larger-radius punch or locally annealing the bend area.
- Surface Impressions: Inspect the lower die shoulders for wear or roughness; consider using a urethane film or non-marring dies.
- Feedback Loop: Data Reintegration
- Correction Factor Archiving: This is often the most overlooked step. After the first-part tuning is complete, record the actual bend deduction (BD), springback compensation angle, and Y-axis adjustments back into the ERP or CAM system.
- Building a Corporate Process Database: Do not let valuable data remain only in the operator’s memory or on sticky notes. Establish a company-wide “Material–Tool–Springback” database. When the same material and bend requirement appear again, validated parameters can be retrieved directly—achieving “first-part-right” production and eliminating trial-and-error inefficiency.
Ⅷ. Advanced Strategies: Complex Scenarios and Efficiency Optimization
Mastering standard operating procedures (SOPs) makes you a competent operator, but building true competitive advantage requires solving problems others can’t (complex scenarios) and squeezing every possible second of productivity (efficiency optimization). This chapter explores the advanced survival rules of world-class factories through the dual lenses of technical breakthroughs and lean manufacturing.
8.1 Pushing the Limits: Special Materials and Complex Structures
As industrial design pushes for lighter, more compact structures, bending technology faces unprecedented challenges: materials are getting harder, and structural geometries more intricate.
8.1.1 Mastering the Art of High-Strength Steel (AHSS)
Bending high-strength steels (such as DP600 or MS1200) is far more than a simple mechanical contest—it’s a battle for springback control, crack prevention, and equipment protection.
- The Grain Direction Rule: For materials with tensile strength above 600 MPa, grain direction is not just a guideline—it’s a red line. Bending must be perpendicular to the rolling direction. Parallel bending subjects the outer radius to maximum transverse tension, often resulting in visible microcracks or even fracture. If process constraints require parallel bending, perform localized annealing or increase the bend radius to at least three times the sheet thickness.
- Die Geometry Redesign: Abandon the traditional $V=8t$ rule. To reduce surface pressure and crack risk, widen the V-opening to 10t–12t and pair it with a large-radius punch.
- Dynamic Springback Compensation: Springback in AHSS is notoriously unpredictable—sometimes reaching 15°–20°. Relying solely on empirical formulas often fails. Instead, use a real-time angle monitoring system or apply a “small V-die + overbending” bottoming strategy (use with caution and verify tonnage). Physical die limits can help lock in the target angle.
8.1.2 Breaking Through Deep Boxes and Closed Structures
The main difficulty with deep box bending is interference—during forming, sidewalls can easily collide with the punch, clamps, or crossbeam.
- Extended Tooling Strategy: Use tall punches or extended die holders to increase the effective stroke space. For fully enclosed box forms, apply window punches, whose hollow center allows pre-formed sidewalls to enter the punch cavity, enabling the final bend.
- Special-Angle Tools: Standard 90° punches often fail in deep U-channel bending due to shank width. Switching to 30° sharp punches or gooseneck punches allows bends exceeding 100 mm depth in tight spaces without interference.
8.1.3 Decision Matrix for Z-Bends (Offset/Joggle)
How can two opposite-direction bends be formed continuously within limited space? The answer depends on production volume and flexibility requirements.
- One-Step Offset Die Forming: Ideal for high-volume, fixed-dimension production. Both bends are completed in a single stroke, doubling efficiency. However, required tonnage is typically 3–5 times that of air bending the same thickness, and the setup lacks dimensional adjustability.
- Two-Step Forming Method: Suited for low-volume or variable Z-dimension production. The first bend is made, then the part is flipped for the second. Though slower, it uses standard tooling and is extremely machine-friendly in terms of tonnage demand.

8.2 Cost and Efficiency Optimization (Lean Manufacturing)
In the low-margin world of manufacturing, every second a press brake stands idle burns money. The essence of lean manufacturing is minimizing all forms of non-value-added time.
8.2.1 SMED in Action: From 30 Minutes to 5
SMED (Single-Minute Exchange of Dies) is more than just installing hydraulic clamps—it’s a process revolution aimed at reducing changeover time to single digits.
- Internalize External Setup: Never wait until the machine stops to start searching for tools. While the current job’s last 10 pieces are running, all tooling, drawings, and process cards for the next job should already be staged on a cart beside the machine.
- Tool Standardization and Quick-Clamp Systems: Replace bolt-fastened setups with one-touch hydraulic or magnetic clamping systems. Combined with the CNC’s die library memory, this eliminates manual alignment—push in the tool, and it’s automatically positioned.
- Virtual Scheduling: Use offline programming to group work orders with similar tooling requirements (Group Technology), reducing changeovers from the planning stage.
8.2.2 Staged Tooling: Turning One Machine into a Production Line
For short, multi-bend parts (such as electrical brackets), frequent tool changes are the ultimate efficiency killer.
- Multi-Station Setup: Use the long press brake bed to install a 30° punch on the left, an 88° straight punch in the center, and a flattening die on the right. The operator moves the part sequentially while the backgauge positions shift via foot pedal—creating a mini production line on a single machine.
- Shut Height Coordination: The key to this approach is equal-height tooling. All dies must have identical closed heights; otherwise, each station requires separate Y-axis depth compensation, complicating programming and increasing risk.
8.2.3 Energy Management: Uncovering Hidden Costs
Energy control in modern press brakes is no longer a slogan—it’s a direct source of profit.
- Servo-Hydraulic Technology: This is the new benchmark for equipment selection. Traditional hydraulic machines run the main motor at full speed continuously, while servo-hydraulic systems draw power only during ram movement. During idle or return strokes, the motor slows or stops. This reduces total energy use by 30%–50%, lowers oil temperature, and extends seal life.
- Idle Stop Strategy: Configure the CNC to enter standby after 3 minutes of inactivity. Up to 20% of workshop energy can be wasted while operators read drawings, deburr parts, or chat. Automatic start-stop functions plug this hidden leak effectively.
By mastering complex structures and implementing lean management, the press brake evolves from a simple processing tool into a high-margin production hub. Achieving this transformation requires not only hardware upgrades but also a managerial mindset shift.
Ⅸ. FAQs
1. What is a press brake and how does it work?
A press brake is a machine tool used for bending metal sheets in fabrication processes. It uses a punch-and-die system, where the sheet is placed on the bed and clamped. The ram moves the punch to deform the sheet against the die, creating a bend. Types include mechanical, hydraulic, pneumatic, and servo-electric, each with different precision and suitability.
2. What are the different types of press brakes?
Press brakes come in several types, each with unique characteristics. Mechanical press brakes are fast but less accurate. Hydraulic press brakes offer precision and handle thicker materials. Pneumatic press brakes are for lighter tasks. Servo electric press brakes provide precise control over the bending process and automation. Hybrid press brakes optimize performance by combining technologies.
3. What are the limitations and applications of press brake forming?
Press brake forming is versatile for bending metal sheets but has limitations like material size constraints, spring-back issues, high costs, safety concerns, and the need for skilled operators. It suits simple bends rather than complex geometries. Despite this, it is essential for precision and flexibility in industrial applications, with various press brakes (mechanical, hydraulic, pneumatic, servo-electric) for specific tasks.
X. Conclusion
Nowadays, with the constant development of the manufacture, the press brake technology is also constantly achieving progress. The appearance of the new material and increased precision improvement make the press brake deal with more complex and diverse workpieces.
Also, the application of automation and digital technology makes the press brake operation more efficient and intelligent. If you are looking for an effective solution for producing components and parts quickly and precisely, the press brake may be the one you desire!
ADH machine tool boosts over 40 years of experience in press brake manufacturing. You can explore our full range of CNC Press Brake and NC Press Brake models, or download our latest brochures for detailed specifications. For customized quotations or technical consultations, feel free to contact us.


