I. Introduction
Have you ever been fascinated by laser cutting technology, eager to bring your digital ideas to life with precision, but found yourself overwhelmed by its complex principles and the wide array of options available?
Don’t worry—this ultimate beginner’s guide has been crafted just for you, providing a clear and comprehensive learning path. Starting from the basics, we’ll demystify laser cutting machines step by step: you’ll find easy-to-understand explanations of how they work, introductions to key components, and practical advice to help you make smart purchasing decisions. We also cover detailed installation procedures, essential safety guidelines, and share crucial maintenance tips to keep your equipment running smoothly. For those who love DIY or want to customize their setup, you can also learn the process of How to Build a Laser Cutting Machine to explore hands-on fabrication possibilities.
Whether you’re looking to add a powerful tool to your studio or just starting out in the world of precision manufacturing, this guide will clear away your doubts and empower you to master this efficient technology. With confidence and safety, you’ll be ready to embark on your journey of precision creation.
II. Understanding Laser Cutting Machines
1. Working Principle
A laser cutting machine uses a high-power density laser beam to cut materials. The process begins with a laser generator producing a high-energy beam, which is then focused onto the surface of the workpiece. The intense energy rapidly melts, vaporizes, or ablates the material, while a coaxial high-velocity gas stream blows away the molten material, enabling precise cutting. The typical cutting process involves the following steps:
(1) Laser Generation: The laser generator produces a high-energy density laser beam.
(2) Laser Focusing: Lenses or mirrors focus the beam into a tiny spot, increasing energy density.
(3) Material Heating: The focused beam locally heats the material to its melting or boiling point, causing it to melt or vaporize.
(4) Cutting Completion: High-pressure gas blows away the molten or vaporized material, leaving a clean cut.
For a deeper dive into laser cutting machine principles, refer to How Laser Cutting Machine Work.

2. Main Components
(1) Laser Generator
The laser generator is the heart of a laser cutting machine, responsible for producing the high-energy laser beam. It converts electrical or other forms of energy (such as chemical reactions or gas discharge) into laser energy. Common types include:
| Type | Main Application | Applicable Materials | Remarks |
|---|---|---|---|
| Fiber Laser | Metal processing (mainstream) | Carbon steel, stainless steel, aluminum, copper, etc. | Wavelength 1.06μm, high efficiency |
| CO2 Laser | Non-metal cutting | Non-metal materials | Wavelength 10.6μm, mature technology |
| YAG Laser | Thick metal cutting | Thick metals | High cost, short lifespan |
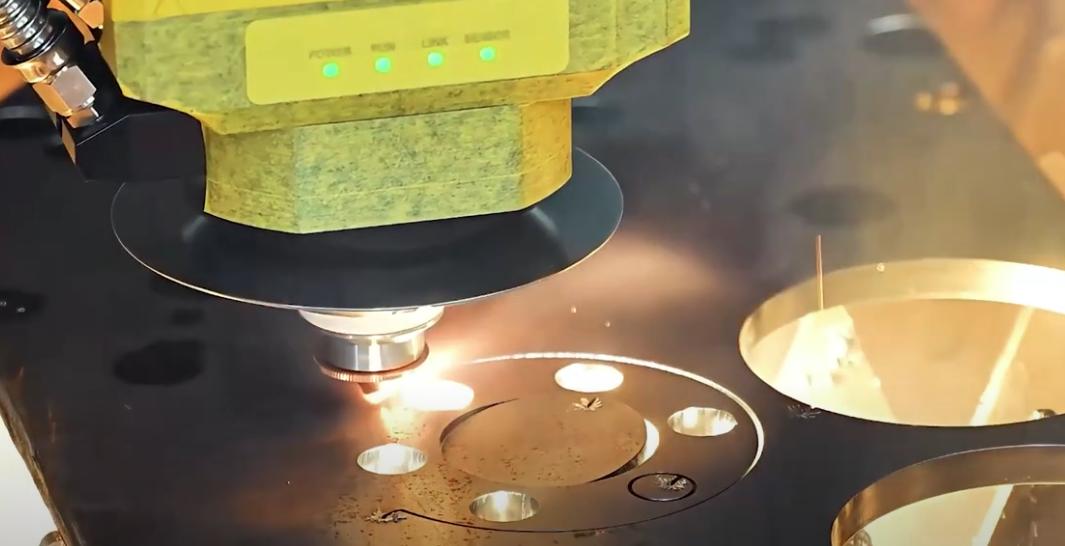
(2) Cutting Head
The laser cutting head, often called the “laser torch,” integrates optical, mechanical, and sensor systems into a precision-moving component.
It typically contains focusing lenses and a nozzle that concentrates the laser beam onto the material’s surface.
With the aid of assist gases, molten and vaporized material is blown out of the cutting zone. The design and maintenance of the cutting head are critical for optimal cutting performance.
(3) Machine Bed
The bed provides the foundation of the laser cutting machine, supporting motors, guide rails, the cutting head, laser beam, and other vital components to ensure stability and precise movement. Common types include:
| Bed Type | Structural Features | Advantages | Application Scenarios |
|---|---|---|---|
| Gantry Bed | Consists of a fixed base and a movable gantry, with the cutting head moving along the beam (Y-axis) and the base (X-axis). Typically designed with box-type or frame steel structures. | High rigidity, high precision, capable of handling large vibrations and cutting forces, suitable for large-format cutting. | Large-format cutting tasks, machining of large workpieces. |
| Cantilever Bed | Open structure with the cutting head mounted on a cantilever beam supported on one side. Lightweight structure, often made of high-strength cast iron or die-cast materials. Some high-end models use marble beds. | Easy loading and unloading, lightweight structure, some models achieve high precision, suitable for medium and small workpieces. | Cutting of medium and small workpieces. |
| Fully Enclosed Bed | Enclosed structure using heavy steel construction, welded and heat-treated to provide a stable cutting environment and minimize dust and smoke interference. | High rigidity, high stability, reduces interference from dust and smoke, ideal for high-power precision machining. | High-power laser cutting, precision machining applications. |
(4) CNC System
The CNC (Computer Numerical Control) system is the "brain" of a laser cutting machine. It consists of a controller (industrial PC or PLC) and specialized software, interpreting cutting programs (G-code or dedicated CAD/CAM instructions) to coordinate machine movement and laser activation.
It accurately controls the cutting head’s X, Y (and sometimes Z) axes, switching the laser on and off according to the design. The CNC interface allows loading part designs, setting parameters, and monitoring status. High-end systems include libraries of cutting parameters, real-time monitoring, and automation interfaces—ensuring precise cutting of complex contours, sharp corners, and small holes.

For a detailed explanation of laser cutting machine components, visit Laser Cutting Machine Description.
3. Main Types of Laser Cutting Machines
(1) Classification by Laser Source
1)CO2 Laser Cutting Machines
These use a carbon dioxide gas mixture as the lasing medium, generating a beam via gas discharge. The focused beam melts or vaporizes the material, while assist gas blows away slag. With a typical wavelength of 10.6μm, they are especially effective for non-metallic materials.
CO2 machines have a lower initial cost than fiber lasers but operate at 10%-15% photoelectric conversion efficiency. They require regular gas refills and mirror maintenance, resulting in higher upkeep.
2)Fiber Laser Cutting Machines
These use fiber doped with rare earth elements (like ytterbium) as the gain medium. Semiconductor pumping generates a highly concentrated beam that instantly melts metals, with high-pressure assist gas removing the molten material for precision cutting. The typical wavelength is 1.06μm, which metals absorb easily.
While more expensive to purchase, fiber lasers offer conversion efficiencies above 30% (up to 50%), require no laser gas, need virtually no optical path maintenance, and consume less power, making them cost-effective to operate. For efficient, versatile cutting, consider the Dual-use Fiber Laser Cutting Machine.
3)Solid-State Laser Cutting Machines
Nd: YAG Laser Cutters: Early solid-state lasers using neodymium-doped yttrium aluminum garnet crystals, with a 1.064μm wavelength. Once common for metal marking and thin-sheet cutting, but now largely replaced by more efficient, reliable fiber lasers.
Disk Laser Cutters: Use thin disk-shaped crystals (like Yb: YAG) as the gain medium. With a wavelength around 1.03μm, they combine the beam quality of CO2 lasers and the metal-cutting advantages of fiber lasers. However, their complex structure and high cost mean they occupy a smaller market share than fiber lasers.
(2) Classification by Mechanical Structure
1)Gantry Laser Cutting Machines
The beam is supported on both ends by side rails, offering high rigidity. Ideal for large-format, high-precision, heavy-duty cutting.
2)Cantilever Laser Cutting Machines
The beam is supported at only one end, resulting in a compact footprint. Suitable for medium-format processing or when space is limited.
3)Hybrid Drive Laser Cutting Machines
An optimized version of the gantry system, with a key improvement in the X-axis drive: the cutting head's movement along the beam (X-axis) is powered by an independent system, separate from the Y-axis movement of the beam itself.

4. The Three Core Laser Processes
Laser cutting, laser engraving, and laser etching/marking are three fundamental techniques that harness the interaction between high-energy laser beams and materials. The essential distinction among these processes lies in how the laser alters the material:
(1) Laser Cutting
The primary goal is to completely separate the material. A high-powered laser instantly vaporizes or melts the material at the point of contact, while an assist gas—such as nitrogen or compressed air—blows away the molten or vaporized material, resulting in a clean cut. This process is characterized by thorough material removal.
(2) Laser Engraving
This process aims to create depth on the material’s surface. The laser vaporizes and removes a portion of the material from the surface, producing recessed patterns or text that can be felt by touch. Like cutting, it removes material, but only from the surface layer.
(3) Laser Etching and Marking
Both of these techniques focus on altering the surface of the material rather than removing it.
Etching uses the heat of the laser to rapidly melt the surface, causing the molten material to expand and solidify into tiny raised marks as it cools.
Marking, on the other hand, employs a low-power laser to induce chemical changes—such as oxidation—on the material’s surface. This process alters the color and produces high-contrast markings, while leaving the surface virtually flat.
Typical applications:
| Function | Essence | Effect & Application Scenarios |
|---|---|---|
| Laser Cutting | Penetration: Laser energy completely passes through the material, separating it into parts. | Effect: Produces clean, precise edges, dividing a single piece into multiple independent sections. Applications: Creating model components, intricate cut‑out artworks, puzzle toys, custom signage. |
| Laser Engraving | Removal: Laser energy vaporizes the surface layer of the material, forming recessed areas with depth. | Effect: Creates tactile, shadowed designs with strong texture that are permanent. Applications: Engraving photographs on wood, etching text onto glassware, making personalized stamps. |
| Laser Marking | Alteration: Using lower power, the laser reacts with the material’s surface to change its color or properties. | Effect: Creates high‑contrast, permanent marks without compromising the material’s smooth finish. Applications: Marking logos on metal tools, adding serial numbers to electronic components, creating patterns on stone slabs. |
Cutting is about “severing,” engraving is about “carving away,” and marking is about “changing color.” Once you master the right balance of power and speed, you can move seamlessly between all three.
III. Choosing the Right Laser Cutting Machine
1. Needs Analysis
| Category | Key Considerations | Corresponding Recommendations |
|---|---|---|
| Processing Material and Thickness | Material Type: Types of metals being processed (carbon steel, stainless steel, aluminum, copper, brass, etc.) and whether they have high reflectivity. Maximum Thickness: Maximum thickness of the material being processed. | Fiber lasers are suitable for metal cutting, offering high efficiency and are considered mainstream in the market. CO₂ lasers are better suited for non-metal cutting (e.g., acrylic, wood). |
| Production Efficiency and Automation Needs | Production Mode: Whether the production is small-batch, customized, or large-batch, standardized. Automation Needs: Requirements for automated loading/unloading, fast table switching, etc. | For small-batch production, choose equipment that is flexible, user-friendly, and allows quick setup. For large-batch production, prioritize high cutting speed and automation features (e.g., exchange tables, loading/unloading systems). |
| Precision and Quality Requirements | Edge Quality and Dimensional Tolerance: Precision requirements for the finished product (high-precision applications vs. general structural parts). Key Metrics: Cutting surface smoothness, perpendicularity, dross, etc. | For high-precision applications, focus on machine positioning accuracy, repeatability, and opt for a high-precision transmission system. For general structural parts, a rack and pinion drive system can meet basic needs. |
2. Interpreting Key Parameters
(1) Enclosure and Laser Classification
Safety is the top priority when selecting a laser cutting machine.
According to IEC 60825-1:2014 and GB 7247.1-2024, laser products are classified as follows:
| Class | Hazard Level | Safety Requirements |
|---|---|---|
| Class 1 | No hazard | Enclosed design, no exposure risk |
| Class 1M | Low hazard | Avoid observation with optical magnification |
| Class 2 | Low power visible light (≤1mW) | Avoid direct eye exposure |
| Class 2M | Similar to Class 2 but hazardous with optical magnification | Avoid using optical instruments for observation |
| Class 3R | Low to moderate risk (≤5mW) | Warning labels required |
| Class 3B | Moderate risk (direct exposure can cause injury) | Protective eyewear, safety interlock devices required |
| Class 4 | High risk (can cause fire and severe injury) | Strict controls, professional protective measures required |
Open laser cutters lack an enclosure, exposing the cutting area for easy handling of large workpieces. However, due to the risk of laser exposure, they are classified as Class 4, demanding stringent protective measures (goggles, protective clothing, designated safety zones, etc.).
Enclosed laser cutters feature a full enclosure that isolates the cutting zone, preventing laser leakage. If the housing and interlocks comply with standards, the machine can be certified as Class 1—even with a Class 4 internal laser module.
For utmost safety, opt for certified, fully enclosed Class 1 machines. If using Class 4, ensure operation is restricted to a dedicated room, with access control and proper signage. Never bypass interlocks or operate with panels removed.

(2) Laser Power
Laser power is the primary measure of a laser cutter’s capability, directly affecting the types of materials, maximum thickness, and cutting speed.
Generally, higher power enables faster cutting of the same material and increases the maximum thickness that can be processed.
For metal processing, here are typical power requirements:
| Laser Power | Carbon Steel | Stainless Steel | Aluminum | Brass |
|---|---|---|---|---|
| 1000W | 0.8-10mm | 0.8-5mm | 0.8-3mm | 1-3mm |
| 1500W | 1-16mm | 1-6mm | 1-4mm | 1-3mm |
| 2000W | 1-20mm | 1-8mm | 1-6mm | 1-5mm |
| 3000W | 1-22mm | 1-10mm | 1-8mm | 1-6mm |
| 4000W | 1-25mm | 1-15mm | 1-10mm | 1-8mm |
| 6000W | 1-30mm | 1-20mm | 1-20mm | 1-12mm |
(3) Working Table Size
Laser cutters are often named by a numeric code indicating their working area. Common models include:
- Model 3015: Working area 3000mm (length) x 1500mm (width), ideal for standard sheet metal.
- Model 6025: 6000mm x 2500mm, for larger sheets or higher nesting efficiency.
- Other popular sizes: 4020 (4000mm x 2000mm), 6020 (6000mm x 2000mm), etc.

Choose a table size that accommodates your largest workpiece, while ensuring your workspace fits both the machine and any auxiliary equipment (e.g., shuttle tables, automation modules).
(4) Cutting Precision
Cutting precision includes both positioning accuracy and repeatability.
1)Positioning Accuracy: The difference between the commanded and actual position.
2)Repeatability: The consistency when the machine returns to the same commanded position.
Laser cutters deliver much higher precision than traditional methods. Generally, fiber lasers offer better precision than CO₂ machines, making them the top choice for high-accuracy applications.
For a comprehensive look at assist gas requirements, see Laser Cutting Machine Gas Consumption.
(5) Automation
Automation in laser cutting involves integrating technologies such as automatic loading/unloading, intelligent control, and robotic cooperation for unmanned, high-efficiency, low-intervention production. Different levels of automation include:
| Automation Level | Key Features | Typical Application Scenarios |
|---|---|---|
| Basic Automation | CNC-controlled cutting, manual loading/unloading | Small-batch, high-variety production |
| Partial Automation | Automated loading/unloading equipment, partial automation of processes | Medium-batch production |
| Full Automation | Full-process automated loading/unloading, sorting, centralized control | High-volume, unmanned production |
| Intelligent Automation | Integration with MES/ERP/logistics systems, flexible manufacturing, intelligent monitoring and optimization | Smart factories, customized production |
Most mainstream mid-to-high-end laser cutters now offer optional automated loading/unloading systems, with some brands making automation a core competitive advantage.
Advanced automation reduces labor costs, delivers excellent repeatability, and minimizes waste.
For those with sufficient budgets, high-automation laser cutters can significantly reduce manual labor and boost productivity.
Ⅳ. Laser Cutting Settings and Basic Operating Procedures
1. Initial Setup
(1) Laser Power
Set the appropriate laser power based on the type and of the material. Excessive power can cause over-melting and rough edges, while insufficient power may result in incomplete cuts or poor edge quality. Refer to the table below for recommended power settings for different materials and thicknesses:
| Laser Cutter Power Setting | Suitable Materials | Cutting Thickness |
|---|---|---|
| Low Power (10W-100W) | Paper, Thin Plastics | Thin Materials |
| Medium Power (100W-500W) | Wood, Acrylic Resin | Medium-Thickness Materials |
| High Power (500W-2000W) | Thick Materials, Metals | Thick Materials |

(2) Cutting Speed
The cutting speed must match the laser power and material thickness. If the speed is too high, the cut may not penetrate; if too slow, burrs and heat deformation may occur. For example, with fiber laser cutting carbon steel:
| Material: Carbon Steel | ||||
| Assist Gas | Thickness(mm) | Speed(m/min) | ||
| 1000W | 3000W | 4000W | ||
| Air | 1 | 12.0-15.0 | 28.0-35.0 | 30.0-38.0 |
| 2 | 3.5-4.5 | 8.0-12.0 | 10.0-16.0 | |
| 3 | - | 2.5-4.5 | 3.0-5.0 | |
| N2 | 1 | 15.0-20.0 | 25.0-38.0 | 30.0-44.0 |
| O2 | 2 | 3.5-5.0 | 5.5-7.0 | 5.5-7.7 |
| 3 | 2.5-3.5 | 3.6-5.0 | 3.7-5.5 | |
| 4 | 2.0-3.3 | 3.0-4.5 | 3.5-4.6 | |
| 5 | 1.4-2.0 | 2.5-3.3 | 2.5-4.0 | |
| 6 | 1.2-1.6 | 2.3-2.8 | 2.5-3.5 | |
| 8 | 0.8-1.1 | 1.8-2.2 | 2.0-2.8 | |
| 10 | 0.6-0.9 | 1.2-1.6 | 1.2-2.2 | |
| 12 | 0.4-0.7 | 1.0-1.3 | 1.0-1.7 | |
(3) Focal Point Position
Adjust the laser focus to the surface of the workpiece or fine-tune it according to material properties to ensure a smooth cut surface.
There are three common focal point positions based on the material and process requirements:
| Focus Position | Applicable Scenarios | Characteristics and Effects |
|---|---|---|
| On Workpiece Surface (0 Focus Distance) | General materials and thicknesses | Smooth cutting surface, widely applicable |
| Above Workpiece (Negative Focus Distance) | Thick plate cutting | Wide cutting width, fast piercing, but cutting surface is relatively rough |
| Inside Workpiece (Positive Focus Distance) | Hard materials, high precision requirements | Larger cutting surface width, high airflow demand, slightly longer piercing time |
(4) Assist Gas Type and Pressure

Common assist gases used in laser cutting include oxygen, nitrogen, and compressed air.
- Oxygen (O₂): An active gas that accelerates cutting through chemical reaction and heating. Fast for thick carbon steel, but causes oxidation at the cut edge.
- Nitrogen (N₂): An inert gas that prevents oxidation. Used for stainless steel and aluminum, providing bright, oxidation-free edges suitable for high-quality cuts and welding, though it is more expensive.
- Compressed Air: The most economical option, offering results between the above two gases. The cut has slight oxidation and is suitable where edge quality is not critical.
For thick carbon steel, oxygen is recommended to boost efficiency and reduce costs. For thin sheets, air or nitrogen can be used to further enhance efficiency and lower expenses.
Before adjustment, consult Brochures for technical parameters to assist with setup.
2. Basic Operations
A machine’s maximum performance is determined by its design, but its everyday output is shaped by how you set it up from the start. Follow these five steps to ensure your equipment runs at peak efficiency from day one, laying a solid foundation for every successful project to come.
(1) Unboxing Inspection
Using the parts list in the manual, carefully verify every component in the package—right down to the smallest screw, cable, and tool—just like a detective checking every clue. Confirm everything is present and free from shipping damage. This is your first step in protecting your warranty rights.
(2) Frame Assembly
Assemble strictly according to the official manual or video tutorials, with two priorities: stability and levelness. Ensure all frame joints are tight with no wobble. Position the machine on a perfectly level, stable, and non-flammable work surface (steel or concrete surfaces are ideal). An uneven base may cause vibrations during high-speed operation, directly affecting the accuracy of your final work.
(3) Optical Path Alignment – CO₂ Lasers Only
This is one of the most overlooked steps by beginners, yet it’s critical for CO₂ lasers. Optical path alignment means precisely adjusting the angles of the three internal mirrors so that the beam from the laser tube consistently hits the exact center of the focusing lens in the cutting head—no matter where the head is positioned in the work area.
If the beam alignment is off, cutting power at the edges of the work area will drop sharply—sometimes to the point where cutting isn’t possible. Follow the manufacturer’s tutorial patiently, using low-power test pulses on masking tape to create “test spots,” then adjust each mirror in sequence.
(4) Bed Leveling and Focus Adjustment
The flatness of your worktable—whether it’s knife blades or a honeycomb panel—determines whether the laser focus stays consistent across the material’s surface. This directly impacts the uniformity of cutting depth.
1) Leveling: Using a spirit level or the machine’s tools, carefully check and adjust each corner of the bed to ensure it is perfectly level along both the X and Y axes.
2) Focusing: Use the focus block, auto-focus sensor, or camera-based distance measurement supplied with your machine to set the exact vertical gap between the cutting nozzle and the material’s surface. The correct focus is key to concentrating laser energy for the narrowest kerf and sharpest engravings.

(5) Software Connection
Install the drivers and core control software (such as LightBurn or the manufacturer’s own XCS), then connect your computer to the laser cutter via USB, Wi-Fi, or Ethernet. Use the software to move the laser head in all directions and send it to the home position to confirm a smooth connection and operation. Completing this step bridges the gap between digital design and physical execution.
(6) Importing Design Files
Pick a design program—Adobe Illustrator, CorelDRAW, or Inkscape—to create and edit the vector graphics needed for laser cutting.
Design with the project’s needs in mind, ensuring lines are clear and avoiding excessive complexity that could hinder cutting performance.
Save the file in a format supported by your laser cutter, such as SVG or DXF.

(7) Test Cutting
Power up in the correct order: cooling system first, then the laser, then the control system. Run a test cut to check verticality, surface smoothness, and for burrs or slag. Adjust parameters based on results until the cut meets your quality standard.
(8) Production Cutting and Monitoring
Fine-tune the cutting head position and focus, prepare the assist gas, and double-check all settings before starting the job.
During cutting, the operator must actively monitor the process. If issues arise—like material shift, path deviation, or abnormal sparking—pause immediately and make necessary adjustments.
After cutting, inspect the quality. Address issues promptly by adjusting parameters or treating the cut edges as needed.
For more details on laser cutter operation, see the Laser Cutting Machine Operating Procedures.
3. Essential Accessories
Beyond the main machine, these three accessories are widely recognized by experienced users as “performance amplifiers” that dramatically boost efficiency and finished quality. Adding them to your toolkit marks the leap from merely functional to truly exceptional.
(1) Air Pump
This device directs a steady stream of high-pressure air to the laser’s focal point. Its value goes far beyond simply “blowing away dust”—it’s a must for professional-grade results:
- Achieve clean, surgical cuts: Strong airflow instantly clears molten or vaporized debris from the cut, preventing it from cooling or burning along the edge, resulting in smooth, carbon-free finishes.
- Suppress flames and eliminate scorching: Air cools the surface, extinguishes potential flames, and significantly reduces the blackened edges common when engraving or cutting flammable materials like wood. For nearly all cutting tasks, a robust air pump is essential.

(2) Honeycomb Panel
A metal work surface made up of countless tightly-packed hexagonal cells. In certain situations, it outperforms the standard knife-blade bed:
- Ideal support for small parts: When cutting projects with many tiny, separate pieces—like models or puzzles—the honeycomb offers more even, continuous support, preventing parts from falling or shifting as cuts complete.
- Improved bottom-side ventilation and smoke removal: The open grid design promotes airflow and smoke extraction under the material, greatly reducing heat marks or smoke stains on the reverse side, keeping both faces clean.
(3) Rotary Axis
A motorized accessory that replaces or sits on the work bed, gripping or supporting cylindrical or spherical objects and rotating them in sync with the laser head’s X or Y movement.
1) Unlock a 360° engraving dimension:
It allows seamless engraving on non-flat surfaces such as tumblers, insulated bottles, baseball bats, and even rings—taking your creations beyond the 2D plane.
2) Open new business opportunities:
Personalized mugs, bottles, and gifts are highly profitable in the laser processing market. Owning a rotary axis opens an entirely new commercial avenue. Rotary tools generally come in chuck-style versions for irregular shapes and roller-style ones for fast batch work on standard cylinders.

4. The Difference Between Cutting and Engraving
At first glance, cutting and engraving may seem like just a matter of different settings. In reality, they are two fundamentally different “mindsets” that drive completely different motion logics in the machine. Understanding this transforms you from a mere operator into a true creator.
(1) The Cutting Mindset
The goal of cutting is to penetrate the material. In this case, choose the “Cut” or “Line” mode.
1) Machine behavior: The laser head acts like a precision drawing pen, following your vector paths exactly, concentrating energy along a line as fine as possible.
2) Core logic: Maximize energy density for the most effective separation. This usually means high power, low speed, and sometimes multiple passes to handle thick materials.
(2) The Engraving Mindset
The goal of engraving is to remove the surface layer of material to create texture, rather than cutting all the way through. For this, you should select either the “Engrave” or “Fill” mode.
1) Machine behavior: The laser head operates much like the ink cartridge in an inkjet printer, rapidly scanning back and forth from left to right across the entire rectangular area containing the design. It switches the laser on and off in milliseconds, activating only at the “pixel points” within the design.
2) Core logic: By scanning at high speed over a wide area, the process “pixelates” the removal of the surface. This is typically achieved using medium to low power combined with extremely high speed.
Let’s take a simple five-pointed star as an example and compare the dramatic differences between the two approaches:
| Attribute | Cutting Approach | Engraving Approach |
|---|---|---|
| Objective | Cut the star completely out of the wooden board to create a separate, standalone object. | Engrave a solid star pattern onto the surface of the wood as a decorative element. |
| Machine Path | Vector path: The laser head follows the star’s five edges precisely in a single pass—clean and efficient. | Raster scanning: The laser head sweeps back and forth rapidly like a carpet pass across the entire rectangle enclosing the star, firing the laser only within the star’s interior. |
| Typical Settings | Power: 90% Speed: 8 mm/s | Power: 25% Speed: 300 mm/s |
| Final Result | You get a smooth-edged wooden star you can hold in your hand. | A solid star pattern, darkened and slightly recessed from ablation, remains on the surface of the wood. |
When you select “Cut” or “Engrave” for different layers in your software, you’re not just toggling between functions—you’re issuing two entirely different sets of battlefield commands to your beam of light. Congratulations—this is where you truly begin to master light itself.
V. Buying Guide
1. Choosing the Right Machine
(1) Selecting the Technology
The core materials you plan to process will determine the type of laser technology you need. If your primary focus is engraving or cutting non-metal materials such as wood, acrylic, leather, glass, paper, or rubber, you must opt for a CO2 laser. Its long wavelength (around 10,600nm) is efficiently absorbed by these substances.
Conversely, if your main business involves cutting metals like carbon steel, stainless steel, aluminum, or brass, then a fiber laser is essential. Its shorter wavelength (about 1,060nm) is required to process metals effectively. This decision is fundamental—choosing the wrong type will result in poor performance or even make processing impossible.
(2) Determining Power Requirements
After selecting the type of laser (CO2 or fiber), you need to determine the appropriate power (wattage/kilowatts) based on the materials you process most frequently and their thickness. Insufficient power can lead to incomplete cuts, slow processing speeds, and poor edge quality (such as slag or burn marks).
For CO2 lasers working with non-metals, a useful rule of thumb is "approximately 10 watts per millimeter of material thickness" (for example, cutting 8mm acrylic would require about 80W). For fiber lasers cutting metal, consult power charts for specific thicknesses (e.g., cutting 10mm stainless steel may require 3kW or more). Accurately quantifying your material thickness needs is crucial for selecting the right power level.
(3) Matching Business Scale
The final step is to align your power configuration with your business size and growth ambitions:
1) Small studios/hobbyists (engraving/thin non-metals)
Choose a 40W-80W CO2 laser, which offers a great balance of affordability and performance for precise engraving and thin material cutting.
2) Growing businesses
- Deepening expertise in non-metals/boosting productivity: Choose a 100W-150W CO2 laser to cut thicker non-metals and increase processing speed.
- Expanding into metalworking: Opt for a 1.5kW fiber laser to open new business opportunities in metal cutting.

3) Industrial production (thick metals/high throughput)
Select a fiber laser with 6kW or more. This is a strategic investment for those seeking maximum cutting efficiency and stable processing of thick metal plates (20mm+), dramatically reducing per-piece costs and enhancing market competitiveness for long-term, high returns.
2. Essential Value-Added Features
Beyond core specifications like power and size, several key features can significantly enhance your results, streamline workflows, and ensure safe operation.
(1) Air Assist System
An air assist system directs a focused stream of compressed air to the point where the laser meets the material. This vital feature blows away debris and hot gases, prevents splatter, and minimizes scorching or burn marks—ensuring cleaner, sharper, and more professional edges.
It also helps protect the focusing lens from smoke and resin build-up, extending its lifespan and maintaining peak performance.
(2) Integrated Camera
A built-in camera provides real-time video feedback of the workspace directly within the machine's software. This enables a true “what you see is what you get” (WYSIWYG) experience, allowing you to:
Accurately overlay your digital designs onto physical materials.
Precisely position designs on irregularly shaped items or maximize the use of scrap material.
Significantly reduce setup time and material waste.
(3) Autofocus
Autofocus systems automatically measure the distance between the laser nozzle and the material surface, adjusting the Z-axis for perfect focal length. This eliminates the need for manual measurement and adjustment, delivering major benefits:
Streamlines setup, especially when frequently switching between materials of different thicknesses.
Reduces the risk of user error, ensuring consistently optimal cutting or engraving quality.
(4) Rotary Attachment Compatibility
If you plan to work with cylindrical objects, compatibility with a rotary attachment is essential. This accessory rotates items like tumblers, glassware, dowels, or bottles, enabling seamless engraving on curved surfaces. It’s a must-have for personalizing drinkware and other rounded items.
(5) Safety Features
Safety should always be your top priority when operating any laser system. Make sure any machine you consider is equipped with the following essential safety features:
| Feature Name | Description |
|---|---|
| Fully Enclosed Housing | Contains potentially harmful laser reflections and manages smoke. |
| Lid Interlock Sensor | Automatically pauses the machine if the lid is opened during operation, preventing exposure to active laser beams. |
| Flame Detector | Integrated sensor capable of detecting fire, pausing operations, and triggering an alarm. |
| Emergency Stop Button | A clearly marked, easily accessible physical button that immediately halts all machine functions in emergencies. |
Ⅵ. Maintenance Measures and Safety Precautions
1. Maintenance Measures
(1) Routine Inspection and Servicing
1)Develop a Maintenance Plan
Create a detailed maintenance schedule based on the manufacturer’s recommendations and actual operating conditions, covering daily, weekly, and monthly inspections.
2)Inspection of Key Components
Regularly inspect critical parts such as the spindle, guide rails, gears, and hydraulic systems to ensure proper operation.
3)Lubrication Maintenance
Routinely add and replace lubricants to prevent wear caused by excessive friction on moving parts.

(2) Spare Parts Management and Replacement
1)Spare Parts Inventory
Maintain a stock of essential spare parts to address unexpected failures.
2)Timely Replacement of Worn Components
Replace parts immediately when they reach the end of their service life or show signs of malfunction to prevent minor issues from escalating into major failures.
2. Safety Precautions
(1) Laser Radiation Protection
1)Wear Appropriate Safety Glasses
Operators must wear laser safety glasses that comply with international standards to block radiation at specific wavelengths.

2)Install Protective Shields
Equip the laser cutter with physical protective covers to prevent laser beams from directly hitting personnel or reflecting onto unintended surfaces.
3)Set Up Safety Interlock Devices
Ensure that the laser automatically shuts off when protective doors are opened, preventing exposure to the beam in unsafe conditions.
4)Avoid Direct Viewing of the Laser Beam
Operators should never look directly at the laser beam, especially during the cutting process.
(2) Fire Prevention
Laser cutting can pose a fire risk, especially when processing flammable materials. To prevent fires, implement the following measures:
1)Do not cut highly flammable materials such as PVC, nylon, or polystyrene.
2)Keep fire extinguishers easily accessible near the laser cutter and check them regularly for effectiveness.
3)Remove flammable items from the work area, such as paper, fabric, and solvents, and maintain a clean workspace.
4)Use efficient smoke extraction systems to remove fumes and hazardous gases generated during cutting.

(3) Personal Protection and Health Safety
When operating a laser cutting machine, operators must wear the following protective equipment:
| Protective Measures | Specific Requirement |
|---|---|
| Wear Protective Clothing and Gloves | Wear fire-resistant and electromagnetic radiation-resistant protective clothing. Use heat-resistant gloves to prevent harm from high-temperature gases or sparks. |
| Wear Mask and Safety Goggles | Use dust masks and safety goggles to prevent inhalation of harmful fumes and to protect eyes. |
| Ensure Proper Ventilation | Ensure the work area is well-ventilated to reduce the accumulation of harmful gases and fumes. |
(4) Operating Protocols and Training
1)All operators must undergo safety training for laser cutting machines, gaining an understanding of how the equipment works and the essential safety precautions.
2)Keep an operation log recording the operator, usage time, and materials, which helps track equipment status and troubleshoot any issues.
3)Only trained personnel should operate the laser cutting machine, and it should never be left running unattended.
3. Tips for Extending Machine Lifespan
(1) Cooling System Maintenance
The quality and temperature of circulating water directly affect the machine’s lifespan. It is generally recommended to use purified water, replace it weekly, and keep the water temperature below 35°C. Clean the water tank when changing the water to prevent scaling.

(2) Optical Path Maintenance
Over time, dust can accumulate on the lens surfaces, reducing the reflectivity of mirrors and the transmittance of lenses, which in turn affects laser output power.
At this point, gently clean the lenses using a small amount of ethanol on a piece of degreased cotton, wiping in a circular motion from the center to the edge.
In addition, try to minimize the use of ultra-high-speed perforation during daily operations; opt for standard perforation methods to extend the lifespan of the focusing lens.
(3) Working Environment
The workshop should be kept dry and well-ventilated, with ambient temperatures maintained between 4°C and 33°C. In summer, take precautions to prevent condensation caused by temperature differences; in winter, ensure the laser equipment is protected from freezing.

4. Common Issues and Solutions
(1) Core Causes and Countermeasures for Incomplete Cutting
Improper parameter settings are a frequent issue; insufficient power or excessively high speed can lead to inadequate energy accumulation. To resolve this, increase the power up to the device’s safe maximum (such as 100%), reduce the cutting speed, or add extra passes for thicker materials. Always conduct a material test before formal cutting.
Incorrect focus disperses the laser’s energy. Use a focus gauge or auto-focus system for calibration. For thick materials, the focal point is best set at half the material’s thickness, and fine-tuned using a “ramp test.”
Abnormalities in the optical system can significantly weaken energy output. Regularly clean mirrors and focus lenses with specialized lens paper and cleaning solution. Replace scratched lenses immediately, and calibrate the optical path to ensure the laser beam enters the center of the focusing lens vertically.
Material and gas issues should not be overlooked. Uneven sheets should be flattened; replace materials with inconsistent composition, and ensure thickness does not exceed the machine’s limits. If auxiliary gas is insufficient, check for leaks and increase air pressure to clear away molten residue.
(2) Causes and Optimization of Burned Edges
Edge burning is mainly caused by heat accumulation (excessive power, too slow speed), incorrect gas configuration, or misaligned focus. Optimization strategies include:
1) Parameter Adjustment: Use the lowest effective power with the highest possible speed. For flammable materials like wood and acrylic, enable pulse mode to reduce continuous heat buildup with intermittent laser bursts.
2) Gas Configuration: For wood and acrylic, increase air assist pressure to extinguish flames promptly. Use oxygen during piercing on carbon steel, then switch to air or nitrogen for cutting. For stainless steel and aluminum, employ high-pressure nitrogen to prevent oxidation and discoloration.
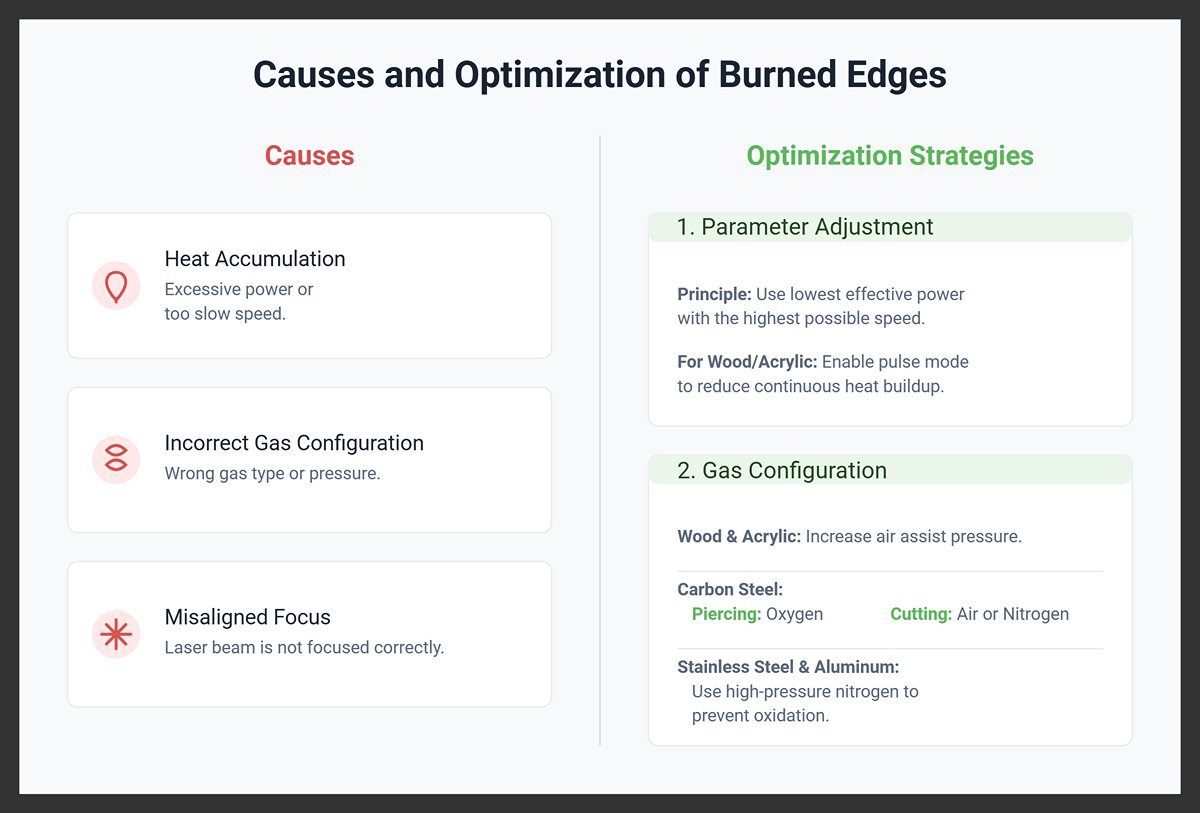
Physical Protection: Apply masking tape to the surface of wood or acrylic to absorb surface heat and reduce charring.
(3) Handling Image Misalignment and Thermal Deformation
1) Image misalignment is often due to mechanical faults. Check and tighten X/Y axis timing belts and secure motor pulleys. Regularly clean debris from guide rails and lubricate them, and inspect stepper motor wiring or driver faults.
2) To control thermal deformation, optimize your cutting strategy: distribute the cutting path to avoid localized overheating; segment long lines and allow cooling intervals; always cut outer contours before internal details. Additional measures include using clamps to flatten sheets and preheating thick plates to 100–150°C to minimize thermal stress.
Ⅶ. Conclusion
With this, you have completed a comprehensive journey from laser technology theory to safe operation, gaining the core skills needed to turn digital designs into physical creations. This guide is designed to clear the fog for beginners, remove obstacles, and empower you to take your confident first step into the world of laser manufacturing.
Solid knowledge is the foundation for making informed decisions. Understanding the distinct characteristics of diode and CO2 lasers, as well as the specific requirements for cutting, engraving, and etching, will enable you to select the most suitable equipment and processes for every project. Safety, above all, is non-negotiable. Always keep safety at the forefront: wear certified protective eyewear, ensure proper ventilation, monitor the process closely, and strictly adhere to material use restrictions—these are essential for safeguarding yourself and your environment, and must never be overlooked.
Ultimately, true proficiency comes only through hands-on practice. While theory guides you, it is through repeated parameter tuning and real-world operation that you will master the delicate balance between power, speed, and material.
For those seeking to boost production efficiency, consider the Single Table Fiber Laser Cutting Machine to meet your high-efficiency cutting needs. The article also provides maintenance tips to help extend the lifespan of your equipment.
A well-maintained and properly operated laser cutting machine will be a powerful asset, helping you tackle complex manufacturing challenges and realize greater business value. If you are considering purchasing a laser cutting machine, feel free to get a free quote by contacting us.


