I. Introduction
Laser cutting is an advanced manufacturing process that utilizes a focused beam of light to cut, engrave, or etch materials with high precision. Despite its widespread adoption in industries ranging from automotive to electronics, this process is not devoid of challenges.
One of the most prevalent issues encountered is the appearance of burn marks on the finished product. These marks can not only detract from the visual appeal of a component but also compromise dimensional accuracy and surface integrity.
How to achieve laser cutting without burn marks? As the article progresses, we will delve deeper into the root causes of burn marks, and the practical methods to avoid burn marks. For a deeper understanding of material-specific cutting processes—especially when working with metals—refer to this comprehensive Guide to Laser Cutting Metals. I hope this article will be useful to you.
II. The Nature of Laser Scorching
1. Defining Scorching, Heat-Affected Zones (HAZ), and the "Thermal Footprint"
What we casually call “scorching” takes on very different forms and meanings under the microscope of materials science. Accurately identifying these variations is the foundation for resolving the problem.
(1) Carbonization
Think of this as a chemical funeral for organic matter. When laser energy becomes overly concentrated, organic materials like wood or leather decompose in high-temperature, low-oxygen conditions, leaving behind a black carbon residue. This not only mars appearance but also indicates complete structural breakdown.
Scorching/Discoloration is an early warning that heat is spreading. It is typically caused by slight oxidation or thermal degradation on the material’s surface—tangible evidence that heat is radiating from the cut core outward. In metals, this appears as temper colors (blue, yellow, brown) depending on temperature—a visible map of heat distribution.
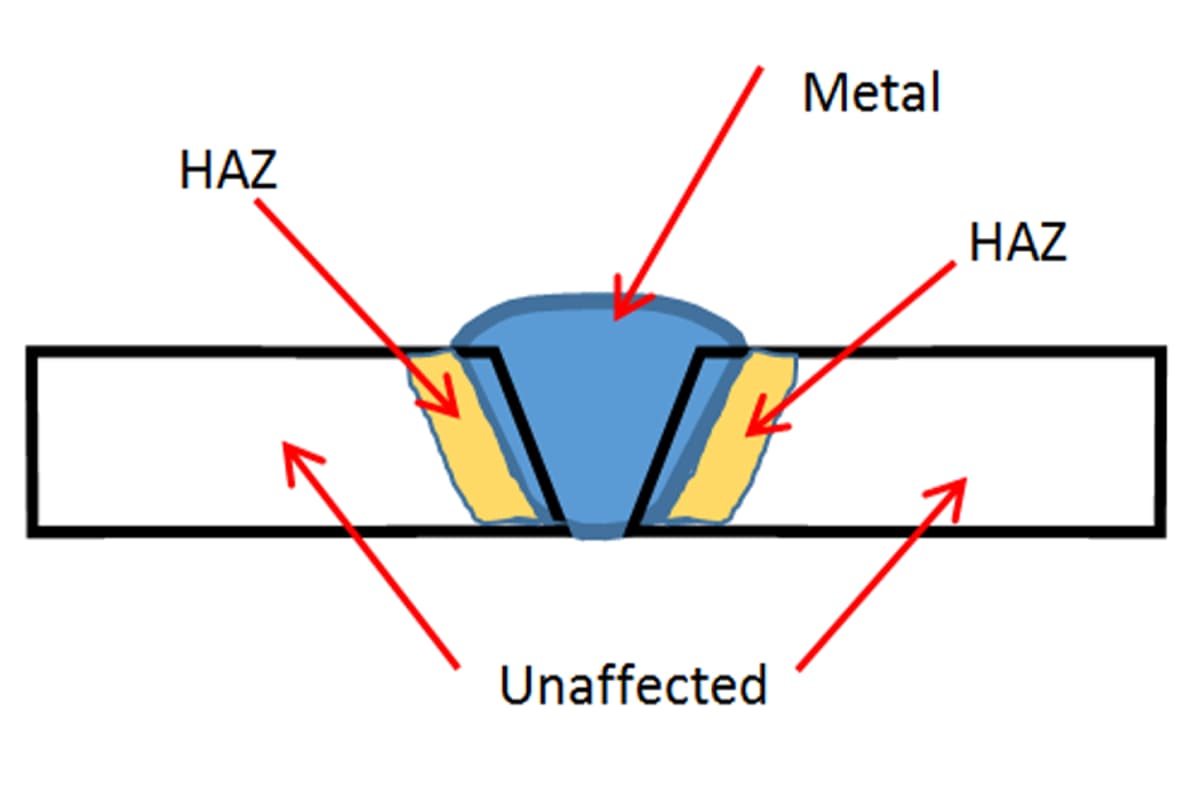
(2) Heat-Affected Zone (HAZ)
This is the true battlefield. The HAZ refers to regions that have not been melted or vaporized, yet have undergone irreversible changes in microstructure and physical properties (such as hardness or brittleness) due to heat exposure. All visible scorching and discoloration occur within the HAZ. An oversized HAZ—no matter how clean it looks on the surface—can mean the internal material has already been weakened, becoming a hidden quality risk.
Our guiding principle should evolve from simply “avoiding scorch marks” to actively “minimizing and controlling the heat-affected zone.”
For this, consider the more tangible idea of a “thermal footprint.” Imagine every step your laser takes leaves behind a “footprint” composed of the cut path and surrounding HAZ. The ultimate goal is to make this footprint as precise and minimal as possible—removing only what you intend to, with no surplus heat left behind.

2. The True Cost of Scorching
Losing control over the “thermal footprint” costs far more than just a defective piece of material. It triggers a silent chain reaction that erodes both profit margins and brand reputation.
(1) Rising Direct Costs
An oversized HAZ often means wider kerfs and greater material waste. Extra post-processing steps—grinding, polishing, etc.—to remove burn marks consume valuable labor and time, wiping out the efficiency gains of automated production.
(2) Plummeting Yield Rates
When working on precision parts or heat-sensitive materials like acrylic, the HAZ is a primary cause of edge cracking, warping, and structural failure. Every part scrapped due to HAZ damage represents a triple loss of material, energy, and man-hours.
(3) Invisible Brand Erosion
In an era where details make or break a product, a rough, scorched cut can destroy a consumer’s perception of quality. Conversely, a clean, flawless edge is a silent testament to exceptional craftsmanship—forming the foundation for premium pricing and lasting customer trust.
Scorching is never merely an aesthetic issue; it’s a strategic concern that affects cost, efficiency, and brand equity.
3. Why Different Materials React So Differently
(1) The Defining Role of Material Properties
Thermal conductivity determines how quickly heat spreads. High-conductivity materials like metals disperse heat rapidly, creating a broader but cooler HAZ. Low-conductivity materials like wood or plastics trap heat quickly—much like using a magnifying glass to ignite paper—leading to intense carbonization and melting. Composition and structure matter: plywood’s glue layers, knots in wood, or varying additives in batches of acrylic each have different ignition points and reaction profiles, causing uneven scorching. Surface condition also plays a role: coatings, surface oils, or oxidation layers all affect how much laser energy is absorbed, shaping the initial “thermal footprint.”
(2) Combustion
Combustion is a slow, heat-releasing chemical reaction we aim to avoid. It occurs when a laser, at relatively low energy density, heats a material long enough for it to reach its ignition point and react with oxygen—either in ambient air or from assist gases. This releases extra heat, fueling a vicious cycle of uncontrolled thermal spread, extensive carbonization, and heat damage. This is the scientific truth behind “scorching.”
Ablation, by contrast, is the ideal, high-efficiency physical process. When a laser delivers extremely high energy density in an instant (on the picosecond or femtosecond scale), the material has no time for heat transfer—it goes straight from solid to plasma through sublimation or vaporization. This “cold processing” approach removes material while transmitting almost no heat to surrounding areas, achieving a near-zero HAZ.
The key to invisible cutting is to skillfully combine every controllable variable—laser parameters, assist gases, and more—to suppress slow, runaway combustion and maximize rapid, precise ablation.
From this point forward, your laser is not just a cutting tool—it’s a scientific instrument capable of precisely managing phase changes in matter. What you’re about to learn is the art of directing this microscopic battle.
Ⅲ. Causes of Burn Marks in Laser Cutting
Burn marks, a frequent problem in laser cutting, can drastically reduce the quality of the final product. Understanding the primary causes of burn marks is essential for optimizing the laser cutting process and achieving clean, precise cuts.
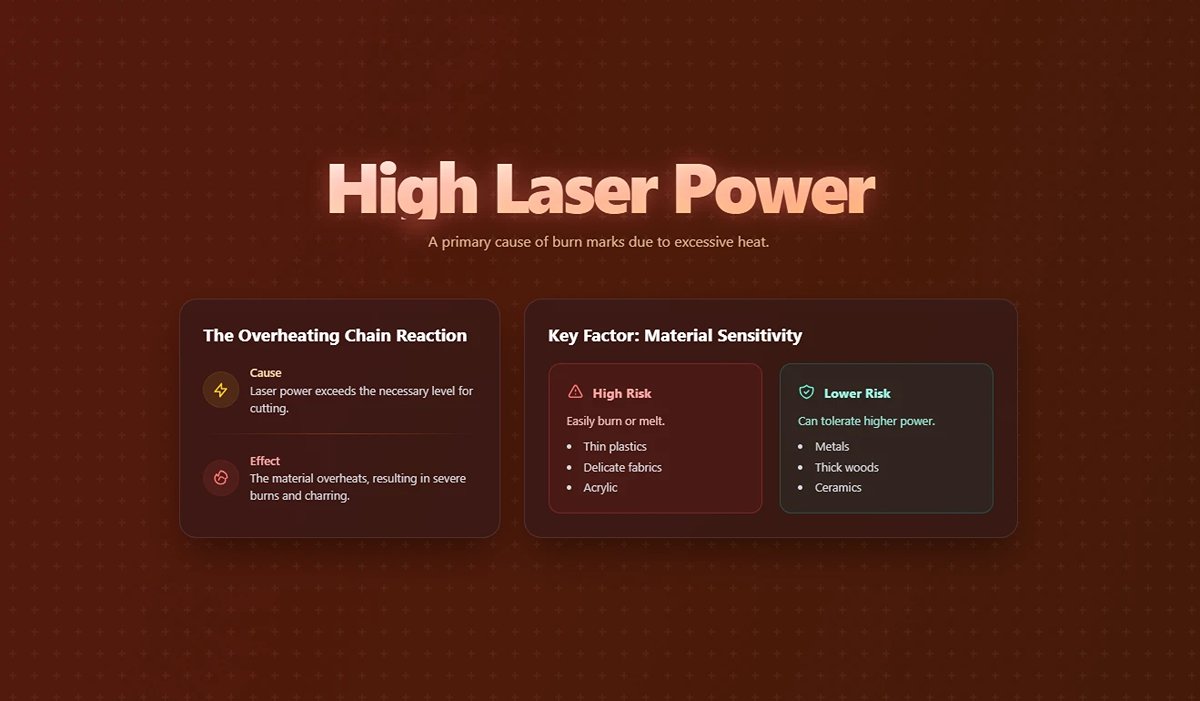
High Laser Power
Excessive laser power is a primary cause of burn marks, as it results in too much heat being applied to the material. When the laser power exceeds what is necessary for cutting, the material overheats and burn marks appear. This issue is particularly significant for heat-sensitive materials such as thin plastics or delicate fabrics.
Key Points:
- Excessive Heat: High power leads to excessive heat, causing burning.
- Material Sensitivity: Different materials have different tolerance levels for laser power. For example, acrylic is prone to burn marks if the power is too high, whereas metals might tolerate higher power levels without burning.
Example:
Consider cutting a 2mm thick acrylic sheet. If the recommended power setting is 50W, using 70W can cause burn marks due to the excessive heat generated.
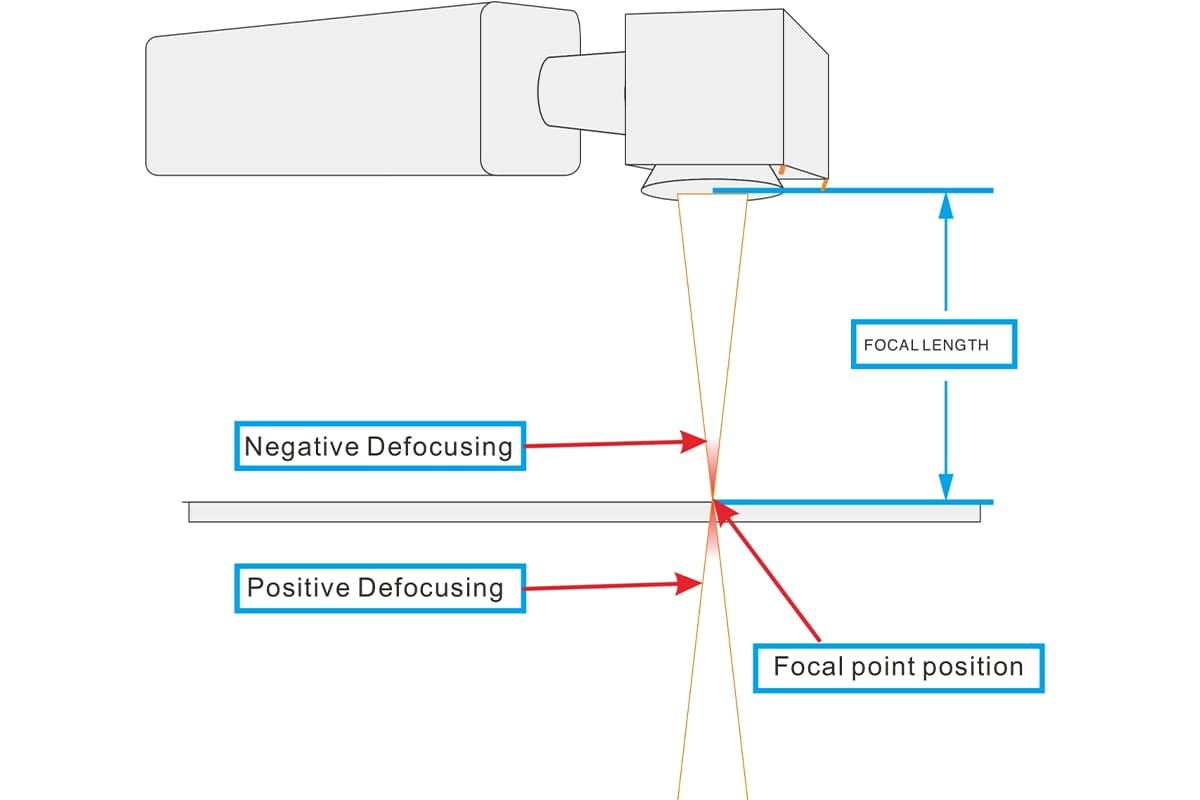
Incorrect Focal Point
Achieving a clean cut heavily depends on the correct focus of the laser beam. An incorrect focal point can lead to inefficient cutting and burn marks. If the focal point is not properly aligned with the material's surface, the laser energy is not concentrated where it is needed, causing uneven heating and burn marks.
Key Points:
- Alignment Issues: Misalignment of the focal point can disperse laser energy, causing burns.
- Optimal Focus: Accurately setting the focal point based on material thickness and type ensures clean cuts.
Example:
When cutting a 5mm thick plywood, if the focal point is set too high or too low, the energy will not be concentrated on the cutting line, leading to burn marks and incomplete cuts.
Material Related Issues
Improper Material Settings
Optimal laser cutting requires specific settings—power, speed, and frequency—that vary with each material. Using incorrect settings can lead to burn marks. For instance, cutting at a slower speed than necessary results in prolonged exposure to the laser beam, causing overheating and burns.
Key Points:
- Speed and Power Settings: Incorrect settings can cause prolonged exposure and burns.
- Material Specificity: Different materials have unique optimal settings that need to be adhered to.
Example:
Cutting a cardboard sheet requires lower power and higher speed settings compared to cutting metal. Using metal settings on cardboard will likely result in burn marks.
Material Impurities
Material quality significantly influences the outcome of the laser-cutting process. Impurities or inconsistencies in the material, such as coatings, oxides, or embedded particles, can create irregularities in how the laser energy is absorbed and dissipated. These impurities often lead to hot spots, increasing the likelihood of burn marks. Utilizing high-purity materials and ensuring proper surface preparation can mitigate this issue.
Incorrect Material Selection
Certain materials are more susceptible to thermal damage and may not be suitable for laser cutting. For example, plastics can easily melt and burn if not cut under optimal conditions. Material selection should be guided by compatibility with laser cutting and consideration for thermal properties to prevent burn marks.
Insufficient Air Assist
Air assist involves using a gas stream (like oxygen, nitrogen, or compressed air) to remove molten material and debris from the cutting area. Insufficient air assist can lead to burn marks by allowing molten material to accumulate and burn the surface.
Key Points:
- Debris Accumulation: Lack of proper air assist can cause debris buildup, leading to burns.
- Gas Type: The type of gas used in air assist can also impact the likelihood of burn marks. For example, nitrogen is often preferred for cutting materials like stainless steel to prevent oxidation.
Example:
While cutting metal, using compressed air instead of nitrogen might lead to oxidation and burn marks on the cut edges.
Suboptimal Beam Quality
The quality of the laser beam itself can affect cutting performance. Beam quality refers to the focusability of the laser beam, which impacts the efficiency and precision of the cutting process. A laser with poor beam quality will not focus the energy effectively on the material, resulting in uneven cutting and burn marks. Investing in lasers with superior beam quality can significantly reduce the occurrence of burn marks.
Inefficient Cooling Systems
During the cutting process, both the laser and the material can generate significant amounts of heat. Inefficient cooling systems in the laser cutter can lead to thermal buildup, which in turn can cause burn marks on the material. Implementing adequate cooling mechanisms, such as water or air cooling, helps to dissipate heat away from the cutting zone, maintaining the integrity of the cut edges.
Smoke and Debris Accumulation
During the laser cutting process, smoke and debris are produced as the material vaporizes. If not properly evacuated, these byproducts can settle on the material surface, causing burn marks and staining.
Types of Burn Marks
Edge Burn
Edge burn appears as discoloration or charring along the cut edges, resulting from direct contact with the laser beam. On wood, this manifests as brown or black edges, while on plastics, it results in a melted or glossy appearance.
Flashback
Flashback occurs when the laser beam comes into contact with the cutting bed, causing heat to reflect onto the underside of the material. This is particularly noticeable on thicker materials and those that are more combustible.
Surface Discoloration
Surface discoloration can occur due to heat transfer or smoke particles settling on the material. This can result in yellowing or scorching of the surface, especially on wood.
Ⅳ. Techniques to Prevent Burn Marks
Achieving laser cutting without burn marks involves a combination of adjusting machine settings, carefully selecting materials, and employing the correct techniques.
Adjusting Laser Power
One of the most effective ways to prevent burn marks is by adjusting the laser power to match the material being cut. Using the appropriate power level ensures that the material is cut efficiently without excessive heating.
Key Points:
- Material-Specific Power Settings: Each material has an optimal power setting that needs to be identified and used.
- Gradual Adjustments: Make incremental changes to the power settings to find the sweet spot that cuts effectively without burning.
Example:
When cutting a delicate material like thin fabric, starting with a lower power setting and gradually increasing it can help achieve a clean cut without burn marks.
Optimizing Focal Point
The focal point of the laser beam must be precisely aligned with the material's surface. Correct focal point alignment ensures that the laser energy is concentrated where it is most effective, reducing the chances of burn marks.
Key Points:
- Focus Calibration: Regularly calibrate the laser cutter to ensure the focal point is correctly set.
- Material Thickness: Adjust the focal point based on the material's thickness to maintain optimal cutting efficiency.
Example:
Cutting a 3mm thick acrylic sheet requires setting the focal point at the material's surface for precise energy concentration and clean cuts.
Material-Specific Settings
Different materials require specific settings for power, speed, and frequency. Using the correct settings for each material can significantly reduce the risk of burn marks.
Key Points:
- Speed Adjustments: Faster cutting speeds can minimize the exposure time, preventing overheating and burns.
- Frequency Modulation: Adjusting the frequency settings based on the material can enhance cutting quality and reduce burn marks.
Example:
For cutting plywood, using a higher speed and adjusting the frequency to match the material's characteristics can prevent burn marks and achieve a smooth cut.
Pre-Treatment Methods
Pre-treating materials before cutting can also help prevent burn marks. Common methods include applying masking tape to the surface of the material to protect it from direct laser exposure.
Key Points:
- Masking Tape: Applying masking tape to wood or other materials can prevent scorch marks by absorbing excess heat.
- Surface Coatings: Special coatings or sprays can be used on certain materials to protect against burns.
Example:
Applying masking tape to a wooden surface before laser cutting can protect the wood from burn marks, resulting in a cleaner finish.
Enhancing Air Flow and Assist Gas
Air assist, which involves directing a stream of gas at the cutting area, helps remove molten material and debris, preventing burn marks. The type and pressure of the assist gas play crucial roles in achieving clean cuts.
Key Points:
- Gas Selection: Choose the appropriate gas (e.g., nitrogen, oxygen, or compressed air) based on the material being cut.
- Pressure Optimization: Adjust the gas pressure to ensure efficient removal of debris and cooling of the cutting area.
Detailed Example:
Using nitrogen as an assist gas while cutting stainless steel can prevent oxidation and burn marks on the cut edges, resulting in a cleaner finish. For instance, a study showed that using nitrogen at 10 psi reduced burn marks by 30% compared to using compressed air at the same pressure.
Advanced Tips and Innovations
Incorporating advanced techniques and staying updated with the latest innovations in laser cutting technology can further enhance cutting quality and prevent burn marks.
Key Points:
- Beam Shaping: Utilizing advanced beam shaping techniques can provide more uniform energy distribution, reducing the risk of burns.
- Modern Software: Leveraging cutting-edge software that optimizes cutting paths and parameters can lead to cleaner cuts and fewer burn marks.
Example:
Recent innovations in beam shaping technology have shown significant improvements in cutting quality by creating a more uniform energy distribution, which helps minimize burn marks.
Implementing Effective Cooling Strategies
Incorporating robust cooling systems can reduce the thermal impact on both the laser and the material. Water or air cooling mechanisms help to dissipate heat generated during cutting, thereby preventing overheating and burn marks. Implementing zoned cooling areas, where specific sections are cooled more intensively, can be particularly effective for materials prone to thermal damage.
Regularly Updating Process Parameters
As materials and laser technologies evolve, regularly updating process parameters based on the latest research and industry best practices is crucial. Keeping abreast of advancements in laser technology, materials, and cooling systems allows for continuous improvement in the cutting process. Conducting periodic reviews and adjustments to the cutting parameters ensures that the process remains optimized for preventing burn marks.
Implementation of Pulse Cutting
For certain applications, utilizing pulse cutting rather than continuous wave cutting can be beneficial. Pulsing the laser delivers energy in short bursts, allowing the material to cool slightly between pulses. This technique can reduce the overall heat affected zone (HAZ) and minimize the risk of burn marks. Fine-tuning the pulse duration and frequency to match the material properties is essential for effective pulse cutting.
Ⅴ. Choosing the Right Materials
Selecting the appropriate materials is crucial for achieving high-quality laser cuts without burn marks. Different materials respond uniquely to laser cutting processes, and understanding these characteristics can help prevent common issues such as burn marks.
Types of Materials Suitable for Laser Cutting
Laser cutting can be applied to a diverse range of materials, each with its specific properties and requirements. Here are some common materials used in laser cutting, along with their potential applications:
Metals
- Steel:
- Types: Carbon steel and stainless steel.
- Applications: Automotive parts, architectural elements, and industrial machinery.
- Considerations: Stainless steel benefits from nitrogen assist gas to prevent oxidation and burn marks.
- Aluminum:
- Applications: Aerospace components, electronics enclosures, and signage.
- Considerations: Requires careful settings to avoid burn marks, especially when cutting thin sheets.
- Copper and Brass:
- Applications: Electrical components, decorative items, and plumbing fixtures.
- Considerations: Highly reflective and conductive, necessitating specialized laser systems and settings.
Non-Metals
- Plastics:
- Types: Acrylic, polycarbonate, and other plastics.
- Applications: Display cases, signage, and medical devices.
- Considerations: Acrylic produces clean, polished edges, while polycarbonate may need different settings to avoid burns.
- Wood:
- Types: Plywood, MDF, and hardwoods.
- Applications: Furniture, decorative panels, and model making.
- Considerations: Proper power and speed settings are essential to prevent burn marks, especially on thin or delicate wood types.
- Textiles:
- Types: Fabrics and leather.
- Applications: Fashion, upholstery, and accessories.
- Considerations: Lower power settings and faster speeds are typically used to avoid burn marks.
Composites and Specialty Materials
- Composites:
- Types: Fiberglass and carbon fiber composites.
- Applications: Automotive parts, sporting goods, and aerospace components.
- Considerations: Require precise settings to avoid burns and delamination.
- Rubber and Foam:
- Applications: Gaskets, packaging, and custom inserts.
- Considerations: Care must be taken to prevent melting and burn marks.
Material Thickness Considerations
The thickness of the material being cut plays a significant role in determining the appropriate laser settings and preventing burn marks. Thicker materials require higher power settings and slower speeds, which can increase the risk of burn marks if not properly managed.
Key Points:
- Thin Materials:
- Considerations: Require lower power and higher speed to avoid excessive heat buildup and burn marks.
- Thick Materials:
- Considerations: Need higher power and slower speeds for effective cutting but require careful balance to prevent burns. Assist gases like nitrogen can help in cooling and debris removal.
Example:
- Thin Stainless Steel (1mm): May require 50W of power and a high cutting speed.
- Thick Stainless Steel (10mm): Might need 500W and a slower speed to achieve a clean cut without burn marks.
Surface Coatings and Their Impact
Surface coatings on materials can significantly affect laser cutting outcomes. Coatings can either protect the material surface or interfere with the cutting process, leading to burn marks if not properly managed.
Protective Coatings:
- Anodized Aluminum: Acts as a protective layer, reducing the risk of burn marks and providing a clean finish.
- Masking Films: Applying protective films or tapes to materials like wood and plastics can prevent surface burns and scorch marks.
Problematic Coatings:
- Reflective Coatings: Highly reflective surfaces, such as polished metals, can reflect the laser beam, causing inefficiencies and potential burn marks.
- Paints and Varnishes: Pre-painted or varnished surfaces can burn or discolor during cutting, necessitating adjustments in laser settings or pre-treatment techniques.
Example:
- Anodized Aluminum: Cutting with a protective coating results in a clean edge without burn marks.
- Varnished Wooden Panel: May require masking tape to prevent surface burns.
2. Precision Solutions for Specific Materials
(1) Wood and Plywood
Wood, even once milled into boards, retains its natural character. Each grain pattern, knot, and hidden glue layer in plywood acts as a variable in heat absorption. Mastering it calls for patience and technique, rather than brute force.
Variations in density, moisture content, resin levels, and glue distribution within plywood can cause severe fluctuations in laser energy absorption. These are the chief culprits behind localized burning, incomplete cuts, and darkened edges. Poor-quality glue layers, in particular, act as "scorch amplifiers."
Solution:
1)Layer-by-layer cutting instead of single-pass cutting:
This is the defining line between novice and expert when working with wood, especially thick boards. Instead of using overpowering settings to punch through in one go, employ medium-to-low power with higher speeds for two or three passes. This "thin-slice peeling" technique channels heat vertically downward, greatly reducing lateral heat transfer. The result is exceptionally clean, vertical edges, while virtually eliminating the risk of backside charring.
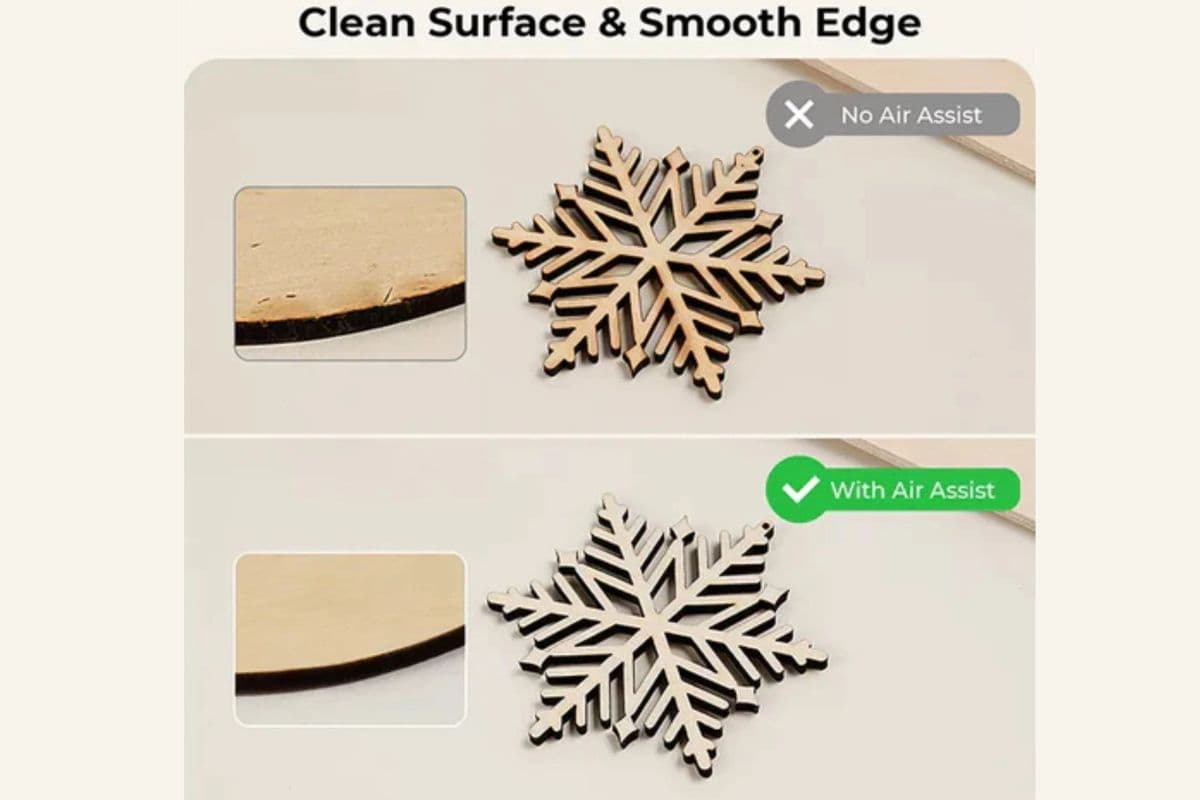
2)The role of high-pressure air as a “debris sweeper”:
When working with wood, high-pressure, high-volume air assist is absolutely critical. Remember, its primary role is not to fuel the cut, but to act as a powerful physical “cleaner.” It forcefully blows away tar and smoke before they can adhere to the cut walls—this is the ultimate secret to preventing secondary contamination and deep scorching of the edges.
3)Building a “sacrificial shield”:
Before cutting, apply masking tape or a dedicated laser-protection film uniformly over the material’s surface. This seemingly simple layer effectively absorbs resin-vapor-induced oily fumes, preventing surface contamination. Once the cut is complete, peel it away to reveal a pristine, art-like finish beneath.
Parameter Blueprint (Example: 5 mm laser-grade plywood):
- Power: 40–60% Speed: 20–30 mm/s
- Passes: 2–3
- Assist Gas: Compressed air, pressure > 0.5 MPa
- Focal Point: Set at one-third of the material thickness

(2) Acrylic (Cast vs. Extruded)
Acrylic is a favorite for laser cutting—but also highly fussy. Its reaction to heat is like a song of ice and fire: handle it well and the edges will be as smooth as if flame polished; mishandle it and you’ll be left with melting, whitening, or even cracking scars. The first step is distinguishing cast acrylic (Cast) from extruded acrylic (Extruded). The former is more heat-resistant and tends to produce clean, brittle breaks; the latter has a lower melting point and melts far more easily.
Being a thermoplastic, acrylic melts readily. Extruded acrylic tends to develop raised, molten ridges along the cut edge that affect flatness; cast acrylic is more prone to micro-cracks or whitening (crazing) caused by internal thermal stress.
Solution:
1)Use frequency (PPI) to encourage “fracture” over “melting”:
This is the core trick for acrylic. Avoid continuous wave or high-frequency settings in favor of lower frequencies (e.g., 300–500 PPI). This makes the laser “fire in bursts” rather than “sweep continuously,” giving the material precious microseconds to cool between pulses. The result: the acrylic is more likely to fracture cleanly instead of flow-melting, yielding edges that are flawlessly smooth and crystal-clear.
2)Absolute precision in focus alignment:
Acrylic is incredibly sensitive to focal point accuracy—any slight misalignment reduces energy density and can cause slanted striations or uneven melting. Conduct a ramp test to find and lock in the sharpest focus. Make good use of the manufacturer’s protective film; unless there’s a specific reason to remove it, keep it during cutting. It not only prevents top-surface scratches during handling, but also absorbs and dissipates some surface heat, significantly reducing micro-cracking.
Parameter Blueprint (Example: 3 mm cast acrylic):
- Power: 70–85%
- Speed: 10–15 mm/s
- Frequency/PPI: Low (<1000 Hz or 300–500 PPI)
- Assist Gas: Compressed air, steady flow at medium pressure
- Focal Point: Precisely on the material surface

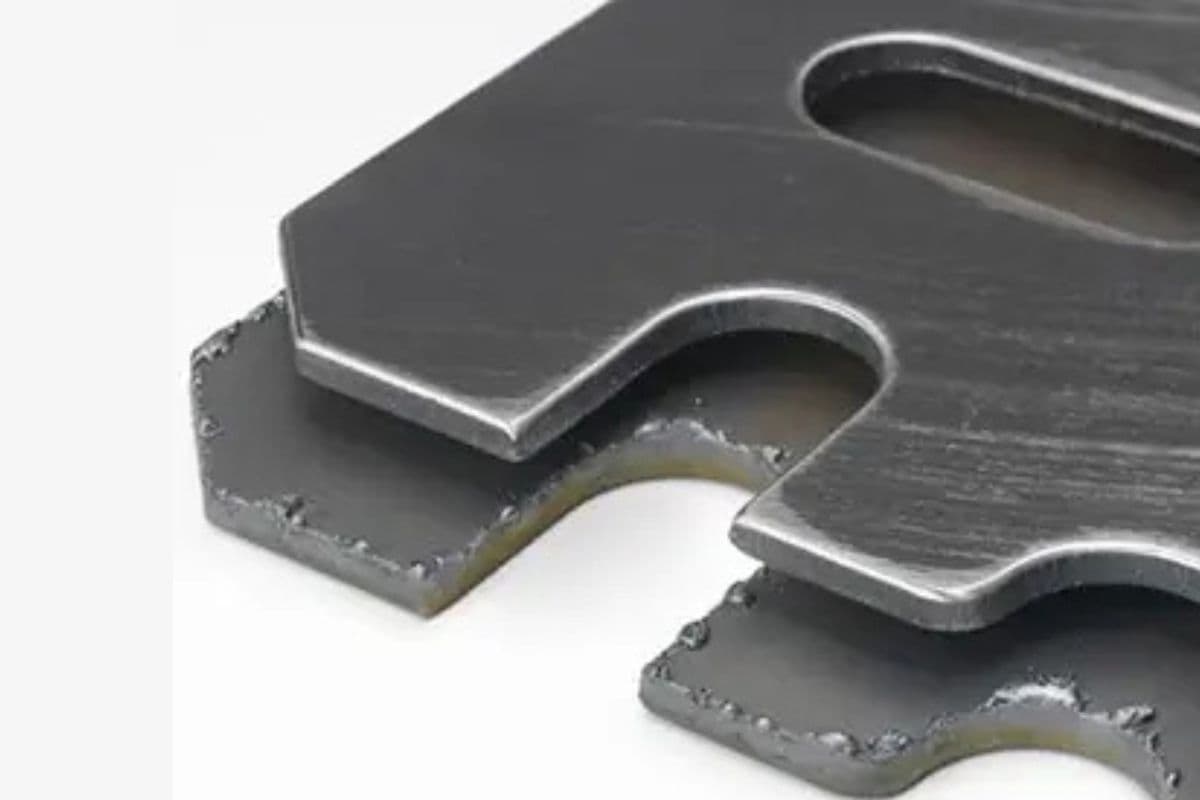
(3) Metal (especially thin stainless steel)
Cutting metal with a laser is essentially a battle against oxidation. At high temperatures, reactive metal elements eagerly bond with oxygen in the air, leaving a permanent “battle scar”—an oxide layer—along the cut edge. To win this war, you’ll need the ultimate weapon.
High heat makes metals especially prone to oxidizing, which discolors the cut edges (blackening stainless steel, bluing carbon steel) and compromises both appearance and post-weld quality. If molten dross isn’t effectively blown clear, it will solidify at the bottom of the cut, creating stubborn slag deposits.
Solution:
1)Nitrogen (N₂) — the only correct answer:
For metals like stainless steel or aluminum that require a bright, polished cut face, high-purity nitrogen is the only way to achieve a mirror-like finish. It plays a dual role.
First, as an inert gas, when delivered at high pressure it creates a “gas shield” that completely isolates the hot metal from ambient air, preventing oxidation at its source.
Second, it acts like a “high-pressure piston,” forcefully ejecting molten metal droplets from the kerf at high speed—leaving edges bright and flawless, with no need for secondary finishing.
2)Isolate “piercing contamination” with a lead-in path:
During the initial piercing phase, laser energy delivery is highly unstable and material burn-off is most intense. To prevent this imperfect phase from marring the part profile, design a short lead-in cut starting from the scrap area so that any contamination occurs off the actual workpiece.
3)Gas pressure and flow rate make or break the cut:
The quality of a nitrogen cut depends directly on whether the gas kinetic energy can overcome the surface tension of molten metal. Maintain sufficiently high pressure (typically > 1.0 MPa) and flow rate to completely blow away dross, ensuring a smooth, slag-free underside.
Parameter Blueprint (Example: 1 mm stainless steel, fiber laser):
- Power: 90–100% Speed: 80–120 mm/s
- Assist Gas: Nitrogen (N₂), purity > 99.99%
- Gas pressure: > 1.2 MPa Nozzle: single-layer, 1.2–1.5 mm orifice, 0.5–1.0 mm height above surface

(4) Leather and fabrics
Cutting organic, flexible materials like leather and fabric is akin to dancing on the tip of a knife—they are extremely sensitive to heat, and even slightly excessive power leads to irreversible charring, stiffening, and strong odors. The key principle here: speed—extreme speed.
These materials have low ignition temperatures, so any excess energy causes severe charring, hardening, and discoloration at the edges. Being soft, they can shrink or distort under heat, and produce potentially harmful, pungent fumes.
Solution:
1)Low power with high speed for “instant cutting”:
The goal is to complete the cut before the material’s molecular structure has time for widespread thermal reaction. This means using the lowest possible power that will still cut through, paired with the maximum machine speed achievable. Think of it as near “cold” cutting—the laser passes like a lightning bolt, removing only the target material and leaving no lingering heat.
2)Make the exhaust system part of quality control:
Here, a powerful exhaust system is more than just about safety or ventilation—it becomes an active quality control tool. Its job is to aggressively pull away smoke and particulates before they settle on and stain the material. Strong negative pressure significantly reduces edge yellowing and unpleasant odors.
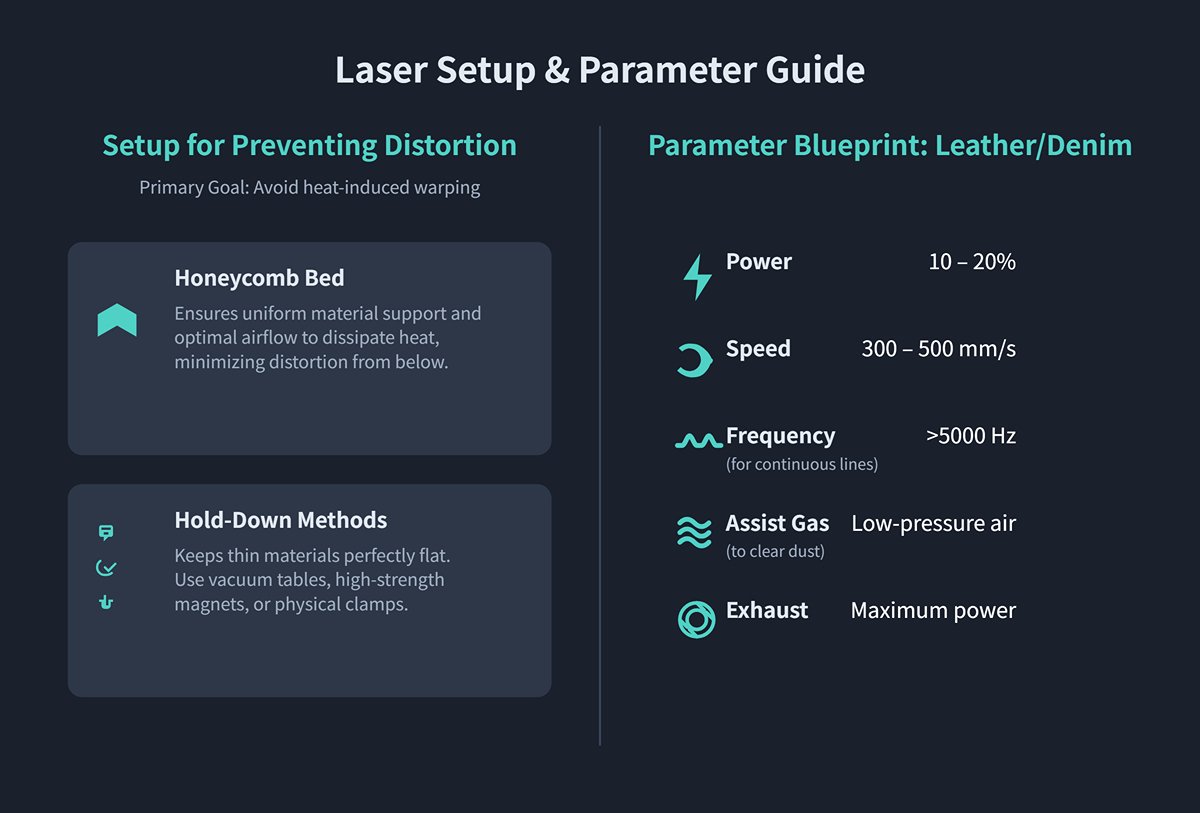
3)Use a honeycomb bed and vacuum hold-down to prevent distortion:
A honeycomb bed offers uniform support for soft materials and optimizes airflow for under-table extraction. For particularly thin or curl-prone fabrics, activate the vacuum hold-down function or secure the material with small magnets or clamps to keep it perfectly flat—this is essential for avoiding heat-induced warping.
Parameter Blueprint (Example: natural leather/denim):
- Power: 10–20% Speed: 300–500 mm/s
- Frequency/PPI: High (>5000 Hz) to maintain continuous lines at high speeds
- Assist Gas: Compressed air at very low pressure, just enough to blow away surface dust Exhaust: Set to maximum power
Ⅵ. Frequently Asked Questions
1. How does air assist help in reducing burn marks?
Building on the previous point about material settings, air assist involves directing a stream of gas (such as nitrogen, oxygen, or compressed air) at the cutting area. This helps in several ways:
- Debris Removal: It blows away molten material and debris, preventing them from accumulating and causing burn marks.
- Cooling: The gas cools the material, reducing the risk of overheating and burns.
- Oxidation Prevention: Using inert gases like nitrogen can prevent oxidation and discoloration on the cut edges.
2. Are there specific laser cutting machines designed to avoid burn marks?
Yes, modern laser cutting machines come with advanced features designed to minimize burn marks:
- Fiber Lasers: Highly efficient and precise, suitable for cutting metals with minimal risk of burn marks.
- CO2 Lasers: Ideal for non-metals like wood and acrylic, offering clean cuts with proper settings.
- Dynamic Beam Shaping: Technology that adjusts the beam profile in real-time, ensuring uniform energy distribution and reducing burn marks.
- Real-Time Monitoring Systems: These systems adjust cutting parameters on-the-fly based on sensor feedback, preventing burn marks.
3. What maintenance practices are essential for preventing burn marks?
Regular maintenance of laser cutting equipment is crucial:
- Optic Cleaning: Keep lenses and mirrors clean to ensure the laser beam is unobstructed.
- Cooling System Maintenance: Ensure the cooling system is functioning correctly to prevent overheating.
- Alignment Checks: Regularly check and adjust the alignment of the laser beam.
- Component Replacement: Replace worn-out components like nozzles and lenses promptly.
4. Can post-cut treatments remove burn marks?
Yes, several post-cut treatments can help remove or reduce the appearance of burn marks:
- Mechanical Polishing: Use polishing tools to smooth and clean the cut edges.
- Chemical Treatments: Apply solvents or cleaning agents to remove discoloration and burn marks from the material surface.
- Sanding: Lightly sanding the edges can remove burns from materials like wood and acrylic.
5. How do different laser technologies compare in terms of burn mark prevention?
Different laser technologies offer various advantages in preventing burn marks:
- Fiber Lasers: Excellent for cutting metals with minimal risk of burn marks due to their high precision and efficiency.
- CO2 Lasers: Suitable for non-metals, offering clean cuts with correct settings and maintenance.
- Nd:YAG/Nd:YVO4 Lasers: Provide high precision for cutting metals and some ceramics, useful for applications requiring fine details.


