Ⅰ. Introduction
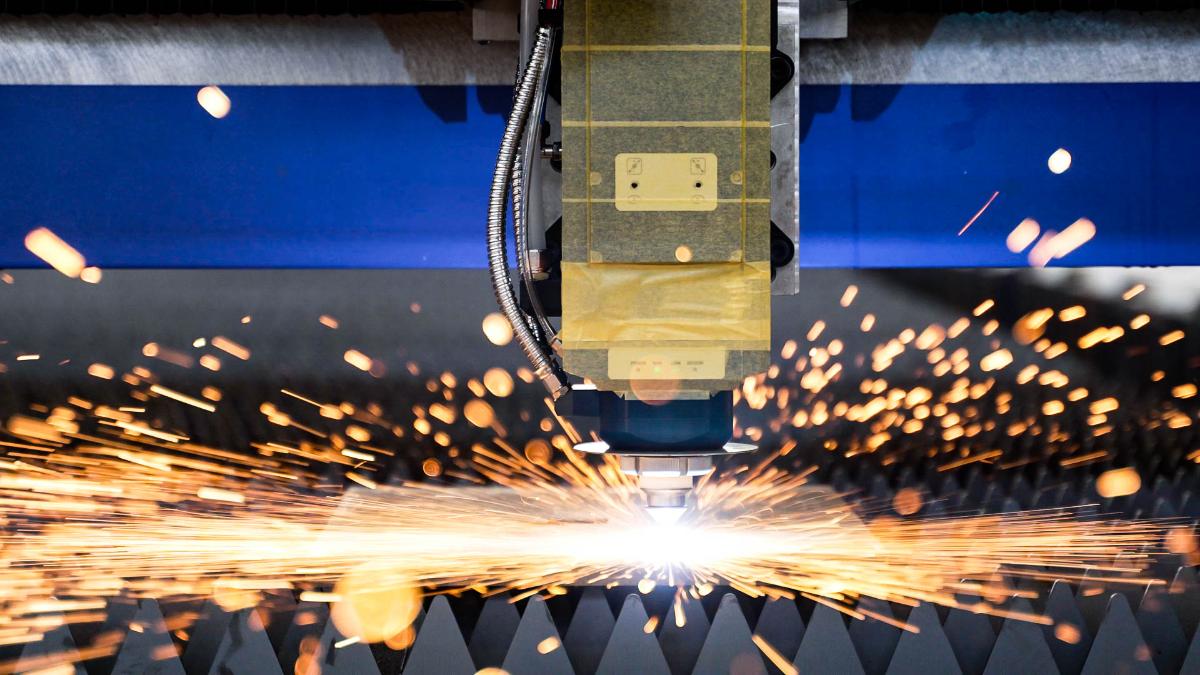
Laser cutting technology, renowned for its unmatched precision and exceptional processing efficiency, has become a driving force at the heart of innovation in modern precision manufacturing and creative industries. However, transforming this powerful beam into flawless components that perfectly match engineering drawings requires operators to possess a comprehensive understanding—from the fundamentals of how the equipment works to hands-on operational skills.
This in-depth guide will provide you with a clear, step-by-step pathway from beginner to expert. It covers everything from initial installation and setup, to the essential procedures for your first test cuts; optimization strategies for cutting parameters tailored to different materials such as metal, acrylic, and wood; advanced techniques aimed at enhancing processing quality and production efficiency; as well as a practical set of troubleshooting and problem-solving methods for common issues. If you want to deepen your hands-on knowledge and explore every operational stage in detail, check out Mastering Laser Cutting Machine Workflow.
In addition, we will emphasize the importance of regular equipment maintenance and rigorous safety protocols throughout the entire process. This is more than just an instruction manual—it is your professional companion, dedicated to helping you transform meticulous design plans or extraordinary creative ideas into high-quality reality with precision and efficiency. For those seeking to explore even more advanced applications such as bevel or multi-dimensional cutting, see the Complete Guide to Angled Laser Cutting.
II. Basic Principles of Laser Cutting Machines
1. Technical Overview
The core principle of laser cutting involves directing a high power-density beam onto the surface of the workpiece. The irradiated material rapidly melts,izes, or ignites, and a high-speed gas stream (such as oxygen, nitrogen, or compressed air) coaxial with the laser blows away the molten or burnt residues, thus achieving material cutting.
For those who want to explore how control parameters are managed digitally within cutting interfaces, refer to the Guide to Laser Cutting Software, which explains how software algorithms optimize beam paths and cutting precision.
2. Types of Laser Cutting
(1) Classification by Laser Source:
1) Fiber Laser Cutting Machine: Uses doped with rare earth elements like ytterbium as the gain medium, generating lasers via semiconductor pumping. For example, a Single Table Fiber Laser Cutting Machine is ideal for introductory metal processing tasks.
2) CO2 Laser Cutting Machine: Employs a carbon dioxide gas mixture as the working, producing lasers through gas discharge.
3) YAG/Disc Laser: Utilizes Nd:YAG crystals or discs pumped by lamps or semiconductors to generate lasers.
4) UV/Green Laser Cutting Machine: Produces short-wavelength UV (355nm) or green light (532nm) through frequency doubling of crystals.
(2) Classification by Processed Material:
1) Metal Laser Cutting Machine: Primarily uses fiber lasers, suitable for various metal sheets and tubes. For more insight into metal-specific performance, read the detailed Guide to Laser Cutting Metals.
2) Non-metal Laser Cutting Machine: Commonly uses CO₂ lasers to cut wood, acrylic, fabrics, etc.
3) Material Laser Cutting Machine: Requires special wavelengths (such as UV) for materials like carbon fiber and ceramic composites.
(3) Classification by Mechanical Structure:
1) Gantry Laser Cutting Machine: Features a moving beam and stationary worktable for high rigidity, ideal for processing large sheets.
2) Cantilever Laser Cutting Machine: The laser head is mounted on a single-side arm, occupying less space, suitable for tubes or small parts.
3) Robotic Arm Laser Cutting Machine: A six-axis robotic arm with a laser head for flexible 3D surface processing, such as automotive parts.
(4) Classification by Worktable Type:
1) Fixed Worktable: Simple structure and low cost, but requires pausing for material loading and unloading.
2) Exchange Worktable: Dual tables operate alternately for continuous production. For instance, a Double Table Fiber Laser Cutting Machine significantly improves production efficiency by reducing downtime.
3) Rotary Worktable: Equipped with a chuck rotation system for circumferential cutting of round or square tubes.
III. Setup Techniques and Material Preparation
1. Core Parameter Analysis
Key parameters of laser cutting machines include the following six elements:
- Power: The energy intensity output by the laser, directly affecting cutting depth and speed.
- Speed: Movement speed of the laser head, determining cutting time and edge quality.
- Focus: The position where the laser beam converges, influencing cutting accuracy and spot diameter.
- Frequency (PPI): Pulse frequency of the laser, typically measured as pulses per inch.
- Assist Gas Pressure: The pressure of gas blown during cutting, commonly oxygen, nitrogen, or air to enhance cutting quality.
Recommended settings:
| Parameter | Recommended Setting |
|---|---|
| Power | Adjust according to material thickness; avoid excessive levels that can cause material to burn or deform. |
| Speed | Higher speeds can be used for thinner materials; reduce speed for thicker materials. |
| Focus | Set based on material thickness, either on the surface or at an appropriate depth within the material. |
| Frequency (PPI) | Reduce frequency for harder materials; increase appropriately for softer materials. |
| Assist Gas Pressure | Oxygen: aids combustion, increases speed. Nitrogen: prevents oxidation. Air: economical and practical. |
2. Strategies for Adjusting Key Parameters
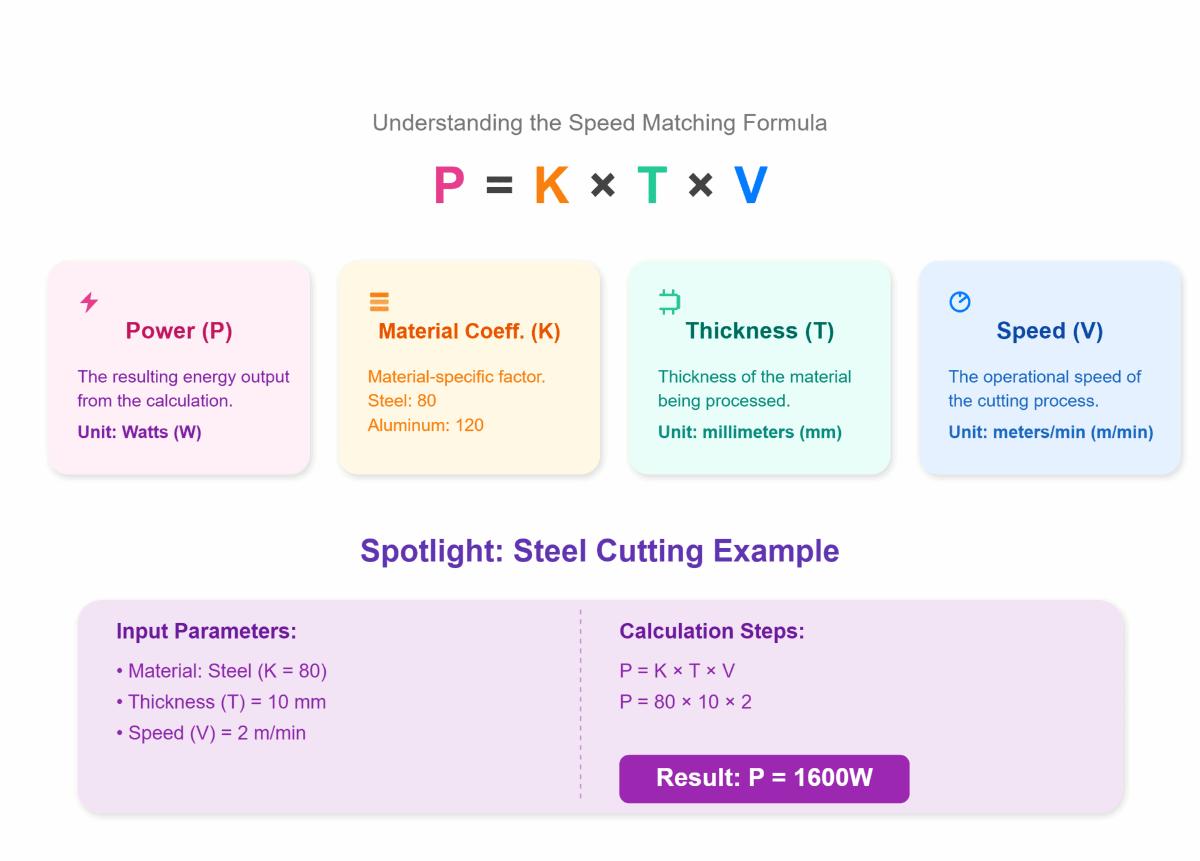
(1) Power and Speed Matching Formula
P = K × T × V
(P: Power in W, T: Thickness in mm, V: Speed in m/min, K: Material coefficient; Steel = 80, Aluminum = 120)
Example for steel cutting:
Parameters: T = 10 mm, V = 2 m/min, K = 80
Calculation: P = 80 × 10 × 2 = 1600W
This empirical formula provides an estimate of required power; for precise values, consult the supplier or refer to the manual.
(2) Assist Gas Selection
1) Main functions of assist gas:
- Combustion Aid & Cutting Acceleration: Oxygen reacts with metal to speed up burning and increase cutting speed.
- Slag Removal: The gas blows away molten metal, keeping the cut clean.
- Oxidation Prevention: Nitrogen and inert gases prevent oxidation, maintaining a smooth finish for further processing.
- Cooling & Protection: The gas cools the cutting area, reduces the heat-affected zone, and protects focusing lenses and optical components.
- Cost Control: Air is the most economical assist gas, suitable for high-volume, low-precision jobs.
2) Rules for selecting assist gases:
By Material Type
| Material Type | Recommended Gas | Purpose/Benefits |
|---|---|---|
| Carbon Steel | Oxygen | Faster cutting, suitable for thick plates or applications with less stringent surface requirements. |
| Stainless Steel | Nitrogen | Prevents oxidation, keeps the edge clean, ideal for high-quality applications. |
| Aluminum Alloy, Brass, Galvanized Sheet | Nitrogen or Air | Nitrogen prevents oxidation; air is more cost-effective. |
| Special Materials (Titanium Alloy, Copper, etc.) | Inert gases (e.g., argon) | Prevents oxidation, minimizes heat-affected zone but has higher costs. |
| Non-metals (wood, acrylic, etc.) | Air | Usually sufficient. |

By Thickness and Speed Requirements
| Plate Type | Gas Used | Advantages |
|---|---|---|
| Thick Plates | Oxygen | Speeds up cutting, suitable for thick carbon steel |
| Thin Plates | Nitrogen or Air | Enhances quality, reducing oxidation and burrs |
By Cost and Safety
| Gas Type | Cost | Safety Requirements | Suitable Applications |
|---|---|---|---|
| Air | Lowest cost | High safety | Suitable for most general materials |
| Nitrogen | Higher cost | Requires high purity | For high-precision and premium surfaces |
| Oxygen | Moderate cost | Fire safety precautions are essential | - |
(3) Focus Control:
| Focus Type | Position Description | Applicable Scenarios/Materials | Characteristics/Advantages |
|---|---|---|---|
| Positive Focus | Above the workpiece | Thick carbon steel, stainless steel, etc. | Smoother cutting surface, good dross expulsion |
| Zero Focus | On the workpiece surface | Thin sheet materials | Thinnest kerf, high edge quality |
| Negative Focus | Inside the workpiece (below the surface) | Hard materials like stainless steel, aluminum, etc. | Wider kerf, suitable for high-hardness materials |
You can browse the Laser Cutting Machine for Beginners Guide for more information on laser cutter parameter settings.
3. Cutting Materials
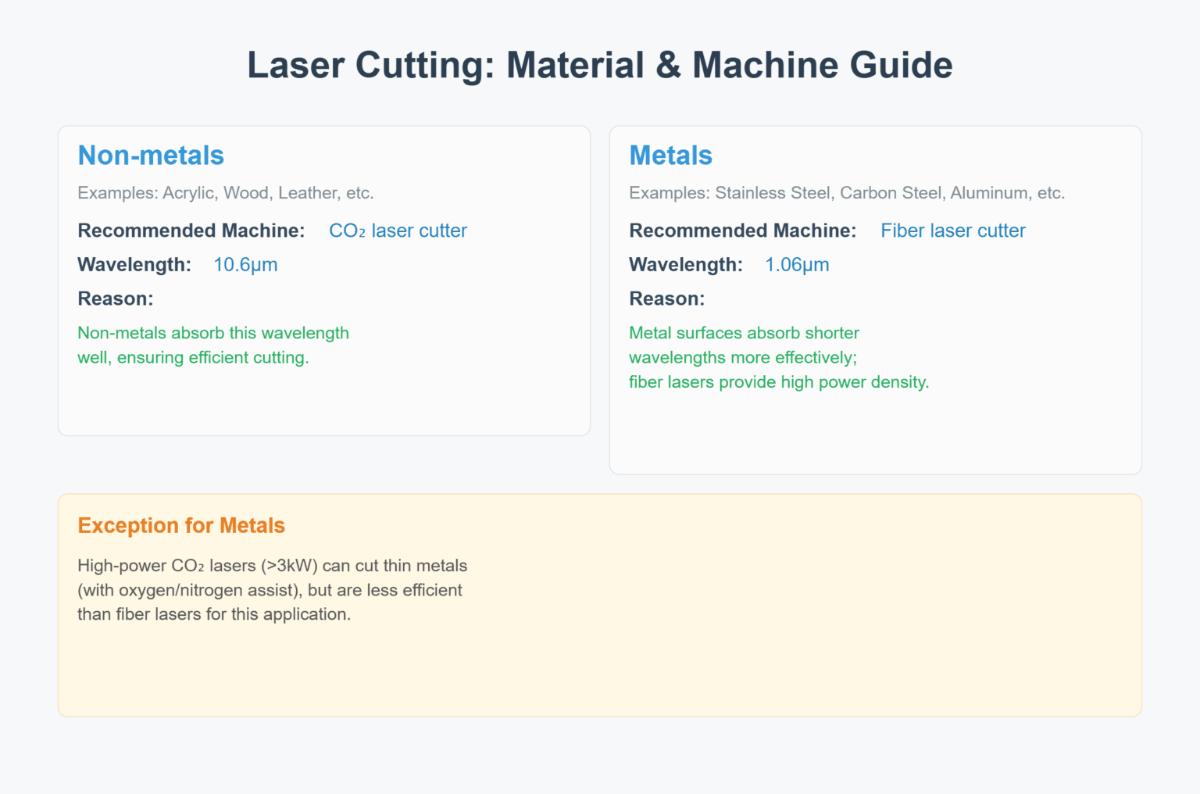
(1) Non-metals (Acrylic, Wood, Leather, etc.)
1)Recommended Machine: CO₂ laser cutter (10.6μm wavelength)
2)Reason: Non-metals absorb this wavelength well, ensuring efficient cutting.
(2) Metals (Stainless Steel, Carbon Steel, Aluminum, etc.)
1)Recommended Machine: Fiber laser cutter (1.06μm wavelength)
2)Reason: Metal surfaces absorb shorter wavelengths more effectively; fiber lasers provide high power density.
3)Exception: High-power CO₂ lasers (>3kW) can cut thin metals (with oxygen/nitrogen assist), but are less efficient than fiber lasers.
Quick reference for common metal settings:
| Material/ Thickness (mm) | Power (W) | Speed (mm/s) | Frequency (Hz) | Gas Pressure (Bar) | Focus Position |
| Stainless Steel 304 | |||||
| 1 | 500–1000 | 2000–5000 | 1000–3000 | 12–18 | -0.5 |
| 2 | 1000–2000 | 1000–2500 | 800–2000 | 14–20 | -1 |
| 3 | 1500–3000 | 600–1500 | 600–1500 | 16–22 | -1.5 |
| Carbon Steel (Q235) | |||||
| 1 | 500–1000 | 4000–8000 | 1000–3000 | 8–12 | -0.5 |
| 2 | 1000–2000 | 2000–4000 | 800–2000 | 10–15 | -1 |
| 3 | 1500–3000 | 1000–2000 | 600–1500 | 12–18 | -1.5 |
IV. Laser Cutting Machine Operation
After mastering the art of choosing the right equipment, it’s time to turn theory into exhilarating practice. The success of your very first cut affects more than just the cost of materials and time—it directly shapes your confidence and technical intuition. This chapter moves beyond theory and presents a refined Standard Operating Procedure (SOP) distilled from countless hands-on sessions. Follow this “zero-error” guide meticulously to avoid rookie mistakes and confidently take the first step from digital blueprint to flawless physical creation—an experience of pure joy born from making something with your own hands.
1. Pre-Flight Check: Safety, Calibration, and Material Preparation
Just as top aviators meticulously follow a pre-flight checklist, proper preparation before laser cutting is the foundation of equipment safety, cutting precision, and operator well-being. Skipping any step can result in costly errors.
(1) Environmental Setup: The Golden Rules of Space, Power, and Ventilation
1)Space and Grounding:
Leave at least one meter of clearance around your machine for safe operation and maintenance, and ensure the floor is level and stable. Most importantly, the machine must be reliably grounded via a standard three-prong socket or dedicated ground wire. Static electricity can interfere with control systems—and in extreme cases, ignite dust particles.
2)Power Supply:
Laser cutters are precision instruments highly sensitive to voltage fluctuations. Always use a dedicated, stable power source rated for your machine. For industrial environments or areas with unstable grids, an industrial-grade voltage regulator is strongly recommended—an economical way to prevent laser power decline and extend equipment lifespan.
3)Ventilation:
The most important yet often overlooked lifeline. Nearly all materials release hazardous fumes, vapors, and particulates when cut. Ensure your exhaust system—whether vented outdoors or connected to an industrial filter—runs powerfully with unobstructed ductwork. A simple test: light a piece of paper near the vent when the machine is off; if the smoke is swiftly and completely drawn away, your airflow is good.
(2) Key Calibration: Foolproof Guide to Beam Alignment and Focus Setting
The beam path and focus are the laser’s “aimpoint”; the precision of calibration determines whether the energy reaches the exact processing spot.
1)Beam Alignment
The laser beam travels from the laser tube through three mirrors before hitting the focusing lens. Even a tiny misalignment—like a bent gun barrel—can lead to major power loss and inconsistent cutting quality.
2)Foolproof Guide: The Tape Test
Place a small piece of masking tape at the center of the first mirror, then briefly pulse the laser using the control panel. Check the burn mark and adjust the mirror’s three screws until the beam hits dead center. Next, move the laser head to the near and far ends of the work area, pulse again, and ensure both marks align perfectly. Repeat this process for the second and third mirrors until the beam precisely enters the cutting head across the entire working range.

3)Focus Setting
The focal point is where the laser energy converges most intensely; proper focus determines kerf width, vertical accuracy, and final cutting quality.
4)Foolproof Guide: The Ramp Test
Position a scrap piece of material (e.g., a 5mm acrylic sheet) on the workbench at a 45° angle. Cut a straight line along the slope. Observe carefully—the thinnest, deepest part of the line marks the optimal focal point. Use a caliper or the machine’s focus gauge to measure the vertical distance between the nozzle and the material surface at that spot; this is your material’s “golden focus distance.”
(3) Material Handling: Professional Techniques for Cleaning, Securing, and Ensuring Flatness
1)Cleaning
Before cutting, wipe the material surface—especially acrylic or metal—with absolute ethanol or isopropyl alcohol to remove oils, fingerprints, and dust. These contaminants can burn under laser exposure, leaving stubborn marks on the workpiece.
2)Securing and Flattening
Warped materials are the enemy of precision. Even a minute focus variation (±0.5mm) can cause incomplete cuts. For flexible thin materials (like veneer or leather), use masking tape or magnetic clamps to firmly secure them to the honeycomb bed, maintaining perfect flatness.
(3) Safety First: Mandatory Checklist for Protective Gear and Emergency Readiness
1)Personal Protective Equipment (PPE)
Always wear laser safety goggles rated for your machine’s wavelength (e.g., 10,600nm for CO₂ lasers). Regular sunglasses or prescription lenses offer no protection—diffused reflections can still cause permanent retinal damage.
2)Never Cut Unknown or Hazardous Materials:
Never proceed without knowing the material composition. Strictly avoid cutting PVC, vinyl (chlorinated compounds), or synthetic leather. When heated, they release highly toxic and corrosive chlorine gas—deadly to humans and destructive to all metal components and optical lenses in the machine.
3)Fire Safety
Keep a CO₂ fire extinguisher within arm’s reach of your machine. Laser cutting is, at its core, a controlled combustion process—especially with wood and acrylic, fire hazards are very real.
4)Logbook
Maintain an Equipment Operation Log noting operator name, date, material type, thickness, and key parameters. This simple record becomes invaluable for troubleshooting, process optimization, and maintenance planning.
2. Five-Step Cutting Process: The Standard Workflow (SOP) from Design to Finished Product
Follow this standardized workflow to minimize the chance of mistakes and build efficient, repeatable production habits for future projects.
(1) Step 1: Optimize Your Design File (Vector Cleaning Techniques)
A clean vector file is the foundation of efficient cutting. Before importing into machine software, perform the following cleanup in your design tool (e.g., Adobe Illustrator, CorelDRAW, or CAD software):
1)Remove Duplicate Lines
Use functions like “select overlapping objects” to delete duplicate paths. Redundant cutting not only wastes time but also burns material edges and causes dimensional inaccuracies.
2)Close Open Paths
Ensure all shapes intended for complete cutting are fully closed. Even a barely visible gap can interrupt the cutting path.
3)Convert Text to Outlines/Paths:
Transform all text objects into outlines or paths. This prevents missing or substituted fonts when files are opened on different computers or machine software, ensuring your design remains 100% true to the original.
(2) Step 2: Material Placement and Origin Setting
Lay your prepared material flat on the workbench. Then, using the control software or panel, move the laser head to your desired starting point—typically the top-left corner—and execute the “Set Origin” command. This defines the reference point for all subsequent cutting operations.
(3) Step 3: Load or Set Cutting Parameters (Power, Speed, Frequency)
Parameter adjustment is both an art and a science—the very essence of laser cutting.
1)Power: The force that penetrates the material.
2)Speed: Determines both the cutting efficiency and the level of precision.
3)Frequency (for pulsed lasers only): The pulse density. High frequency is ideal for engraving, while low frequency works better for cutting.
(4) Step 4: Test Cut on Scrap Material — The Most Cost-Effective Insurance Policy
Before cutting your actual piece, always perform a quick test cut—a small square (e.g., 1 cm × 1 cm)—on a scrap section of the same material. This seemingly minor step is your cheapest and most effective insurance policy, allowing you to verify within 10 seconds:
- Do the parameters cut through the material completely?
- How is the edge quality (burn marks, smoothness)?
- Is the cut dimensionally accurate?

A successful test cut can save you from ruining an expensive sheet of material.
(5) Step 5: Execute and Monitor — Detect and Respond to Abnormalities Promptly
Once the cutting process begins, never leave the machine unattended. Stay alert like a watchful sentinel and pay attention to these three aspects:
1)Unusual noises or movements: Ensure the machine runs smoothly without abnormal vibrations or harsh sounds, which may signal a loose belt or dry guide rails needing lubrication.
2)Flames: A few brief sparks are normal, but if you see persistent flames, immediately hit the “Pause” or “Emergency Stop” button, and if necessary, use a CO₂ extinguisher. This often indicates inadequate airflow or incorrect parameter settings.
3)Smoke levels: Check that the exhaust system is working efficiently and that no excessive smoke is accumulating inside the cutting chamber.
3. Post-Processing and Finishing — The Final Touch That Elevates Quality
A flawless cut doesn’t mark the end of the process. Professional post-finishing can transform a decent piece into a refined, high-quality product.
(1) Safe Removal and Cooling
After cutting, wait a minute or two for the workpiece and table to fully cool before handling. Freshly cut metal or thick acrylic can retain high heat—touching them immediately could cause burns.
(2) Surface Cleaning: Removing Soot and Residues Effectively
Wood and Leather — The Masking Trick: When cutting wood or engraving leather, smoke stains can leave unattractive marks on the surface. The ultimate solution is to apply a full layer of medium-adhesive masking tape before cutting. Afterward, peel it off like a face mask to reveal a perfectly clean, smoke-free surface.
Acrylic: Use a soft microfiber cloth with water or a specialized acrylic cleaner to gently wipe the surface.
(3) Edge Finishing: Achieving Polished, Professional Results
Acrylic: With precise control of power, speed, and airflow, a CO₂ laser can produce edges as smooth and glossy as if flame-polished—one of laser cutting’s most attractive commercial advantages.
1)Wood: To remove dark burn marks from the cut edges and restore the natural look of raw wood, gently sand along the grain using fine-grit sandpaper (600 grit or higher).
2)Metal: For high-precision workpieces, post-processing methods such as tumble deburring or electropolishing can create flawless, mirror-quality edges.
4. Evaluating Cutting Results and Parameter Adjustment
After test cutting, thoroughly observe and record the results. Key evaluation criteria include:
| Key Inspection Metric | Detailed Evaluation Criteria | Parameter Adjustment |
| Cut Quality | - Smoothness: The cut surface should be smooth without visible ripples or roughness. - Burrs/Scorch: Edges (especially the bottom) should be free or have minimal, easily removable burrs; no significant scorch marks. - Heat-Affected Zone (HAZ): Assess the size of the HAZ; for applications with strict material property requirements, minimize HAZ. | - Burrs/slag: Adjust cutting speed, focus position, assist gas pressure and purity, check nozzle condition. - Scorch marks: May be due to excessive power or slow speed; optimize power and speed balance. - Excessive HAZ: Lower laser power, increase speed, or use pulse mode if applicable. |
| Cutting Depth | - Full Penetration: Ensure the laser has completely cut through the material. - Depth Consistency: For partial cuts (e.g., engraving), maintain uniform depth. | - Incomplete cut/insufficient depth: Increase power, decrease speed, adjust focus deeper, raise assist gas pressure, or check lens/nozzle cleanliness. - Inconsistent depth: Check material flatness, beam stability, and nozzle-to-workpiece distance. |
| Edge Condition | - Perpendicularity: Edges should be as vertical as possible with minimal taper. - Dross Build-up: Edges should be free of stubborn molten metal or oxide deposits. - Excessive Melting: Avoid over-melted, collapsed, or rounded edges. | - Excessive taper: Adjust focus, optimize nozzle type and aperture, check beam quality. - Dross: Optimize assist gas type, pressure, and flow; adjust speed and focus. - Excessive melting: Lower power, increase speed, or use higher-pressure assist gas. |
| Dimensional Accuracy | - Profile Accuracy: Part profiles, hole sizes, and slot widths should meet drawing tolerances. - Feature Integrity: Sharp corners, small arcs, and narrow slots should be clear and intact without distortion. - Overcut/undercut: Pay special attention to corners and complex curves to avoid overcutting or undercutting due to improper speed or power. | - Dimensional deviation: Check machine positioning accuracy, recalibrate axes, optimize cutting paths (e.g., apply corner deceleration or lead-ins), adjust compensation values. - Feature distortion/loss: Optimize power and speed dynamics, adjust focus, use special techniques like “pre-piercing” or “pulse dot” for small features. - Overcut/undercut: Adjust acceleration/deceleration, fine-tune power timing, optimize CNC path planning. |
For more detailed instructions, please refer to the Laser Cutting Machine Tutorial for Beginners.

V. Optimizing Cutting Quality
1. Methods to Improve Efficiency
(1) Optimize Path Planning
1) Minimize Idle Travel: Utilize intelligent software to reduce non-cutting movements of the laser head.
2) Shared Edge Cutting: For dense layouts, use shared edge techniques to reduce total cutting path length.
(2) Increase Automation
1) Use automatic loading and unloading systems to reduce manual intervention and increase production rates.
2) Integrate intelligent monitoring systems for real-time parameter adjustments and improved operational efficiency.
(3) Proper Equipment Parameter Selection
1) Increase Power
Higher power enhances efficiency when cutting thick materials, but excessive power can widen kerf or cause slag. For example, 3000W is more efficient than 2000W for cutting8mm carbon steel.
2) Optimize Speed
Match speed dynamically to power:
Thin Sheets: For 2mm stainless steel, use very high speeds (≥2m/min) with small-diameter nozzles.
Thick Plates: Lower speed for full penetration, e.g., 12mm carbon steel at 0.8–1.2m/min.
3) Focus Position Control
Lowering focus position by about -1~1mm when cutting stainless steel can reduce slag; regularly calibrate auto-focus systems.
4)Assist Gas Parameters
Select the right gas and pressure:
| Gas Type | Application | Pressure Range (bar) | Optimized Effect |
|---|---|---|---|
| Oxygen | Carbon steel cutting | 0.8–1.2 | Increases combustion speed by 30% |
| Nitrogen | Precision stainless steel cutting | 1.5–2.5 | Reduces oxide layer thickness by 50% |
| Compressed Air | Non-metals/thin metals | 0.6–0.8 | Cuts operating costs by 40% |
Refer to Section III for specific selection methods.
Upgrading your system with specialized nozzles, lens kits, or gas handling modules from Laser Cutting Machine Accessories and Upgrades can further optimize efficiency.
(4) Regular Maintenance
1) Ensure optical fibers and lenses are clean to reduce energy loss.
2) Calibrate the machine regularly to avoid efficiency loss from parameter drift.
2. Methods to Improve Precision
(1) Use High-Precision Equipment
1) Select machines with precision guide rails and ball screws to minimize mechanical errors.
2) Equip with auto-focus and dynamic tracking systems to keep the cutting head optimally positioned.
(2) Minimize Thermal Deformation
1) Optimize cutting paths to distribute heat and avoid local overheating and deformation.
2) Use systems or low-heat-input lasers to reduce thermal distortion.
(3) Enhance Workpiece Fixation
1) Use vacuum or magnetic clamps to prevent movement during cutting.
2) For thin sheets, add supports to the rear to prevent vibration.
(4) Fine-Tune Parameters
1) Focus Position:
Use short focal length lenses for smaller spots, the foundation of high-precision cutting, while ensuring penetration and stability.
2) Power Adjustment:
Power must be precisely matched to speed and material thickness/type; use manufacturer data as a starting point.
(5) Regular Inspection and Calibration
1) Periodically check the verticality of the cutting head for straight cut faces.
2) Use precision measuring instruments to verify results and adjust parameters as needed.
VI. Laser Cutting Machine Troubleshooting
Below is a quick-reference table for common laser cutting machine faults and simple troubleshooting steps:
| Phenomenon Category | Specific Phenomenon | Priority Checks & Simple Troubleshooting Steps |
| Cutting Quality Poor | Incomplete Cut | 1. ↑ Power or ↓ Speed 2. Check/Adjust Focal Point 3. Clean/Replace Lens (Protective Lens/Focusing Lens) 4. ↑ Gas Pressure/Flow or Check Gas Type |
| Excessive Burr/Rough Edge | 1. Fine-tune Focal Point 2. Adjust Speed (Usually ↑ Speed reduces burr, ↓ Speed reduces dross) 3. Clean Lens/Material Surface 4. Check Gas Pressure | |
| Kerf Too Wide/Uneven | 1. Calibrate Focal Point 2. Check/Replace Nozzle (Aperture/Damage) 3. Adjust Nozzle Height 4. Check Beam Alignment (Center Beam) | |
| Material Burnt/Yellowed | 1. ↑ Cutting Speed 2. ↓ Laser Power 3. ↑ Assist Gas (Nitrogen) Pressure/Flow 4. ↑ Focal Point (Raise Focus) | |
| Machine Not Moving/Abnormal | Machine Completely Immobile | 1. Release Emergency Stop Button 2. Check Limit Switches (If triggered) 3. Restart Control Software/Controller 4. Check Power/Driver Alarms |
| Movement Stuttering/Juddering/ Noise | 1. Clean & Lubricate Rails/Lead Screw 2. Check Belt Tension/Damage 3. Remove Debris from Rails/Lead Screw 4. Tighten Mechanical Components | |
| Cutting Dimensions Inaccurate | 1. Re-home the Machine 2. Check if Material is Securely Fixed 3. Check Drive Component Wear/Looseness (Lead Screw/Belt) | |
| Laser Issues | No Laser/Laser Weak | 1. Confirm Laser Power Supply is ON 2. Check Chiller (Operation/Water Flow/Temperature) 3. Ensure Safety Door is Closed 4. Check Control Cable Connections |
| Laser Flickering/Unstable | 1. Check High-Voltage Cables/Connectors 2. Check Chiller Stability (Water Temperature) 3. Check Power Supply Voltage Stability | |
| Auxiliary System Issues | No Assist Gas | 1. Check Gas Source (Gas Present/Valve Open) 2. Check Gas Hose (Kinked/Blocked/Disconnected) 3. Check Software Gas Settings / Solenoid Valve |
| Chiller Alarm | 1. Add Water (Deionized/Purified Water) 2. Clean Chiller Filter/Radiator Fins 3. Check Water Pump/Flow Rate | |
| Exhaust Fan Not Working | 1. Check Power/Switch 2. Clean Ductwork/Dust Collection Bin | |
| Software/Control Issues | Software Cannot Connect to Machine | 1. Replug Data Cable 2. Restart Software/Computer/Controller 3. Check Software Communication Settings |
| Software Crashes/File Import Issues | 1. Restart Software/Computer 2. Check File Format/Path 3. Simplify/Repair Graphics (in CAD) |
VII. Maintenance and Safe Operation
1. Standard Procedures for Safe Operation
(1) Three-Tier Protection System
Laser cutting safety adheres to the well-established “hierarchy of controls” principle, systematically reducing risks through three progressive levels. The core philosophy is to prioritize the most effective engineering controls to eliminate or isolate hazards at the source, followed by administrative measures to regulate human behavior, and, as a last resort, reliance on personal protective equipment (PPE) as the final line of defense.
1) Engineering Controls
Engineering controls are physical safety measures built into equipment or the work environment, designed to isolate operators from hazards at the source. This represents the most reliable level of protection.
Fully Enclosed Safety Shields
These are the primary engineering control, effectively blocking laser beams, sparks, and molten metal splatter, while containing smoke and harmful gases produced during processing within the enclosure.
Safety Interlock Devices
Fitted to service doors or protective covers of the equipment, these sensors immediately shut down laser emission if a door is opened during operation, preventing accidental laser exposure.
Dedicated Fume Extraction Systems
High-efficiency ventilation and filtration systems promptly remove and treat harmful fumes and dust generated in the cutting area, maintaining air quality in the workspace. Some advanced equipment features a positive-pressure fresh air system, ensuring that the air pressure inside the operating room is slightly higher than outside, effectively preventing contaminated air from entering.
2) Administrative Controls
When risks cannot be entirely eliminated through engineering, administrative controls establish rules, procedures, and training to guide personnel behavior.
Lockout/Tagout Procedures
During equipment maintenance, servicing, or cleaning, LOTO procedures must be enforced. Maintenance personnel use specialized locks and tags to isolate and secure all energy sources (such as electricity and gas), ensuring that the equipment cannot be accidentally started until work is complete. This is a critical procedure to prevent serious injury during maintenance.
Safety Zone Delineation
Clearly define laser operation areas, material storage zones, finished product areas, and safe passageways, using prominent signage to provide warnings.
Regular Safety Training and Certification
All operators must undergo comprehensive theoretical and practical training and pass assessments to be certified before working. Training content should be regularly updated to address new equipment, materials, and newly identified risks.
3) Personal Protective Equipment
PPE serves as the last barrier protecting operators from any remaining risks and must be properly selected and worn at all times.
| Personal Protective Equipment (PPE) | Description | Recommended Usage Scenarios |
|---|---|---|
| Laser Safety Glasses | Must be selected according to the type of laser, with the appropriate protection wavelength and sufficient Optical Density (OD) value. | Protects eyes from laser radiation when operating any type of laser (e.g., fiber lasers, CO2 lasers). |
| Protective Gloves | Heat-resistant and cut-resistant gloves, suitable for handling high-temperature or sharp-edged materials. | Prevents burns or cuts when handling cut parts or coming into contact with sharp materials. |
| Respiratory Protection | Industrial dust or gas respirators designed to filter harmful fumes or particles. | Used in environments with high concentrations of toxic fumes, poor ventilation, or insufficient exhaust systems during material processing. |
(2) Material-Specific Hazards
1) Materials Strictly Prohibited for Cutting
- Polyvinyl Chloride (PVC): Laser cutting PVC releases chlorine and hydrogen chloride gases, which react with moisture to form hydrochloric acid. This poses severe toxicity to operators’ respiratory systems and causes extensive corrosion to metal components and precision optical parts of the equipment.
- Halogenated Plastics: Plastics containing fluorine, chlorine, bromine, or iodine generate highly toxic and corrosive gases when cut.
- ABS and Polycarbonate: ABS emits cyanide gas during cutting, which is extremely poisonous. Thin polycarbonate sheets can technically be cut, but are highly flammable, prone to melting, and result in poor cut quality; cutting thicker polycarbonate is not recommended.

2) Risks of Cutting Highly Reflective Metals
Cutting materials with high reflectivity, such as copper, brass, aluminum, and silver, poses significant risks. The powerful laser beam can reflect off the surface and return to the laser head, potentially damaging the focusing lens, collimator, or even the optical fiber, leading to costly equipment failures.
Mitigation measures include using specialized lasers and cutting heads designed for anti-reflection, angling the workpiece slightly to avoid perpendicular reflection, or optimizing cutting parameters to reduce reflectivity.
(3) Emergency Procedures: Responding Calmly to Unexpected Incidents
1) Fire Suppression
ABC dry powder extinguishers are the standard choice for putting out fires involving metals, electrical equipment, and ordinary materials. Fires involving highly reactive metals such as magnesium or titanium require a specialized Class D extinguisher.
Never use a carbon dioxide (CO2) extinguisher to spray the laser head or optical lenses directly. The extremely low temperature of CO2 discharge (around -78°C) can cause sudden thermal shock, shattering delicate optical components and causing irreversible damage.
In the event of a fire, immediately press the emergency stop button to cut off main power to the equipment, then use the appropriate extinguisher. If the fire cannot be controlled, evacuate the area without delay and call emergency services.
2) Laser Leakage and Emergency Shutdown
If you suspect a protective enclosure breach, interlock failure resulting in laser leakage, or notice unusual sounds or burning odors, immediately press the nearest emergency stop (E-Stop) button. This instantly halts all equipment movement and laser emission. Notify your supervisor and the maintenance team right away, and implement the Lockout/Tagout (LOTO) procedure until the issue is resolved.
3) Smoke Extraction System Failure
If the smoke extraction system fails, stop cutting operations immediately. Allow residual smoke in the chamber to settle or dissipate slowly before opening the safety guard, and report the malfunction for repair. Never open the machine door while the chamber is filled with smoke.
2. Routine Maintenance Procedures
(1) Regular Inspection Checklist
- Daily: Check for unusual noises/leaks/temperature, confirm emergency stop is functional.
- Weekly: Clean filters, vents; check cables for wear; lubricate moving parts (rails, bearings).
- Monthly: Calibrate sensors, tighten bolts, record operating parameters (voltage, pressure, etc.).
(2) Cleaning Procedures
- Power and use an anti-static brush to remove dust from circuit boards; use neutral cleaner for oil stains.
- Never use high-pressure water on electrical units; clean precision parts with anhydrous alcohol.
(3) Consumables Management
- Establish replacement schedules (e.g., filters every 500 hours, hydraulic oil every 2000 hours).
- Use OEM or certified replacement parts, and keep records of replacements.

3. Measures to Prevent Accidents
(1) Never leave the laser unattended while operating: This is the foremost safety rule. If a problem occurs, a laser can ignite material within seconds.
(2) Wear proper protective gear: Many diode and fiber are open-type; always wear dedicated safety goggles to prevent eye injury from laser radiation.
(3) Keep the work area (and machine) clean and tidy: After every job, clear away debris or burnt scraps on the laser bed—especially wood or paper, which can ignite if struck by the laser or through heat accumulation.
(4) Use appropriate ventilation and avoid toxic fumes: Laser cutting produces potentially harmful fumes. Always run exhaust fans or fume extractors during cutting. Ensure hoses and filters are correctly installed to vent fumes outside or filter them properly.
(5) Be prepared for fires: Despite precautions, always be ready for fire emergencies. Mount a fire extinguisher on the wall or workstation within easy reach of the laser.

4. Environmental Protection and Sustainability
(1) Metal Dust Recovery and Management
The significant amount of metal dust generated during laser cutting requires effective management and recovery to ensure environmental compliance, occupational health and safety, and resource recycling.
Modern equipment is typically equipped with advanced dust collection systems, focusing on source capture and efficient filtration. This not only safeguards operators’ respiratory health, but for reactive metals like aluminum, magnesium, and titanium, specialized explosion-proof systems also help prevent dust explosion hazards.
Collected dust is far from waste—it is a valuable "urban ore" rich in base metals. By sorting, storing, and sending it to professional recycling companies for remelting and purification, it can be regenerated into metal ingots or powder feedstock. This process closes the resource loop, reduces the need for virgin mining, minimizes environmental impact, and serves as a model for the circular economy.
(2) Application of Energy-Efficient Cooling Systems
The stable operation of laser cutting machines depends on effective cooling systems, which themselves are major sources of energy consumption. Implementing energy-efficient cooling technology is essential for green manufacturing.
The core innovation lies in shifting from traditional fixed-frequency compressors to variable frequency drive (VFD) technology:
1) On-Demand Output: Compressor power is dynamically adjusted according to real-time thermal load, automatically reducing consumption during standby or low-load periods;
2) Precise Temperature Control: Achieves temperature precision within ±0.1°C, enhancing laser stability and cutting quality, while eliminating the start-stop waste of fixed-frequency systems. Additional energy-saving strategies include using high-efficiency heat exchangers to improve thermal performance, smart control algorithms to optimize operation (such as utilizing ambient temperature), and adopting eco-friendly refrigerants (such as R410A/R32) to reduce environmental impact.
Compared to traditional fixed-frequency systems, energy-efficient cooling solutions can reduce power consumption by 30%-50%. While the initial investment may be slightly higher, rapid payback through electricity savings, lower operating costs, and improved equipment stability and longevity make these systems a wise choice for both economic and environmental benefits.
Ⅷ. Conclusion
Through this comprehensive guide, you now have a thorough understanding of laser cutting technology, from fundamental principles to advanced applications.
From basic concepts to complex operations, this article systematically explores the working principles, setup techniques, basic operations, optimization methods, troubleshooting, and safe maintenance of laser cutting machines. Mastering this knowledge enables you to fully leverage laser cutting equipment for higher quality and efficiency.
In real-world production, challenges such as inconsistent cut quality, sudden machine alarms, or parameter drift are inevitable. When these situations arise, having a structured diagnostic reference at hand—such as the Laser Cutting Machine Troubleshooting Guide—can significantly shorten recovery time and help you return to stable production faster.
With a comprehensive knowledge of laser cutting equipment, users can flexibly apply this technology to a variety of scenarios, from simple shape cutting to intricate engraving. Whether for industrial production or custom creative work, laser cutting is indispensable.
If you're looking for cutting-edge solutions to achieve unparalleled precision in your manufacturing processes, consider investing in a Precision Laser Cutting Machine, designed to deliver exceptional accuracy and performance.
For personalized advice on this technology or to discuss your specific project needs, feel free to contact us for an expert consultation.


