I. Introduction
Are you both excited and a bit overwhelmed by the prospect of a Laser Cutting Machine—an incredible machine that can bring your digital designs to life with pinpoint accuracy? Don’t worry; this seemingly complex device is far from an intimidating, mysterious tool. Instead, it’s your key to unleashing limitless creativity, serving as a brilliant bridge between digital concepts and tangible creations. For those who want to start strong, check out the Laser Cutting Mastery: Beginner’s Guide for a smooth learning curve.
Whether you’re a complete novice taking your first steps into the world of industrial machinery or an enthusiastic DIYer eager to broaden your skills, this ultimate guide is here to clear every hurdle from theory to hands-on application. We’ll lay a solid foundation for you in four essential areas: an in-depth exploration of the science behind laser cutting, a strong emphasis on safety, a comprehensive understanding of material properties and critical parameter controls, and a mastery of proper daily maintenance techniques.
Ready to get started? Let’s systematically unlock the full potential of this powerful machine together, helping you evolve from a cautious operator into a skilled, creative master, and embark on your journey of efficient, precision-driven creation!
I. Introduction
Are you excited, maybe a bit overwhelmed, by the idea of a Laser Cutting Machine? This machine can turn your digital designs into real objects with impressive accuracy.
Honestly, it’s not as intimidating as it looks. Instead, think of it as your ticket to endless creative possibilities—a bridge between digital ideas and things you can actually touch.
Whether you’re brand new to industrial tools or a hands-on DIY fan looking to level up, this guide aims to take you from theory to practical know-how. We’ll focus on four big areas: the science behind laser cutting, safety, understanding materials and parameters, and daily maintenance.
Let’s get into it. You’re about to move from cautious operator to confident creator. Ready to see what this machine can really do?
II. Fundamentals of Laser Cutting Machines
1. How It Works
(1) Core Principle
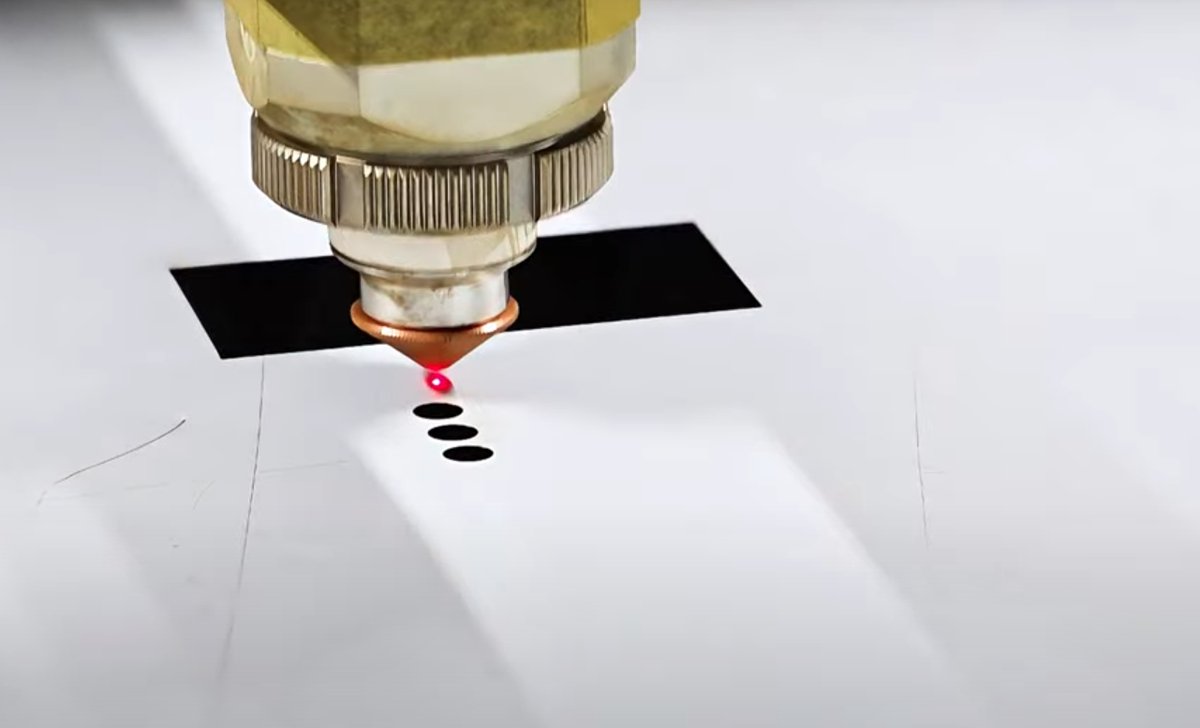
Laser cutting uses a concentrated, high-energy laser beam to heat up a material until it melts, vaporizes, or combusts. A flow of gas blows away the unwanted material, leaving a precise cut.
(2) Operating Steps
1) Laser Generation
The laser generator is at the heart of the machine. It uses a specific medium—like CO₂ gas, fiber, or a solid-state crystal—energized by an external power source to create a focused laser beam.
The beam’s brightness, direction, and coherence make it perfect for industrial cutting.
2) Laser Focusing
After generation, the laser beam passes through an optical system of lenses and mirrors. This setup focuses the energy into a tiny spot, producing intense heat right where you need it.
That’s how you get both accuracy and efficiency.
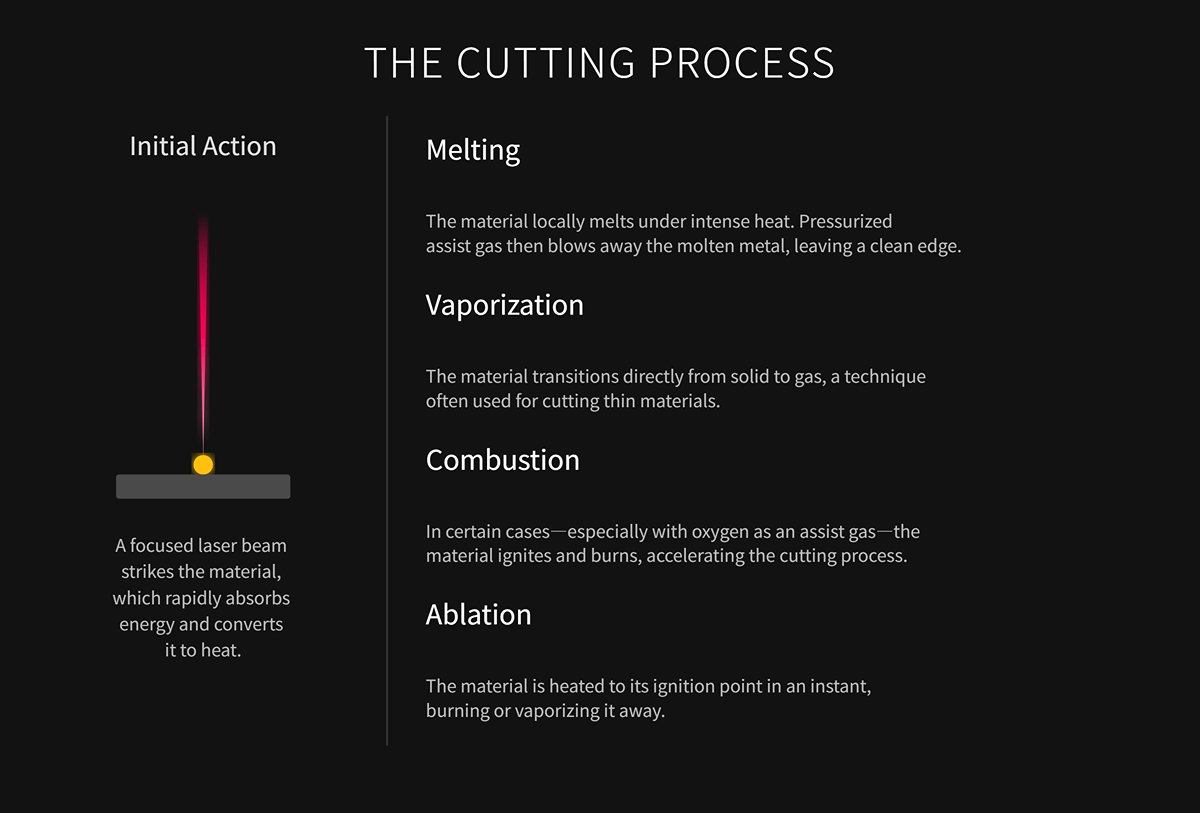
3) The Cutting Process
The focused laser beam hits the material, which quickly absorbs the energy and turns it into heat. Depending on the material and the settings, a few things can happen:
- Melting: The material melts, and the assist gas blows away the molten metal, leaving a clean edge.
- Vaporization: The material jumps from solid to gas, which works well for thin materials.
- Combustion: Sometimes, especially with oxygen, the material burns, speeding up the cut.
- Ablation: The material heats up so fast it burns or vaporizes instantly.
4) The Role of Assist Gas
Assist gas is essential in laser cutting, and it does a few jobs:
- Slag Removal: It blows away melted or vaporized bits, keeping the cut clear.
- Cooling: It cools the cutting area and the laser head, so you don’t get warping or damage.
- Chemical Reaction: Oxygen, for example, reacts with the material to boost cutting speed. Nitrogen, on the other hand, prevents oxidation for a cleaner edge.
2. Key Components
(1) The Laser Generator
The laser generator creates the high-energy beam needed for cutting.
There are three common types: fiber lasers, CO₂ lasers, and YAG solid-state lasers.
Fiber lasers, with a wavelength around 1.06 microns, are efficient and great for cutting metals like carbon steel, stainless, aluminum, and copper. They’re the go-to for industrial metal work, with machines like the Single Table Fiber Laser Cutting Machine leading the way.
CO₂ lasers, at about 10.6 microns, are better for non-metal materials.
YAG lasers also work at roughly 1.06 microns and can handle thicker metals, but they’re pricier and don’t last as long. Inside the laser unit, you’ll find the pump source, gain fiber, reflectivity gratings, beam combiners, cladding strippers, and splicing points—all working together for a steady, quality laser.
(2) Optical System
After generation, the laser travels to the cutting head through the optical system.
This system uses collimating mirrors, reflective mirrors, and focusing lenses to align and focus the beam.
The focusing lens shrinks the beam to a tiny spot, increasing energy density for that intense, localized heat. Things like transmittance, reflectivity, focal length, and heat resistance affect cutting quality and reliability.
Protective lenses inside the cutting head keep splatter and debris away from delicate optics, helping the machine last longer.
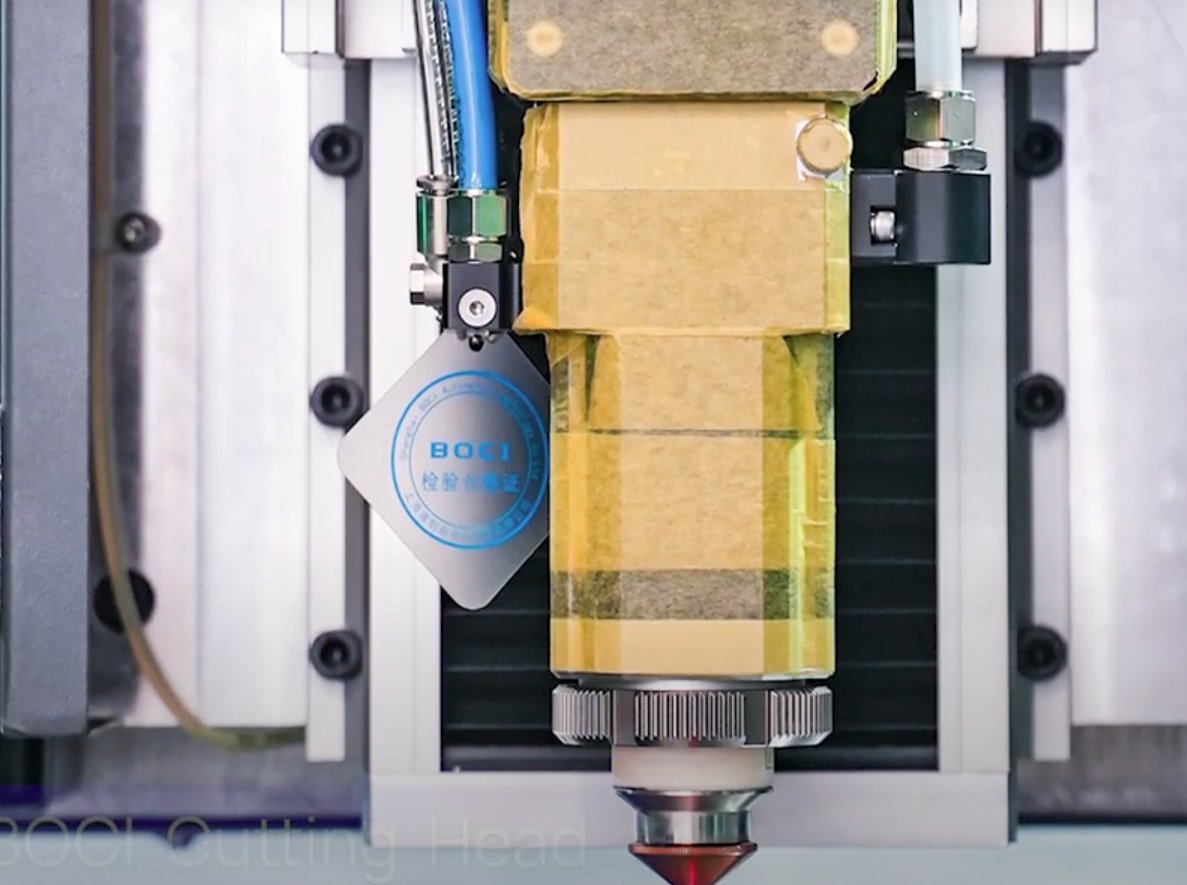
(3) Cutting Head
The cutting head is where the action happens. It holds the optics, focusing lens, nozzle, capacitive height sensor, and protective glass.
The nozzle channels the laser and directs assist gas to blow away molten metal, keeping the seam clean.
The capacitive height sensor monitors the gap between the nozzle and the material, adjusting focus automatically. This keeps the laser spot right where it should be, even on bumpy surfaces.
(4) Motion Control System
The motion control system includes the CNC controller, motors, guide rails, and transmission parts. Together, they move the cutting head with speed and precision.
With feedback devices and closed-loop control, the system tracks the correct path. It also handles acceleration, multi-axis sync, and path interpolation—all crucial for accuracy and speed.
(5) Cooling System
Most laser cutters use a closed-loop water cooling system. Circulating pumps move coolant through the laser generator and optics to keep things cool.
The system has pumps, pipes, reservoirs, and sensors. Keeping temperatures steady means reliable laser output and longer equipment life.
(6) Assist Gas System
You’ll pick different gases based on the material and the job. There are shielding and cutting gases.
Shielding gas, often nitrogen, protects optics from debris. Cutting gas, like oxygen for metal, helps with combustion for faster cutting. Nitrogen is also used for clean, oxidation-free cuts.
| Gas | Applicable Materials | Advantages | Disadvantages and Considerations |
|---|---|---|---|
| Air | Carbon steel, stainless steel, aluminum alloy, wood, etc. | Low cost, widely applicable, low risk | No acceleration effect, no protective capability for the cutting edge |
| Oxygen | Carbon steel, low-alloy steel, thick plates | High cutting speed, significant combustion support | Cutting edge easily oxidizes and blackens, safety risks in operation |
| Nitrogen | Stainless steel, aluminum alloy, copper alloy | Prevents oxidation, smooth cutting edge, reduced heat-affected zone | High cost, large consumption, requires industrial-grade supply |
| Inert Gas | Titanium alloy, copper, and special materials | Protects cutting edge, minimizes heat-affected zone | High cost, difficult to prepare, narrow application |
(7) Sensors
This category covers position sensors, temperature sensors, and pressure sensors. Position sensors follow the movement and location of both the platform and the cutting head. They help keep everything moving precisely—no surprises there. Temperature sensors step in to keep an eye on both the laser and the cooling water. If anything starts to get too hot, these sensors catch it before it turns into a real problem. Pressure sensors, meanwhile, look after the gas assist system. They help keep things stable and safe during the cutting process.
3. Core Concepts
(1) Operation Types
1) Vector Cutting
Laser vector cutting uses a high-power, low-speed laser beam that follows pre-designed vector paths. The beam heats specific areas of the material until they melt or vaporize, creating complete and precise cuts.
This method works well for jobs that need to cut all the way through materials, like structural components, parts, or frames. You'll usually get clean, smooth edges and sharp contours, and it's often quicker than engraving.
People commonly use AI and DXF vector file formats for these two-dimensional outlines.
2) Raster Engraving
Raster engraving is a bit different. Here, the laser head scans across the material line by line, following a bitmap image.
It uses low power and high speed to etch patterns or text onto the surface, giving a shallow relief effect. The laser's intensity changes based on the grayscale values in the image, so you can get a lot of detail and different shades.
This technique shows up a lot in signage, artistic decoration, and photo engraving. For raster engraving, JPG and PNG bitmap formats are standard.
Vector cutting needs higher laser power and slower speeds so the material gets fully cut through. You have to adjust the focal point carefully if you want those clean edges.
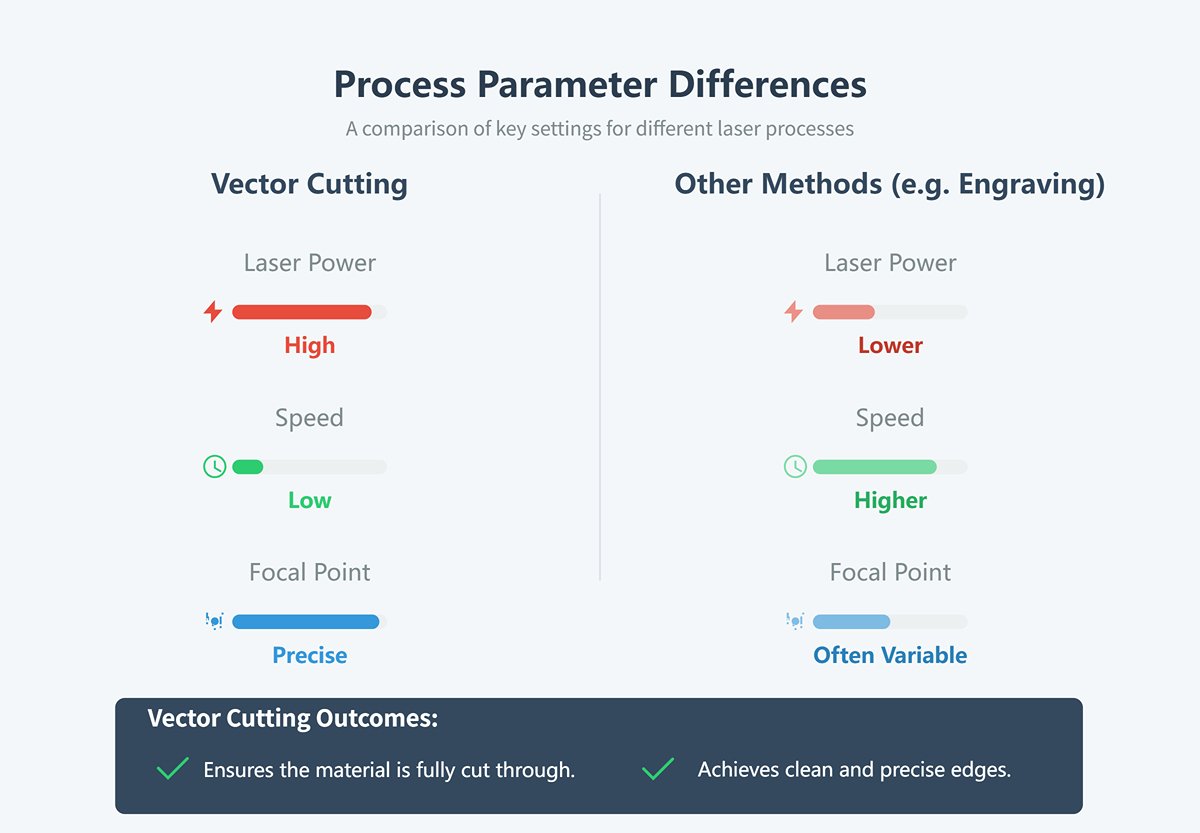
In contrast, raster engraving generally uses lower power and higher speeds, etching the surface through multiple scans. The focus may be slightly offset to create different texture effects.
(2) Key Parameters and Their Impact
1) Laser Power
Laser power sits at the core of laser cutting. It determines how much energy the laser beam delivers every second.
Power sets the upper limit for the thickness you can cut. More power means you can blast through thicker stuff—think about how slicing a 20mm carbon steel plate takes a lot more oomph than a skinny 1mm stainless sheet.
For any given thickness, boosting power lets you speed up the cut. You can move faster and still get a clean edge, which is great for productivity.
But cranking up the power isn't always smart. Thin sheets don’t need much, and too much juice just melts things too wide, messes up the edges, and leaves stubborn slag on the back. It's a balancing act—matching power to the material and thickness really matters for getting the job done right.
Here's a table showing the kind of power you’ll need for different metals:
| Parameter | Fiber 3000 | Fiber 4000 | Fiber 6000 | Fiber 8000 |
|---|---|---|---|---|
| Output Power | 3,000 W | 4,000 W | 6,000 W | 8,000 W |
| Mild Steel (Max. Cutting Thickness) | 20 mm | 20 mm | 25 mm | 25 mm |
| Stainless Steel (Max. Cutting Thickness) | 12 mm | 15 mm | 30 mm | 30 mm |
| Aluminum (Max. Cutting Thickness) | 12 mm | 20 mm | 30 mm | 30 mm |
| Brass (Max. Cutting Thickness) | 6 mm | 8 mm | 15 mm | 15 mm |
| Copper (Max. Cutting Thickness) | 6 mm | 8 mm | 12 mm | 12 mm |
2) Cutting Speed
Cutting speed is basically how fast the laser head moves along its path. This speed controls how long the laser hits each spot on the material.
If you set the speed too low, the laser dumps too much energy into each area. That leads to "overburning," which just means the cut gets wider, the edges melt badly, and the surface turns rough.
You'll also see a lot of slag building up at the bottom of the cut. Not ideal.
But if you go too fast, the laser doesn't have enough time to do its job. Sometimes it can't cut all the way through, or the cut trails off and gets spotty—especially near the end.
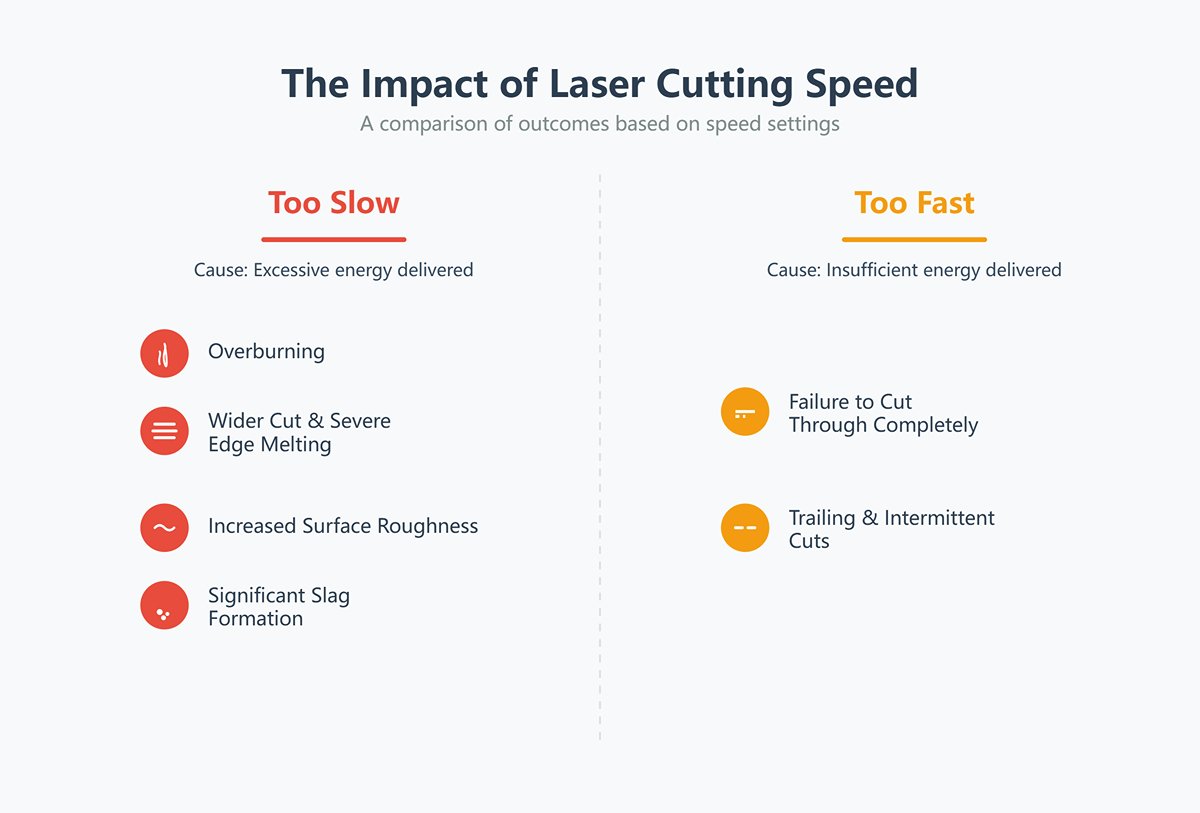
It is crucial to match the cutting speed closely with the laser power. Given a fixed power level, there is an optimal speed range. Within this range, you can achieve narrow, smooth, and nearly slag-free cuts.
Take stainless steel, for example:
| Power (W) | Cutting Thickness | Gas Used | Speed (mm/s) |
| 500 | 1mm Stainless Steel | Nitrogen | 200 |
| 700 | 1mm Stainless Steel | Nitrogen | 300-400 |
| 1000 | 1mm Stainless Steel | Nitrogen | 450 |
| 1500 | 1mm Stainless Steel | Nitrogen | 700 |
| 2000 | 1mm Stainless Steel | Nitrogen | 550 |
| 2400 | 1mm Stainless Steel | Nitrogen | 600 |
| 3000 | 1mm Stainless Steel | Nitrogen | 600 |
To explore equipment specifications that can enhance your operations, you can download our Brochures.
3) Focal Position
The focal position is all about where the laser beam actually focuses compared to the surface of the workpiece.
When you change the size of the laser spot, you end up controlling the power density—that's just how much power hits each bit of the material.
This detail makes a big difference in how clean or precise your cut turns out.
| Focus Type | Focus Position | Characteristics and Principle | Main Applications | Cutting Effect / Advantages |
|---|---|---|---|---|
| Zero Focus | Focus is exactly on the workpiece surface | Highest surface power density, smallest spot size. | High-speed cutting of thin plates, surface engraving. | Achieves the narrowest surface kerf width. |
| Positive Focus | Focus is above the workpiece surface | Lower surface spot size, larger lower spot size, facilitates molten material removal. | Cutting thick carbon steel plates. | Wider kerf at the bottom, aiding in slag discharge. |
| Negative Focus | Focus is below the workpiece surface | Laser beam "converges" as it penetrates the material. | Cutting thick stainless steel, aluminum, etc. | More vertical cut surface, smaller taper, significantly improved cut quality. |
4. Main Types of Lasers
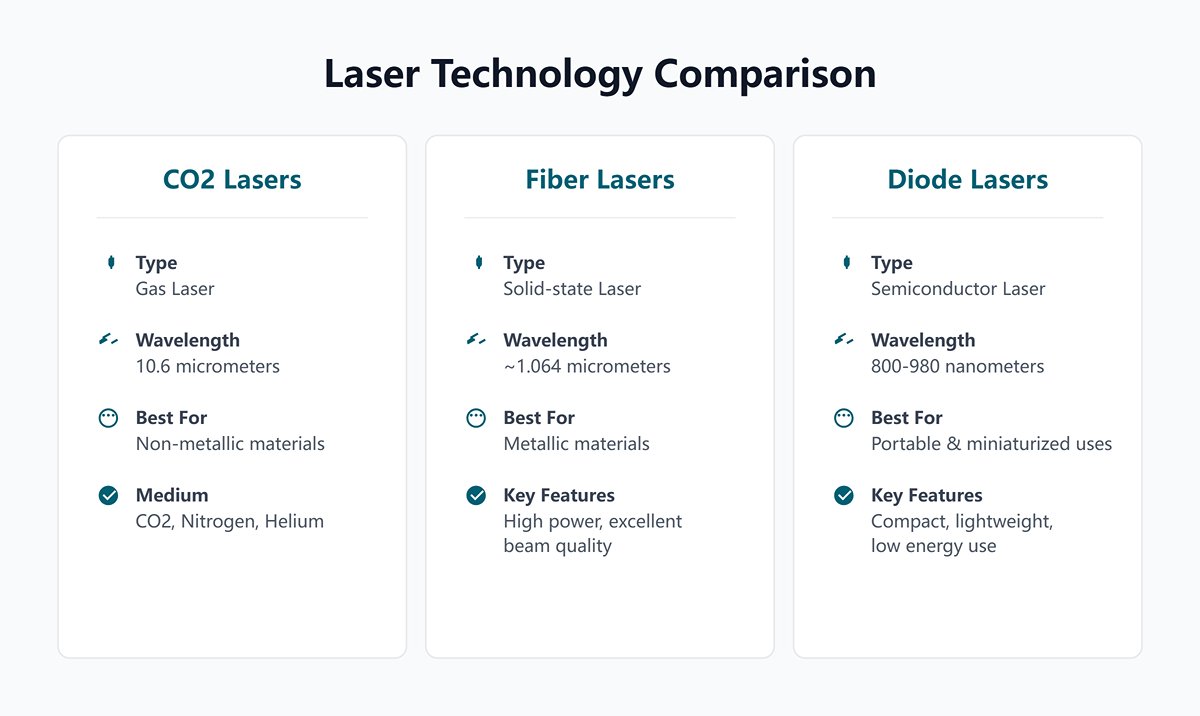
In modern manufacturing, picking the right laser technology really shapes how efficient and precise your process will be. It also affects which materials you can actually work with. If you want to get great results, you’ve got to understand the basics and quirks of different laser generators. That’s just the reality of optimizing how things get made. Curious for a deeper dive? our Types of Laser Cutting Machines covers this stuff in more detail. Let’s look at three of the most common types: CO2 lasers, fiber lasers, and diode lasers.
(1) CO2 Lasers
CO2 lasers use a mix of carbon dioxide, nitrogen, and helium as their lasing medium. They're part of the gas laser family.
The usual wavelength sits at 10.6 micrometers. That makes them especially good at interacting with non-metallic materials.
Honestly, it's no wonder folks turn to CO2 lasers when working with things like wood, plastic, or glass. They just handle non-metals better than most alternatives.
(2) Fiber Lasers
Humanized Output
Copy
Fiber lasers are solid-state lasers that use a fiber-optic gain medium. They usually run at a wavelength around 1.064 micrometers. This wavelength works really well for processing metals. You’ll find that fiber lasers have high power density and great beam quality, so they’re a top choice in metal fabrication. If you need to handle both sheet metal and tubes, a Dual-use Fiber Laser Cutting Machine offers impressive versatility.
(3) Diode Lasers
Diode lasers use semiconductor materials. They're pretty compact, lightweight, and don't need much power.
Because of these traits, you’ll often spot them in portable or miniaturized gadgets. Their wavelength? It usually falls somewhere between 800 and 980 nanometers, which is actually a pretty broad range.
III. Operating Guide
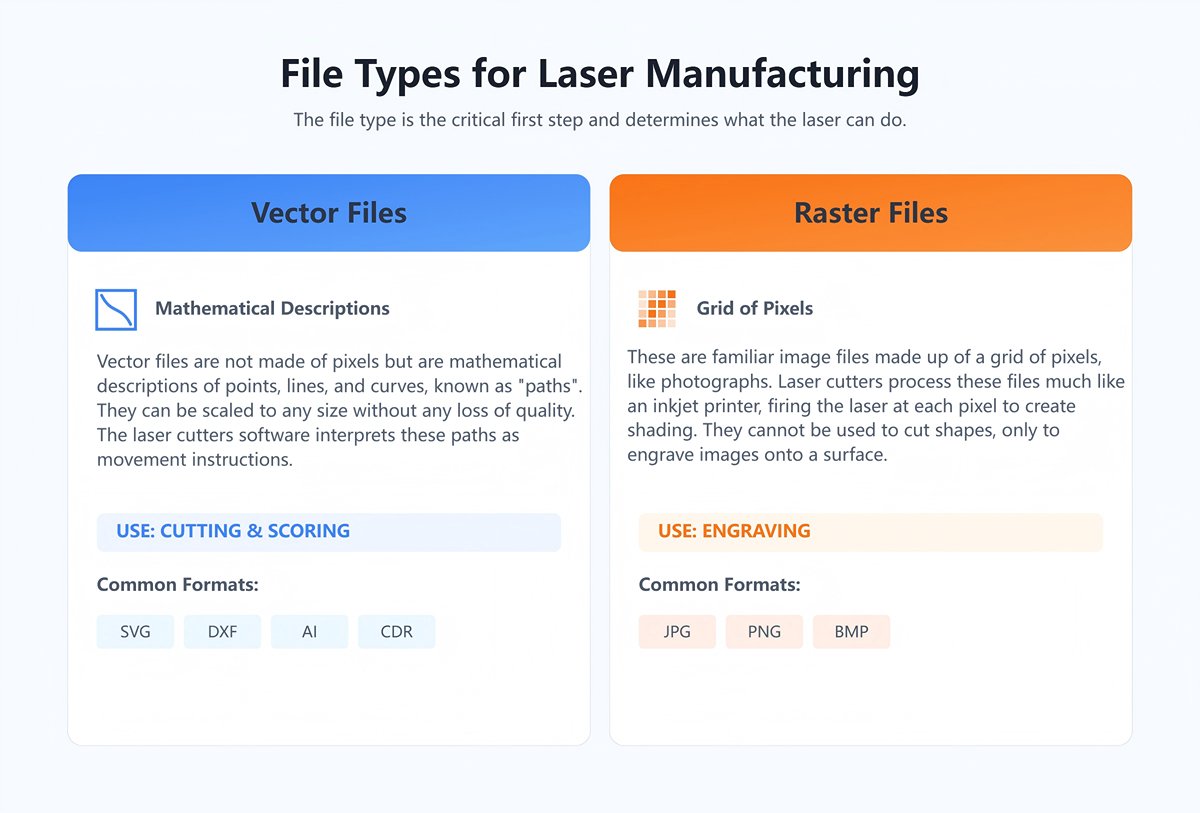
1. Design and File Preparation
Creating the right file is honestly the first big step when you're starting the manufacturing process. The file type you pick really shapes what the laser can do.
Files usually land in one of two categories:
(1) Vector Files
Vector files aren't built from pixels. They're described by mathematical points, lines, and curves—basically, "paths." Since they're formula-based, you can scale vector graphics up or down without any loss in quality. The laser cutter's software reads these paths as instructions for movement.
You'll run into common vector formats like SVG (Scalable Vector Graphics), DXF (Drawing Exchange Format), AI (Adobe Illustrator), and CDR (CorelDRAW). People use these for both cutting and scoring.
(2) Raster Files
Raster files are the classic image formats, made from a grid of tiny pixels—think photographs. JPG, PNG, and BMP are all examples. When a laser cutter handles these, it acts a bit like an inkjet printer, moving back and forth while firing the laser at each pixel to create different shades.
Folks use raster files for engraving. You can't use them to cut shapes; they only engrave the image onto the material's surface.
1) CAD Drawing and Design
You start by creating the specs, shapes, and patterns for your parts in CAD software. It's all about getting the details right from the beginning.
2) CAM Program Generation
Next, import your CAD model into CAM software like Mastercam or PowerMill. The program turns your design into machine instructions—usually G-code.
This code tells the laser cutter exactly how to move. Every little step matters if you want the finished piece to match your design.
A few things to remember when prepping your files:
- Convert all text to outlines. If you skip this, the CNC laser might misread your fonts.
- Double-check that every path is closed. If you leave any open, the laser could stop and leave awkward gaps.
- Keep your design files clean. Only include the paths you need to cut and any essential notes.
- Make sure you scale everything correctly. Wrong scaling? Your parts probably won't fit or work right.
- Check your file format and make sure it's solid. Most machines want G-code or DXF. Always verify your file is complete—missing tool paths can ruin an entire job.
2. Material Preparation and Selection
Pick the right material for your job. Make sure it works with your laser cutting machine.
Here are some common options:
- Metals: stainless steel, carbon steel, aluminum, copper, brass, and others.
- Non-metals: wood, acrylic, plastics, leather, paper, and fabrics.
- Special materials: glass, ceramics, and rubber. These need specific laser settings.
If you're working with metal, fiber laser cutters usually work best. For non-metallic materials, CO2 laser cutters are the way to go.
Double-check the thickness, size, and flatness of your material. If it doesn't match what your machine can handle, you risk messing up the equipment.
After picking your material, give it a close look before you start.
Make sure the surface is clean. Wipe away oil, dust, release agents, sticky stuff, paint, or anything else that could mess with your results or damage the machine.
Think about coatings or protective films too. If a film won't work with your machine, peel it off. Some coatings—like the zinc layer on galvanized steel—can create weird slags when cut, so it's worth deciding if you want to leave them on.
Heads up: Don't use a laser cutter on the following materials:
| Material | Reason |
|---|---|
| PVC (Polyvinyl Chloride) | Releases chlorine gas, which combines with moisture to form hydrochloric acid; highly toxic and corrosive to machine metal components. |
| Polycarbonate | Poor infrared absorption, results in dirty and discolored (yellowish) cuts; easily catches fire, produces dense black smoke, and damages optical components. |
| ABS (Acrylonitrile Butadiene Styrene) | Easily melts, poor cut quality, releases toxic fumes (such as hydrogen cyanide). |
| HDPE (High-Density Polyethylene) | Melts into a sticky, gooey substance, easily catches fire, and emits harmful odors. |
| Polystyrene and Polypropylene Foam | Highly flammable, ignites quickly during laser cutting, posing a high fire risk. |
| Fiberglass and Carbon Fiber Composites | The resin releases harmful fumes that are hazardous to human health and should not be inhaled. |
| Materials with Halogens, Epoxy Resin, or Phenolic Resin | Release toxic and corrosive byproducts (e.g., compounds of fluorine, chlorine, bromine, iodine). |
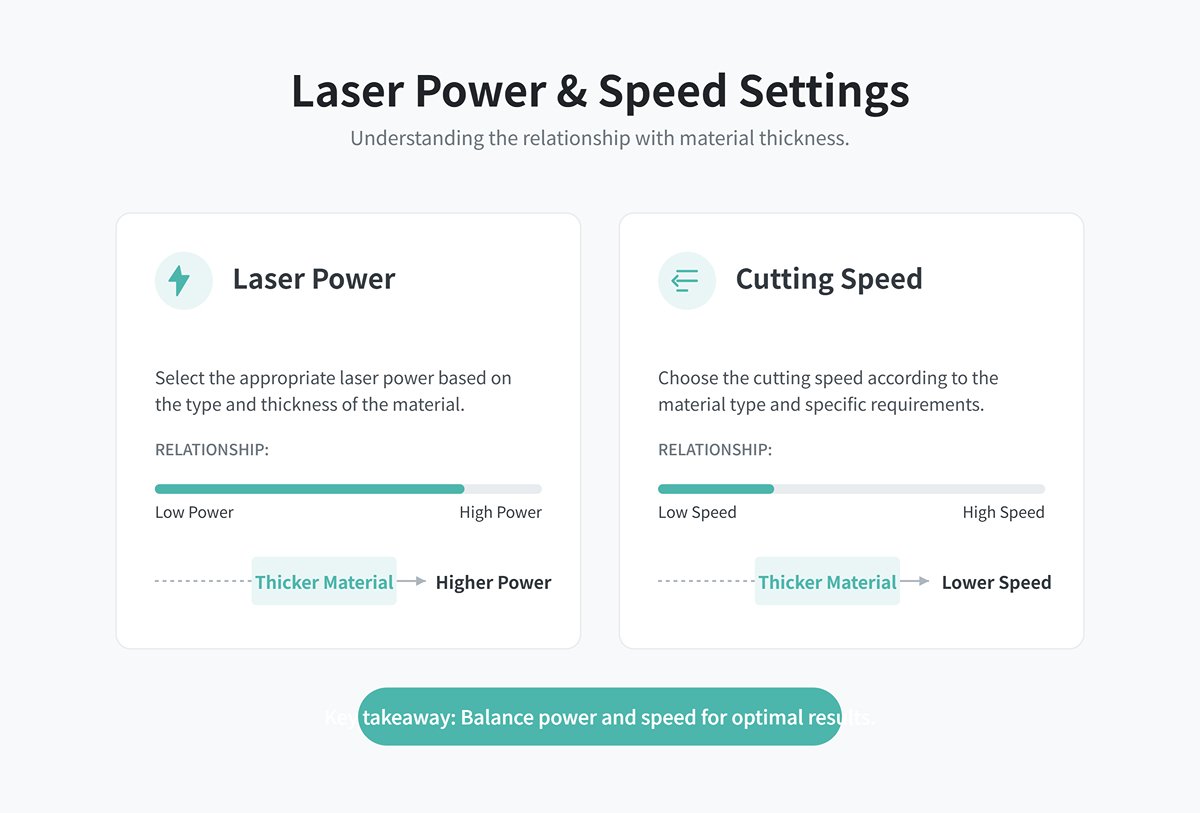
3. Machine Configuration Settings
(1) Power and Speed Settings
Laser Power: Choose your laser power depending on both the material type and how thick it is. Thicker stuff usually needs more power, plain and simple.
Cutting Speed: Adjust the cutting speed to fit what you're working with and what kind of cut you want. Thinner materials can handle faster speeds, but you'll want to slow things down for thicker pieces.
(2) Focal Length and Alignment
Focal Length Adjustment: Make sure the laser's focused right on the material's surface. This little detail can make a big difference in how well it cuts.
Cutting Path Alignment: Try using alignment tools or software to get the laser head lined up with your chosen path. It really helps keep things accurate.
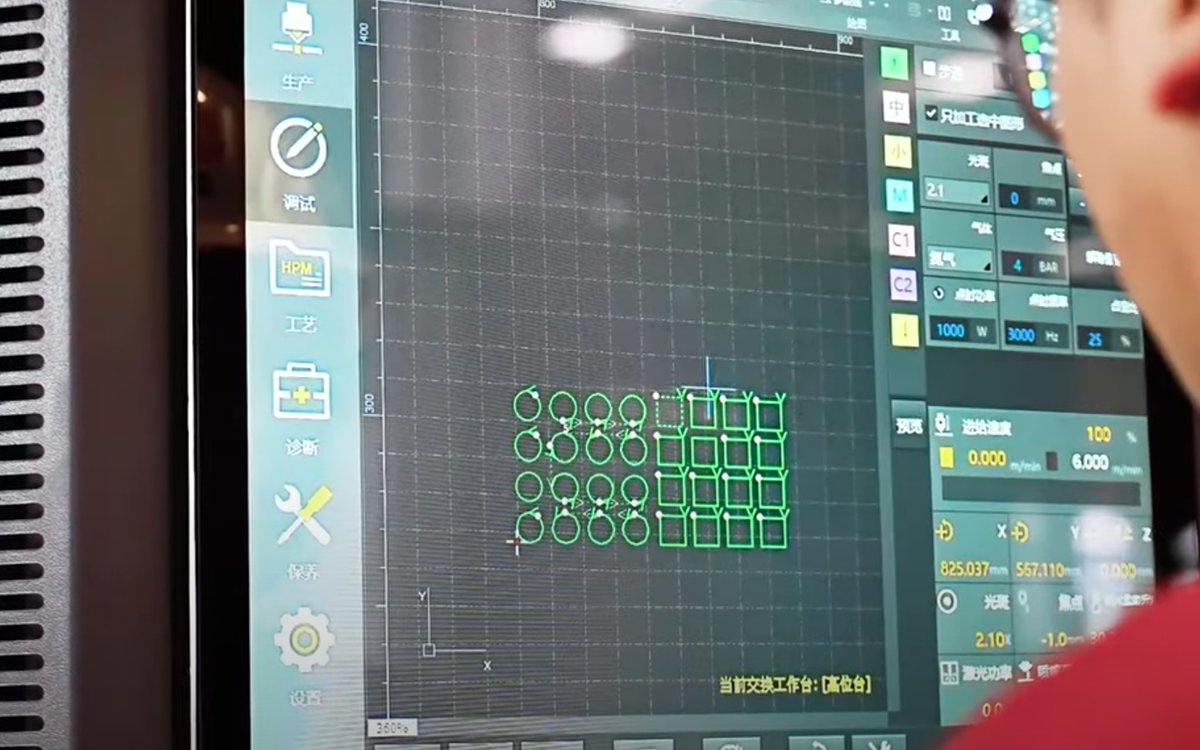
4. Testing and Preview
Before jumping into full-scale production, it's smart to do a test cut on material that's exactly like your final workpiece.
(1) Purpose of Test Cutting
You run a test cut to check if your laser power, cutting speed, and focal length settings actually work. It's a way to make sure your cut quality lines up with what you need.
If things aren't quite right, you can tweak the settings based on what you see in the test. That way, you give yourself the best shot at nailing the final result.
(2) Inspection Criteria
Once you've finished the test cut, take a look at these key aspects:
| Inspection Item | Specific Standards and Requirements | Inspection Methods and Tools |
|---|---|---|
| Cutting Quality | Smooth edges, no burrs; flat surface; no cracks, burns, or melt marks. | Visual inspection, tactile inspection. |
| Dimensional Accuracy | Measure actual dimensions and compare with design drawing tolerances to ensure they are within limits. | Calipers, vernier calipers, micrometers, coordinate measuring machines (CMM). |
| Surface Roughness | Surface roughness (Ra) value of the cut surface meets technical requirements. | Surface roughness tester. |
| Cutting Line Straightness | Cutting line is free from noticeable bends, ripples, or deformation. | Straightedge, straightness measuring instrument, laser alignment tool. |
| Cutting Parameter Validation | Verify current parameters (e.g., laser power, cutting speed, gas pressure, focal distance) are optimal and require no adjustment. | Compare test cut samples and check equipment parameter settings. |
| Material Suitability | Cutting results are appropriate for the specific material (e.g., metal, plastic, wood) with minimal impact on material properties (e.g., heat-affected zone). | Metallographic microscope (if needed), hardness tester, visual inspection. |
| Cutting Consistency | Across repeated cuts, the quality indicators (e.g., dimensions, appearance) remain stable. | Perform at least three repeated cutting tests and compare results. |
| Abnormality Check | No abnormal phenomena during the cutting process, such as excessive smoke, unusual sparks, odors, or equipment noises. | Auditory and visual observation during the process. |
5. Starting and Monitoring the Cutting Process
After you’ve finished the earlier steps, it’s time to move on to the formal cutting stage.
Check that the cutting path’s set, all safety checks are done, and materials are loaded and centered. Now, head over to the machine’s control panel and get ready to start cutting.
The steps for starting a laser cutting machine go like this:
(1) Startup Sequence
Grab the equipment manual or your standard procedures, and power up the device. First, turn on the cooling system. Then, fire up the laser and control systems.
(2) Laser Activation
Hit the start button to get the laser cutting machine going. The laser beam shoots from the cutting head, gets focused by lenses, and lands right on the material’s surface to start the cut.
(3) Activating the Control System
Turn on the control system. It’ll handle the laser’s output power, cutting speed, and other settings automatically, following the programmed instructions.
(4) Starting the Drive System
Set the drive selector switch to “Run.” Press both the drive power and reset buttons.
(5) Homing Operation
Zero the machine axes. Hit the “Axis Home” and “Cycle Start” buttons.
(6) Safety Confirmation
Check that safety mats work as intended. Put up awareness barriers to keep everyone and everything away from the moving gantry.
(7) Program Loading
Load the workpiece onto the table and secure it. Pick the program you want to run.
(8) Test Run
Hit “Dry Run,” then “Cycle Start” to test new programs. This step helps catch big mistakes before you start real production.
(9) Start the Machine
Double-check your settings. When you’re ready, press the “Start” button to kick off the laser cutting.
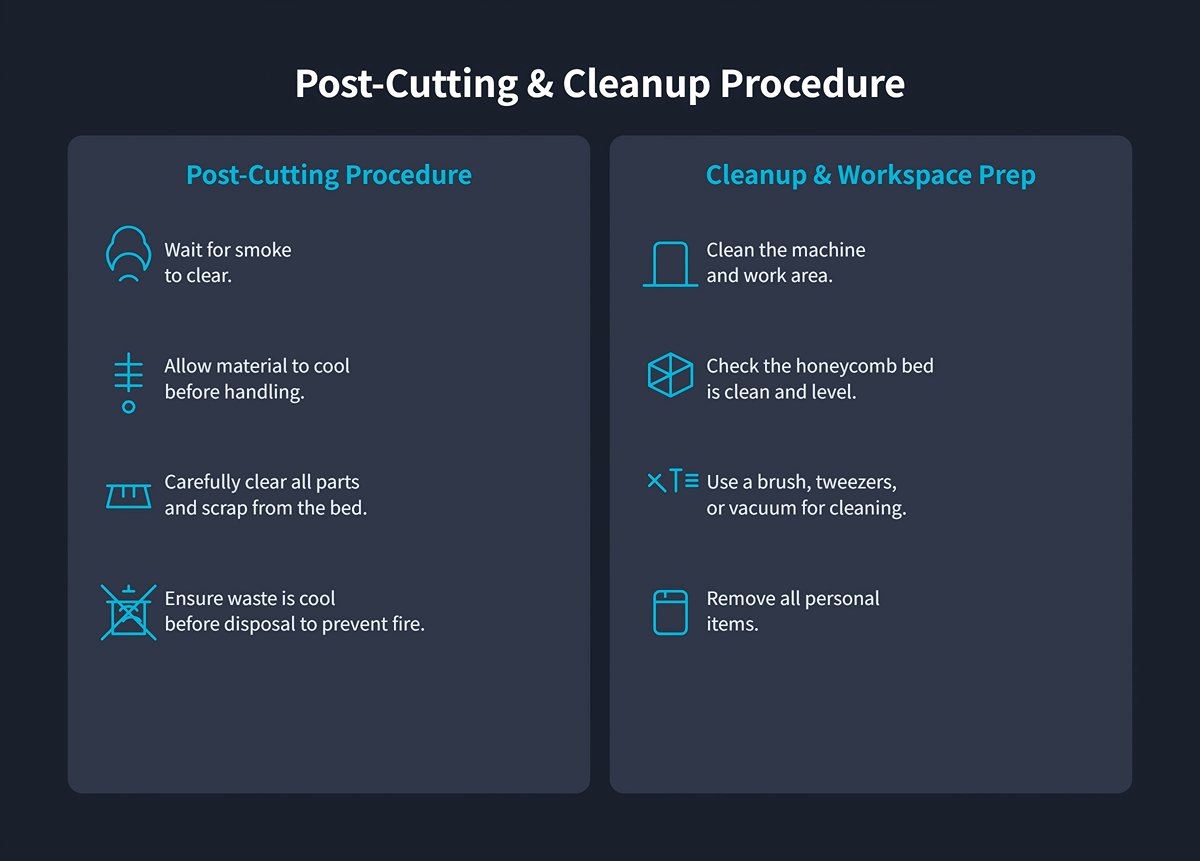
Wait for the smoke to clear before opening the cover. Let the material cool down so you don’t risk burns.
Carefully clean the cut parts and waste from the bed. Make sure any scraps have cooled completely—nobody wants a fire.
Deburr or smooth any sharp edges on finished parts. It’s not just about looks; it’s about safety too.
After unloading, tidy up the machine and work area. Brush, tweeze, or vacuum away debris and check that the honeycomb bed stays clean and flat.
Don’t forget your personal items before you leave. A tidy workspace makes life easier for whoever’s next.
IV. Safety Issues
1. Awareness of Three Major Fatal Risks
(1) Eye Injury
Laser cutting uses a beam that's extremely powerful. Some wavelengths can actually penetrate eye tissue and cause irreversible retinal damage.
This can potentially lead to blindness. Even a quick exposure might have severe consequences.
(2) Fire Hazard
Laser cutting creates a lot of heat. It can melt or even vaporize materials.
All that energy might start fires, especially when you're cutting flammable stuff or working around combustible materials.
(3) Toxic Gases
When you cut materials like PVC or polycarbonate at high temperatures, you can release toxic gases or fumes. Things like hydrogen chloride, carbon monoxide, or dioxins might get into the air.
These gases pose serious health risks to anyone operating the machine.
For a more comprehensive overview of potential risks and mitigation strategies, we recommend Understanding Laser Cutting Machine Side Effects.
2. Mandatory Safety Procedures
(1) Personal Protective Equipment
A standard pair of safety glasses offers virtually no protection against lasers. A full set of Personal Protective Equipment (PPE) serves as your first—and most critical—physical barrier against danger.
1)Professional Laser Safety Glasses
These are the absolute cornerstone of your PPE. Laser damage to the eyes is both permanent and irreversible. You must choose eyewear designed to block the specific wavelength of the laser you are using. The lenses are typically marked with the wavelength range they protect against (OD rating).
For example, glasses made for CO₂ lasers (wavelength 10,600 nm) offer almost no protection against the radiation from fiber lasers (wavelength 1,064 nm). While the laser’s fully enclosed casing blocks most direct and reflected light, wearing the correct safety glasses is mandatory any time the cover is opened for maintenance, calibration, or emergencies.

2)Respiratory Protection Mask
The fumes generated during laser cutting are far from harmless steam—they are aerosols containing ultra-fine particles (PM2.5) and hazardous chemicals. Cutting wood produces tar, while cutting acrylic releases irritating gases.
For this reason, a half-face respirator fitted with an activated carbon filter is strongly recommended. It efficiently absorbs volatile organic compounds (VOCs) and filters out microscopic particles, providing genuine protection for your respiratory health.
3)Protective Gloves
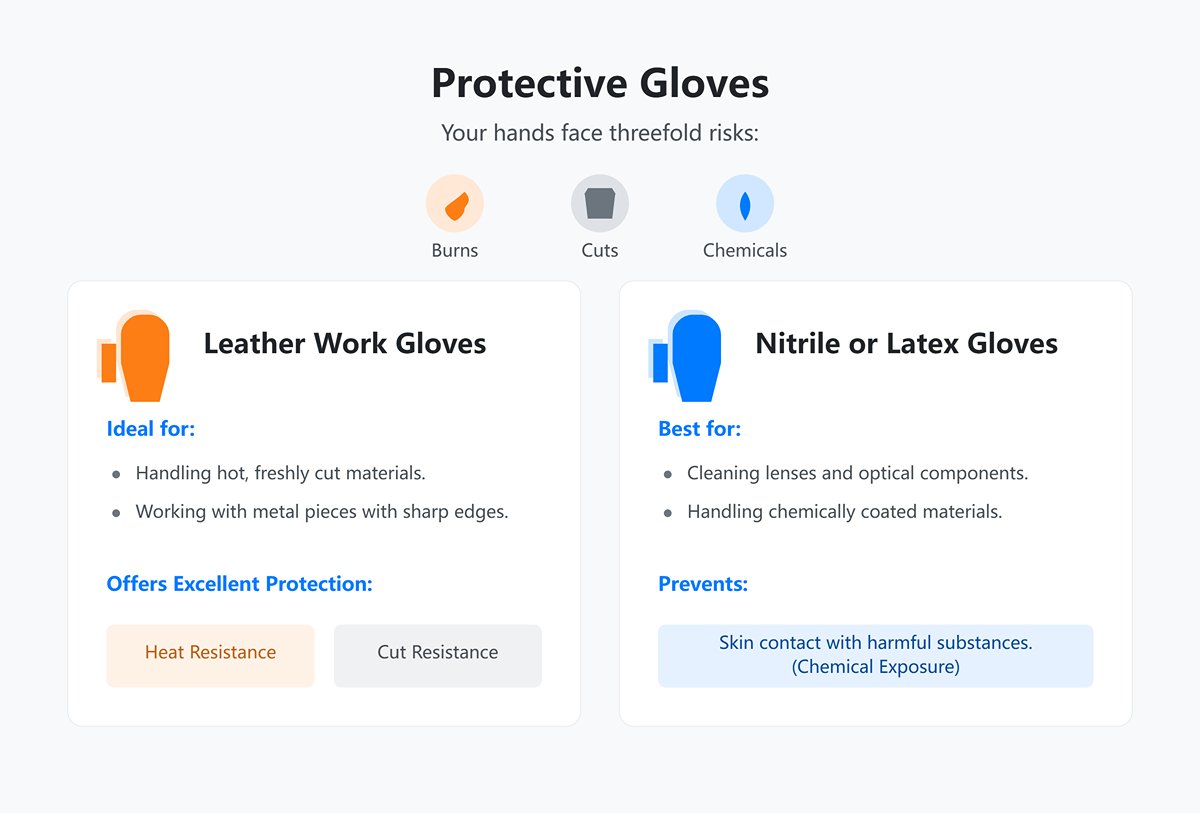
Your hands face threefold risks: burns, cuts, and chemical exposure.
- Leather work gloves: Ideal when handling freshly cut materials that are still hot, or metal pieces with sharp edges; they offer excellent heat and cut resistance.
- Nitrile or latex gloves: Best for cleaning lenses or handling chemically coated materials, preventing both skin contact with harmful substances and contamination of optical components.
(2) Equipment and Environmental Safety Checks
Before each startup, take a few moments for a thorough safety inspection.
1)Emergency Stop Buttons:
Ensure all emergency stop buttons are accessible and functioning properly. Do not skip this step—if even one button is faulty, repair it before doing anything else.
Safety Guards:
Check that every safety cover, light curtain, and interlocked door is in place and working correctly. Never operate the equipment if even a single safeguard is compromised.
2)Ventilation and Exhaust Systems:
Make sure the exhaust system is running correctly. Cutting generates hazardous fumes and dust, so good ventilation is essential.
3)Workspace Cleanliness:
Keep the area around the equipment clean and organized. Remove clutter, flammable materials, and any spilled oil to reduce the risk of fire.
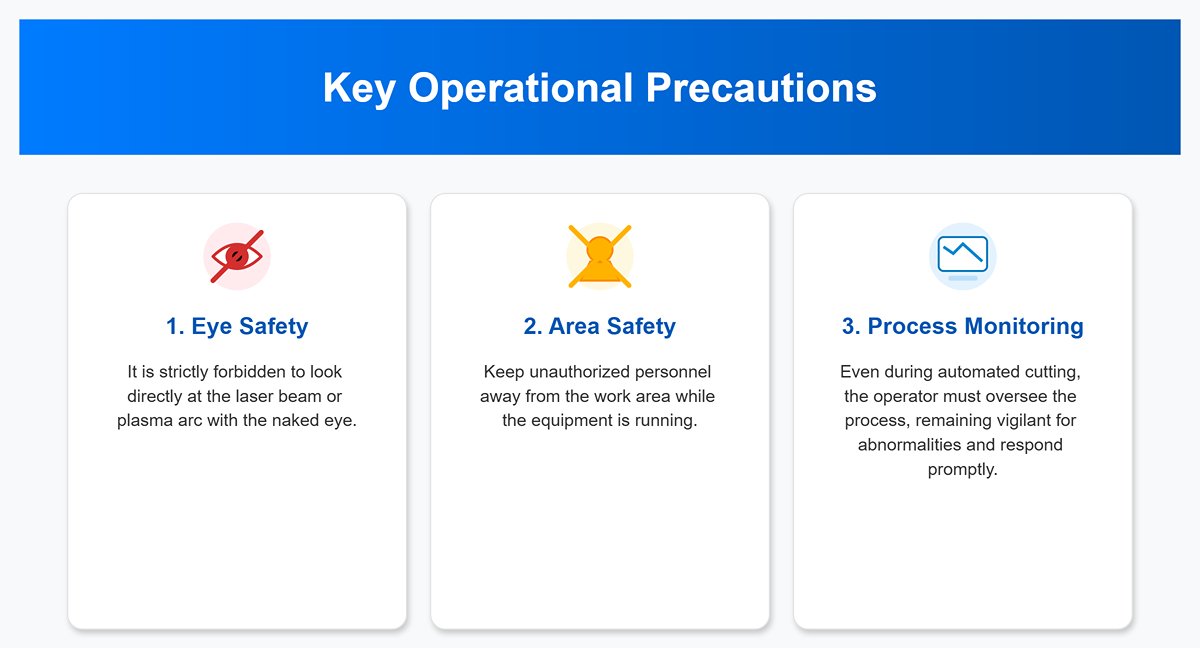
(3) Key Operational Precautions
1)Never look directly at the heat source: Under no circumstances should you ever look directly into a laser beam or plasma arc. Seriously—never.
2)Maintain a safe distance: When the machine is in operation, keep unauthorized personnel well away from the work area.
3)Monitor the cutting process: Even with fully automated cutting, the operator must observe from a safe distance. Stay alert for anomalies like collisions, fires, or poor cuts, and be ready to act immediately if a problem occurs.
(4) Fire Prevention Before Ignition: Creating a Safe Workspace and Emergency Plan
Fire is the most common hazard in laser cutting, especially when working with flammable materials like wood or acrylic. A well-thought-out fire prevention environment and an emergency response plan are key to working with peace of mind.
An efficient ventilation system is fundamental for safety—it must both capture fumes quickly and expel them far away.
1)Capture (Intake System):
Ensure the machine’s built-in exhaust fan is powerful enough and functioning correctly. For high-power or long-duration operations, consider adding an in-line duct fan midway along the exhaust pipe to boost airflow, maintain negative pressure around the cutting zone, and keep fumes from escaping.
2)Expel (Exhaust Outlet):
Keep the exhaust duct as short and straight as possible, minimizing bends, as each bend significantly increases airflow resistance and reduces efficiency.
The exhaust outlet should vent directly outdoors and be placed away from doors, windows, or any other air intake that could draw fumes back inside. Seal all duct joints completely with aluminum tape or clamps to prevent hazardous leaks.
(5) Choosing, Positioning, and Using Fire Extinguishers
A CO₂ fire extinguisher is the only correct choice for a laser cutting workspace. It effectively extinguishes solid material and electrical fires by displacing oxygen and rapidly cooling the flames, without leaving any corrosive or hard-to-clean residue.
In contrast, the powder from a dry chemical extinguisher will infiltrate every crevice of your machine, causing severe secondary damage to optics, rails, and electronic components.
Place the extinguisher within arm’s reach of the machine but also near the emergency exit, so you can grab it instantly in a crisis.
If you notice persistent open flames (not just momentary sparks), hit the emergency stop immediately, then aim the extinguisher nozzle at the fire’s base and discharge in short bursts.
3. Materials Prohibited from Cutting
| Material Type | Main Hazards and Inapplicable Reasons | Released Harmful Substances | Impact on Equipment | Impact on Operator/Environment |
|---|---|---|---|---|
| PVC and Chlorine-containing Plastics | Releases large amounts of toxic, corrosive gases. | Chlorine gas, Hydrochloric acid | Severely corrodes internal components, reduces lifespan, potential downtime. | Severely harmful to operator's health. |
| Polycarbonate (PC) | Melts easily, produces black smoke and toxic gases, poor cutting quality, high fire risk. | Toxic gases, Black smoke | Smoke is harmful to equipment. | Extremely hazardous to operator's health, high fire risk. |
| Halogen-containing Materials (e.g., bromine, fluorine flame retardants) | Releases highly corrosive, highly toxic gases under laser processing. | Highly corrosive and toxic gases (e.g., bromine compounds) | Extremely detrimental to equipment safety. | Extremely harmful to environmental safety. |
| Carbon Fiber/Epoxy Resin/Phenolic Resin | Produces large amounts of dust and toxic gases, difficult to cut, high fire risk. | Benzene compounds, Hydrogen cyanide, Large amounts of dust | Severely damages machinery. | Severely endangers operational safety. |
| ABS Plastics | Produces dense smoke and toxic gases, posing safety and health risks. | Dense smoke, Toxic gases | Dense smoke is typically harmful. | Poses safety and health risks. |
| Lead/Mercury-containing Heavy Metals | Releases toxic metal vapors, high reflectivity. | Toxic metal vapors (e.g., Lead, Mercury) | Laser reflection can damage optical components. | Toxic vapors are hazardous to health. |
| Copper and Copper Alloys | Extremely high reflectivity, difficult to cut, high operational risk. | (Primarily a physical risk) | Easily damages laser optical components. | High operational safety risk. |
| Coated/Painted/Laminated Materials | Coatings and laminated resins release corrosive and toxic gases. | Corrosive and toxic gases | Severely affects equipment lifespan. | Severely impacts environmental safety. |
| Foam Materials and Flame-retardant Foams | Easily produces dense smoke and flames, releases harmful gases, very high fire risk. | Harmful gases, Dense smoke | Fire and smoke are major threats. | High fire risk, harmful gases endanger health. |
Ⅴ. Common Issues and Solutions
1. Cutting Doesn't Penetrate or Fully Cut Through
This is the most common obstacle faced by beginners. The root cause is often not that the machine "lacks power," but that the laser energy is not being delivered to the target point efficiently and precisely.
Here’s how to address it:
(1) Check the Focus
This is suspect number one: even a slight deviation in focal distance can cause the laser's energy density to drop dramatically. A misaligned focus turns a lethal “needle of energy” into a gentle “heat gun,” often resulting in failed cuts.
Immediately use your focus gauge block or autofocus feature to carry out a precise recalibration of the focus. For thicker materials, a common rule of thumb is to set the focal point about one-third of the way into the material’s thickness to achieve straighter cut walls.
(2) Inspect the Optical Path
Cleaning effectively gives you free extra power. The laser beam travels from the tube to the material via three mirrors and a focus lens. Any tiny amount of smoke, oil, or residue along this path acts like sunglasses—absorbing and scattering valuable laser energy.
With the power completely off, use dedicated lens cleaner and lint-free optical wipes, following the manufacturer’s instructions, to gently clean each of the three mirrors and the focus lens (noting their correct orientation). A thorough cleaning often yields better results than a 10% power boost.
(3) Fine-Tune Power and Speed
If the focus and optical path are both in top condition, the issue may lie in your parameters.
Using your current settings as a baseline, try lowering the speed by 10% or increasing the power by 5%. Avoid drastic changes. For materials thicker than 6mm, instead of chasing a one-pass cut with high power and low speed (which often leads to scorching and tapered walls), opt for lower power, higher speed, and 2–3 passes. This often produces cleaner, straighter cuts.
(4) Check Material Flatness
A sheet of plywood that seems flat may actually have a slight bow in the center. This means the actual focal distance can change as the laser head moves, with raised sections falling out of focus and failing to cut through.
Gently press the center of the material to ensure it sits flush on the work table. Use honeycomb pins, clamps, or magnets to secure both the edges and the middle firmly in place.
2. Charred or Burnt Edges
One of the charms of laser-cut wood is its warm, caramel-colored edges. If you’re getting edges that are pitch-black like charcoal, it’s a clear sign heat has lingered in the cut too long, causing overburning.
Here’s how to fix it:
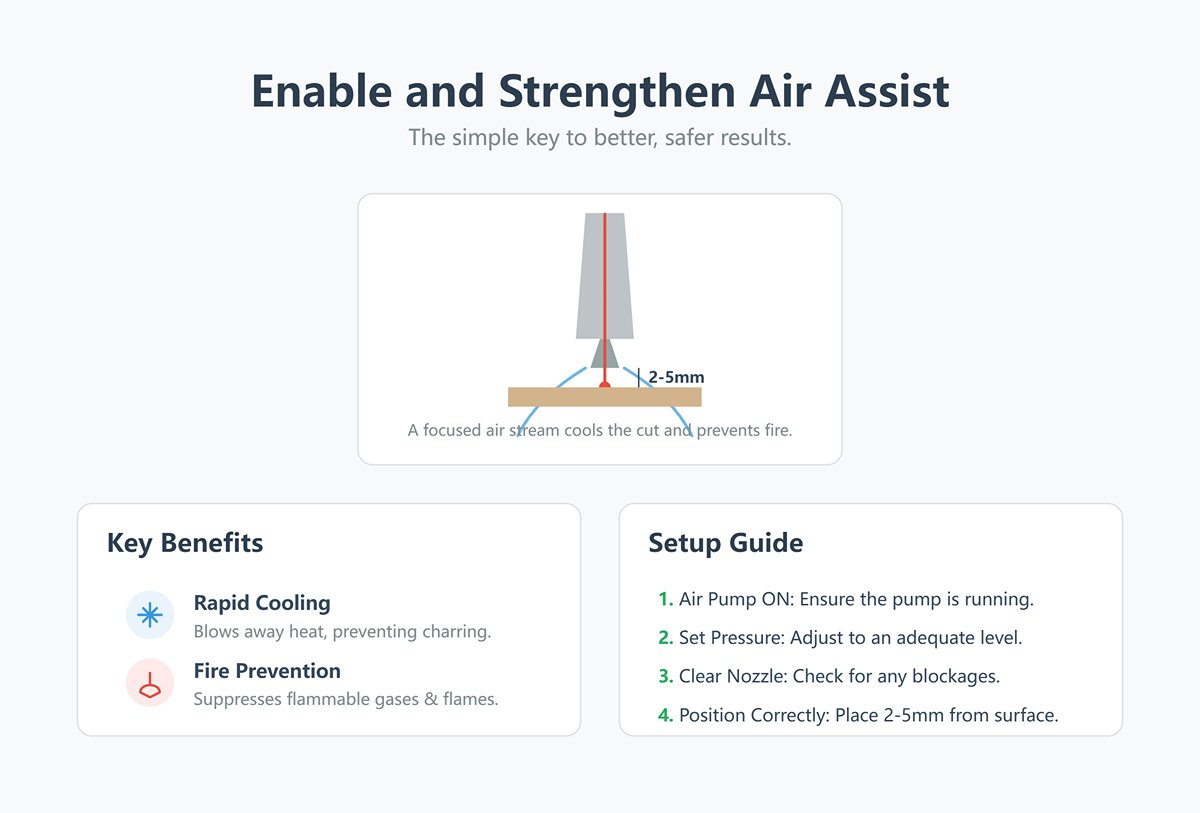
(1) Enable and Strengthen Air Assist
Air assist is the key to cooling and fire prevention—it’s far from optional. A strong, focused stream of air is your first line of defense against charring. It instantly blows away flammable gases and heat as they form, rapidly cooling the cut and actively suppressing flames.
Ensure your air pump is on and set to adequate pressure. Check that the nozzle is clear, and position it as close to the material surface as possible (typically 2–5mm) to maximize air pressure at the cut.
(2) Optimize Speed–Power Balance
While still ensuring full penetration, aim to have the laser “hit and run,” minimizing excess heat buildup.
Try significantly increasing the cutting speed while proportionally increasing the power to find a new balance point.
(3) Clean the Honeycomb Bed
Over time, the underside of a honeycomb bed collects thick tar and resin deposits. When the laser pierces the material, it can ignite these residues, producing smoke that backstains the underside and edges of your cut.
Regularly remove the honeycomb bed and soak and scrub it with a strong cleaner (such as oven cleaner) until it returns to its bare metal finish.
(4) Use Masking Tape
This is a remarkably simple yet highly effective pro tip.
Before cutting, apply a smooth, even layer of painters' masking tape to the material surface—especially for wood and plywood. The tape absorbs most of the top-down smoke and heat. Once cutting is done, peel it off to reveal a remarkably clean surface with noticeably improved edges.
3. Blurry Engravings or Misaligned Graphics
A beautifully engraved piece is defined by sharp details and precise outlines. When your result shows blurring, ghosting, or misaligned lines, it usually points to mechanical precision issues or misconfigured settings.
Here’s your troubleshooting checklist:
(1) Refocus
Clarity in engraving, as with cutting, depends on precise focus. A large, unfocused spot can never render crisp details. Action: for engraving tasks, recalibrate your focus.
(2) Check Belt Tension
Ghosting and misalignment often stem from the X- and Y-axis drive belts. Loose belts create “play” when the head changes direction quickly, resulting in ghost images; overly tight belts increase motor load, causing potential step loss and misalignment.
Lightly pluck the belt; it should produce a low, guitar-like “twang” — taut but not excessively tight. Adjust tension according to your machine’s manual.
(3) Lower Acceleration
Your software’s advanced settings have an “acceleration” parameter. High acceleration can cause overshoot and vibration on sharp engrave moves, rounding corners and distorting lines.
In your machine settings, try lowering engraving acceleration for both X and Y axes by 20–30%.
(4) Clean and Lubricate Rails
Dusty or dry linear rails increase movement resistance, leading to subtle head stutters—which translate to irregular wave patterns in engraving.
Wipe all rails with a lint-free cloth to remove dust and debris, then apply a thin layer of appropriate lubricant according to your machine’s specifications.
4. Parameter Test Matrix
(1) How to Create and Use a Parameter Test Matrix
1)Design the matrix file:
In LightBurn or similar software, create a grid of multiple small squares (e.g., 5×5). Next to each square, engrave its corresponding settings (such as "S:200 P:30") at low power for identification.
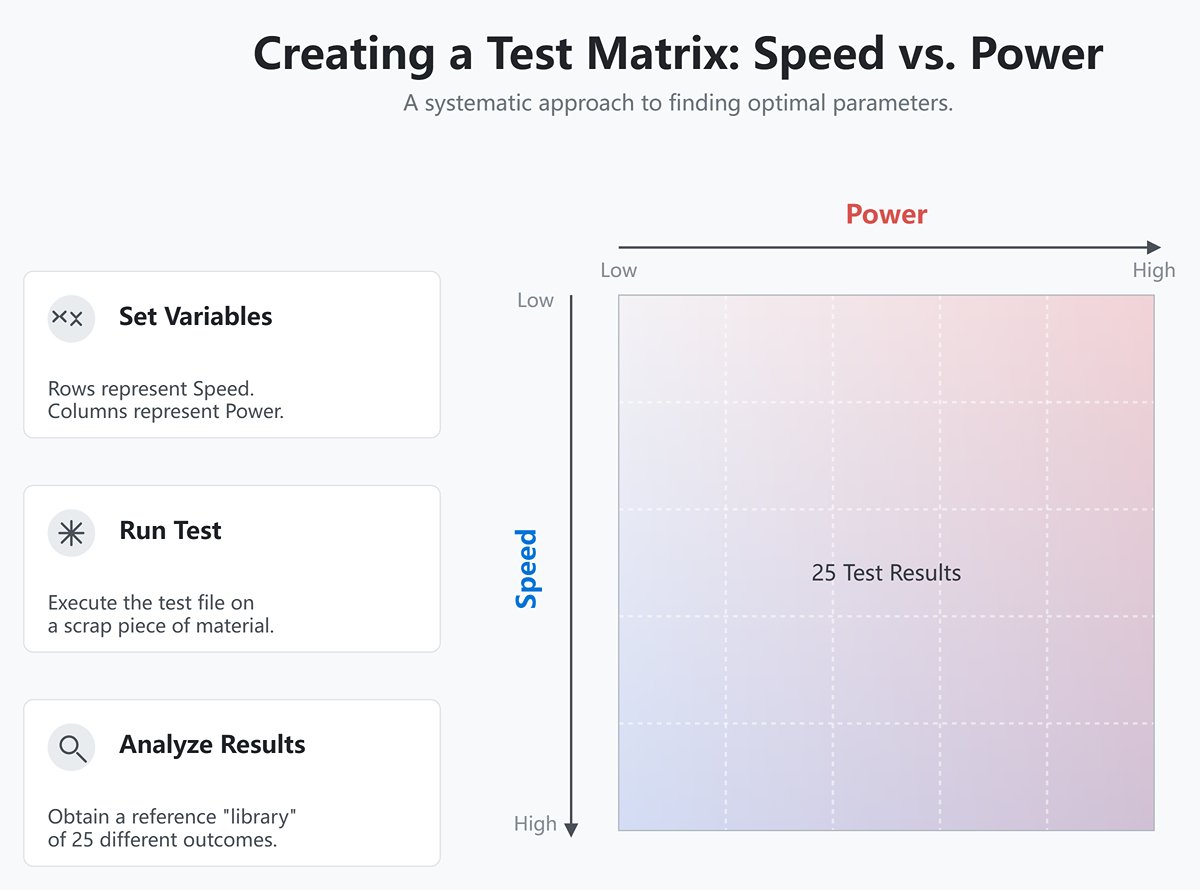
2)Set variable parameters:
The purpose of the matrix is to systematically test combinations of the two key variables: Speed and Power.
Have each row represent a fixed speed that increases from top to bottom, and each column represent a fixed power that increases from left to right.
3)Run and analyze:
Run the test file on a small piece of scrap material of the type you intend to use. When complete, you’ll have a reference “library” of 25 different results.
An example of interpreting a simple cutting matrix for 3mm plywood:
| 20% Power | 30% Power | 40% Power | 50% Power | 60% Power | |
|---|---|---|---|---|---|
| 10 mm/s | Not cut through | Not cut through | Cut through / moderate charring | Cut through / heavy charring | Cut through / fire risk |
| 15 mm/s | Not cut through | Not cut through | Cut through / clean edge | Cut through / slight charring | Cut through / moderate charring |
| 20 mm/s | Not cut through | Not cut through | Not cut through | Cut through / perfect edge | Cut through / slight charring |
| 25 mm/s | Not cut through | Not cut through | Not cut through | Not cut through | Cut through / perfect edge |
Take a close look at this “treasure map.” For cutting, your goal is to identify the square that uses the highest speed and lowest power while still cutting cleanly all the way through, leaving the neatest possible edges. In the example above, 25 mm/s at 60% power might actually be a more efficient and optimal setting than 15 mm/s at 40%.
For engraving, create a similar engraving matrix and look for the square that delivers the exact depth of color and crispness of detail you’re aiming for.
Photograph and archive each “parameter test matrix” you create for every material type and thickness. Over time, you’ll build a priceless, personalized database of settings tailored to your own machine—a decisive step in moving from hobbyist to true professional.
Ⅵ. Conclusion
As a cornerstone of modern manufacturing, laser cutting technology has really changed the game. Its high efficiency, precision, and broad applicability have made it one of the core technologies in metalworking. This article digs into the working principles and main types of modern laser cutting machine. You'll also find key parameter settings and operating procedures.
With correct parameter settings and precise operation, users can maximize both cutting quality and production efficiency. Adhering strictly to safety protocols and performing regular maintenance not only extends equipment lifespan but also minimizes unexpected downtime. Rapid diagnosis and resolution of common issues are crucial to ensuring uninterrupted production.
Daily maintenance and troubleshooting get their own spotlight, offering a practical technical guide. If you're after a hands-on reference, this should help deepen your understanding and boost your efficiency with laser cutting technology. Got questions about supporting your production or process innovation? Honestly, just contact us—we're always happy to chat.


