In the age of automation, the question "Can CNC press brakes be operated manually?" might seem counterintuitive. The industry's focus is squarely on the power of CNC programming to deliver speed and precision. To many, manual operation is a forgotten feature, a relic of a less efficient time.
This perspective, however, misses a critical truth. The ability to operate a CNC press brake manually is not an obsolete skill but a vital, strategic asset. It's the key to unlocking true operational resilience, enabling rapid problem-solving, and in many cases, providing a more cost-effective solution than automation. This guide will demonstrate that mastering manual control is not a step backward, but the ultimate step toward complete command of your machine and process.
I. Dispelling Misconceptions and Redefining Understanding: The Core of CNC Press Brake Manual Operation
In the world of metal forming, CNC (Computer Numerical Control) press brakes have become a cornerstone of modern manufacturing thanks to their unmatched precision, efficiency, and automation. Yet, a persistent misconception remains: if we already possess such a powerful automated “brain,” does this seemingly retrograde manual mode still serve any practical purpose?
The answer is an emphatic yes—and its significance is far greater than most imagine. Manual operation is not just the dividing line between ordinary operators and elite technicians; it is also a form of strategic redundancy and the ultimate safeguard that keeps a production line steady in turbulent times.
1.1 The Direct Answer: Yes—but Manual Is Far More Than “Manual”
To start plainly: Yes, modern CNC press brakes can absolutely be operated manually.
However, this is not a nostalgic return to the days of hand-cranked presses powered by sheer muscle and mechanical levers. The so-called “manual mode” on a CNC press brake (often labeled Manual Mode or Jog Mode on the control panel) is more precisely defined as a command-based incremental control system.
In this mode, the operator does not wrestle with the machine physically, but instead issues direct, real-time command authority over critical movement axes—such as the vertical slide (Y-axis), the backgauge (X-axis), or the crowning and compensation axis (R-axis)—via buttons or foot switches on the control panel.
The essential distinction operates on two levels:
- Difference in Control Core: Traditional manual bending depends on the operator’s strength and intuition, yielding inconsistent results. In CNC manual mode, every command is still processed by the machine’s controller—the intelligent core—and executed precisely through servo motors and proportional hydraulic valves. Even in manual operation, the movements retain digital-level accuracy, stability, and repeatability, far beyond what purely mechanical systems can achieve.
- Difference in Operational Purpose: In traditional manual work, hand operation was the sole way to produce parts. In CNC manufacturing, manual mode serves as a tactical tool—optimal for scenarios where automation may fall short, such as equipment calibration, die alignment, first-piece trials, troubleshooting, or highly specialized bending tasks that conventional programs cannot handle.
1.2 Manual Mode Is an “Advanced Skill,” Not an “Outdated Method”
To dismiss manual mode as outdated is to misunderstand its strategic value entirely. In real-world production environments, proficiency in manual mode is the true litmus test of a technician’s deep understanding of the machine, the material, and the process itself.
If automation solves 90% of standard production challenges, the remaining 10%—the complex, non-standard, and unforeseen cases—is precisely where manual mode shines brightest and where expert technicians demonstrate their greatest value.
The sophistication of manual mode is evident in several ways:
- Conquering “Impossible” Geometries: Certain complex bending sequences may trigger interference warnings or fail to generate viable paths through automated programming. Veteran operators can use manual mode to perform the task incrementally, avoiding tool collisions and achieving bends that automation alone cannot.
- Bringing “Touch” and “Intuition” to Cold Data: Springback is one of the most challenging issues in bending. Though CNC systems offer automatic compensation, material batch variations, uneven thickness, or temperature fluctuations can render presets unreliable. Expert technicians rely on experience to make micron-level artistic adjustments to ram depth (Y-axis) in manual mode, infusing digital precision with human sensitivity to achieve perfect angular consistency.
- Igniting Innovation’s “Rapid Reactor”: During R&D, programming and debugging a full CNC routine for a handful of prototype parts can be costly and time-consuming. Manual operation enables rapid prototyping directly—reducing iteration cycles from hours to minutes and dramatically accelerating the design–verification–iteration loop.
- Acting as the “Machine Diagnostician”: When a machine emits unusual sounds or products show systematic deviation, automated programs will merely reproduce the fault. A seasoned technician switches to manual mode to isolate each axis movement, diagnosing step by step to pinpoint whether the issue lies in tooling, the backgauge, hydraulics, or the servo system.
1.3 Why It Matters: Manual Mode as the Final Safeguard for Production Resilience
In today’s efficiency-driven landscape, Production Resilience—the capacity of a manufacturing system to maintain or swiftly recover output during disruptions—has become a defining measure of competitive strength. Within this context, the CNC press brake’s manual mode functions as a critical final line of defense.

This safeguard operates in several ways:
- A “Bypass Route” for Malfunctions: Imagine a non-core sensor—say a point on a safety light curtain—misfires due to oil contamination, freezing the automated program while delivery deadlines loom. Manual mode provides an emergency detour. Under safe conditions, the operator can bypass faulty signals and complete urgent batches manually, buying time for repair and preventing costly downtime.
- A “Fast Lane” for Production: Suppose a line urgently needs a small spacer or bracket. Interrupting high-volume production to reprogram and change tooling would waste precious efficiency. A skilled technician, using manual mode, can fabricate such items swiftly without affecting the main job, showcasing outstanding flexibility.
- A “Shock Absorber” for Risk: Dependence on any single automated system breeds vulnerability to “single-point failures.” Manual mode effectively serves as a built-in contingency plan. Even if the control system collapses unexpectedly, the line can revert to a basic, controlled level of operation—providing critical buffering against uncertainty.
- A “Guardian of Safety”: At the end of shifts or during machine maintenance, standard operating procedures typically call for manual mode to lower the upper die slowly until it rests snugly on the lower die before cutting main power. This practice safeguards costly tooling and ensures the machine stops in its safest, most stable state.
II. Strategic Application: When Can Manual Mode Create Maximum Value?
If the CNC press brake’s automatic mode defines the upper limit of production efficiency, manual mode sets the baseline for resilience and the ceiling for technical mastery. It is not merely a backup option but a powerful strategic tool. Astute workshop managers and expert technicians know precisely when to activate manual mode to deliver value that automation alone cannot match—in five key situations described below. For more insights on press brake applications and expert guidance, visit ADH Machine Tool.
2.1 Scenario One: Emergency Response and Crisis Management

On a highly synchronized automated production line, even a minor disruption can trigger a costly cascade of shutdowns. Manual mode acts as the “golden key” capable of turning crisis into control.
- Tactical loss control — bypassing noncritical failures: When a secondary sensor—say, a section of the safety light curtain obscured by oil, or a nonessential lubricant level sensor—triggers a false alarm that halts automation, the entire line stops. Yet core components—hydraulics and servo systems—often remain fully functional. A skilled technician can swiftly assess safety risks, switch to manual mode, temporarily ignore the faulty subsystem, and complete the most urgent bending task. This approach functions as a “risk hedge,” using professional judgment and experience to buy the maintenance team valuable time and keep crucial orders on schedule.
- Breaking program loops and enabling “checkpoint recovery”: Complex bending routines may hit logical deadlocks or execution errors due to material anomalies—for instance, thickness variations beyond tolerance. When the system cannot detect an expected positioning signal, production halts. Instead of laboriously rewriting the code, the faster solution is to switch into manual mode, execute the stalled step or two precisely, then resume automatic operation. This works like a “checkpoint restart,” a surgical-style intervention restoring workflow efficiency.
- Safe recovery after an Emergency Stop (E‑Stop): Pressing the emergency stop button locks every motion axis for safety. Restarting automation immediately can cause violent collisions if components are misaligned. The proper sequence is to first verify all faults are cleared, then engage manual mode to carefully reposition the punch and back gauge to a completely safe starting point before reactivating the CNC system. In this process, manual mode ensures a smooth, secure “soft landing” and safe reboot—an essential safeguard for both machine and tooling. To learn more about safe manual operation principles, check can cnc press brakes be operated manually.
2.2 Scenario Two: Agile Development and Prototype Fabrication

During rapid product development and prototype manufacturing, speed and flexibility are far more critical than repetitive efficiency. Manual mode becomes the “rapid response unit” of agile production.
- “Zero-programming” quick prototyping: For a newly designed part, only one or two samples may be needed to verify structural integrity and assembly fit. Writing, optimizing, and testing a complete CNC program could take hours. An experienced technician using manual mode can follow the drawing directly and complete the part within minutes—dramatically shortening the design–validation–iteration cycle. It’s a crucial competitive advantage for companies seeking agility in fast-changing markets.
- Experimental process research: When testing a new material or exploring an unprecedented bending method, properties such as rebound, formability limits, and required tonnage are unknown. In manual mode, a technician can conduct controlled, experimental trials—incrementally increasing bending depth, observing deformation behavior, and recording pressure and angle data. These exploratory steps build irreplaceable empirical foundations for future standardized automated production.
2.3 Scenario Three: Equipment Diagnostics and Troubleshooting

A CNC press brake is a sophisticated mechatronic-hydraulic system. When it “falls ill,” manual mode serves as the most efficient diagnostic “stethoscope,” enabling technicians to pinpoint the root cause swiftly.
- Applying the “controlled variable” method for fault isolation: When bending angles consistently deviate or abnormal noises occur, the automated program merely repeats the error. Technicians can switch to manual mode, break the complex cycle into single-axis motions—controlling Y1 (left hydraulic cylinder) and Y2 (right cylinder) separately to compare speed and pressure stability. This reveals whether the issue lies in the synchronization valve or one cylinder. Likewise, manually moving the back gauge (X-axis) back and forth while monitoring noise helps identify whether lubrication issues or servo motor defects are to blame. This diagnostic approach is both precise and efficient.
- Performing high-precision calibration and verification: After changing tooling or completing annual maintenance, recalibration is needed to restore factory-level accuracy. Manual mode is central to this: the operator lowers the punch gently until it contacts the die, then uses a feeler gauge to check uniformity along the die’s entire length. Based on this, they fine-tune Y1 and Y2 axes individually at the micrometer level—achieving critical parallel alignment between punch and die.
2.4 Scenario Four: Complex Processes and Fine Adjustments
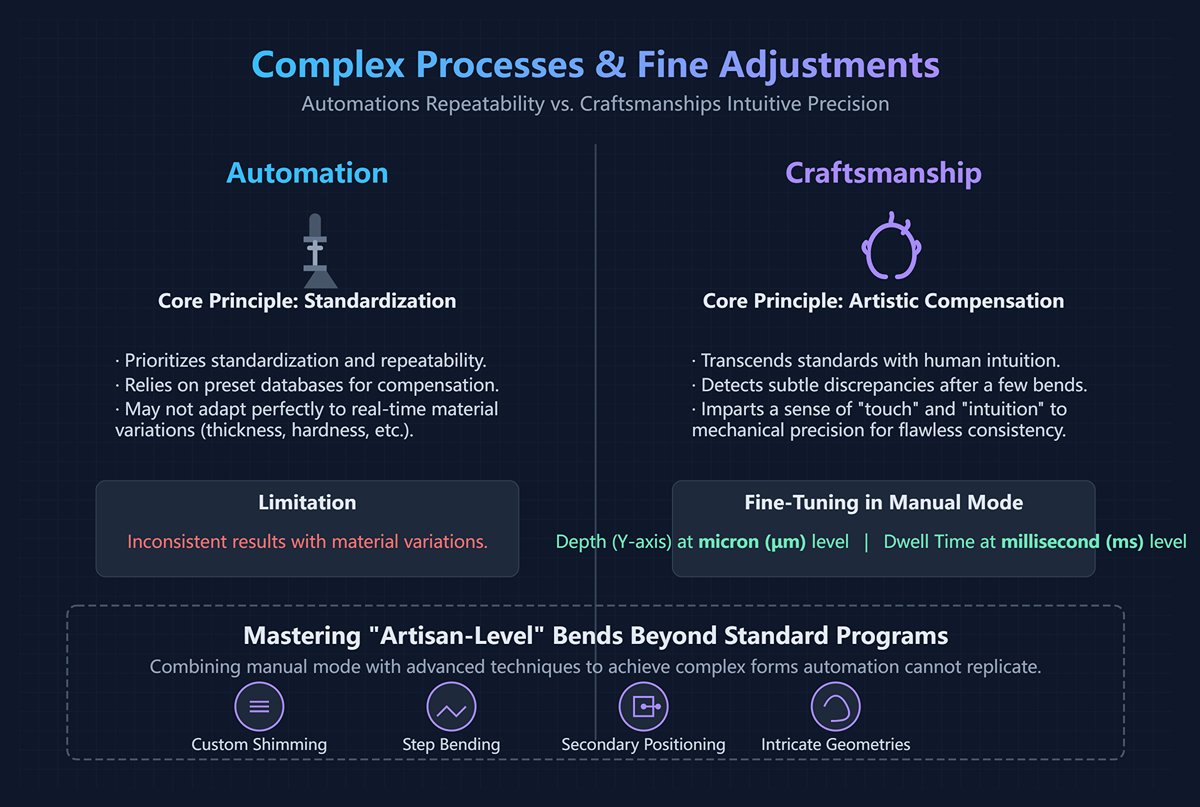
Automation prioritizes standardization and repeatability, while true craftsmanship often stems from transcending those standards through human intuition and precise manual adjustments.
- “Artistic compensation” for material variation: Even within the same material grade, slight inconsistencies in thickness, hardness, or ductility across batches—or within a single sheet—can alter rebound angles. Automatic compensation relies on preset databases and may not adapt perfectly in real-time. Seasoned technicians detect subtle discrepancies after just a few bends and immediately use manual mode to fine-tune depth (Y-axis) or pressure dwell time at the micron or millisecond level. This imparts a sense of “touch” and “intuition” to mechanical precision, ensuring flawless consistency.
- Mastering “artisan-level” bends beyond standard programs: Some nonstandard bends require specialized extrusion or stretching effects, or involve geometries too intricate for one-step automated execution. Through manual mode, combined with techniques like custom shimming, step bending, and secondary positioning, these complex forms can be achieved. Such work surpasses ordinary manufacturing—blending experience, wisdom, and creativity into true “metal craftsmanship” that automation alone cannot replicate. Discover more about CNC press brake innovation in can cnc press brakes be operated manually.
2.5 Scenario Five: Skill Training and Principle Education

Manual mode is the essential pathway for novice operators to grow into expert technicians—and the best classroom for truly understanding how the machine works.
- Opening the “black box” and building intuitive cause-and-effect awareness: In automatic mode, operators typically only know how to input parameters, press the start button, and await results—the entire process feels like a mysterious black box. In manual mode, however, trainees control every 0.1 mm of slide movement themselves and can observe how it affects the bending angle, or see how a 1 mm shift in the backgauge changes flange length. This tangible, muscle-level understanding of how “input” connects to “output” lays the foundation for developing craftsmanship intuition and independent problem-solving skills. No textbook or simulation software can replicate that experience.
- Bridging software and hardware—building complete cognitive understanding: By manually moving each axis, trainees gain a deeper, hands-on comprehension of hardware fundamentals—how the hydraulic system builds pressure, how servo motors achieve micron-level accuracy, how the grating ruler provides real-time feedback, and how synchronization valves coordinate dual-cylinder motion. An operator who only understands software programming but not machine mechanics can never become a true expert. Manual mode serves as that crucial bridge connecting software and hardware, theory and practice—the transformative path from “operator” to “craftsman.”
III. Practical Training: The Ultimate Step-by-Step Guide to Manual Operation on a CNC Press Brake
Theory only proves its worth through practice. If the previous chapters revealed the underlying principles, this chapter focuses on techniques. Mastering manual mode is like an F1 driver mastering manual gear shifting—it’s the ultimate skill that lets you transcend machine limits and achieve true human–machine harmony. This guide will skip empty theory and walk you through every stage—from preparation to mastery—unveiling real-world secrets that go beyond the textbooks.
3.1 Preparation Phase: Safety and Equipment Inspection Checklist
Every power-up is a dual commitment to safety and precision. Manual mode offers tremendous freedom, but it also magnifies potential risks. That’s why a tactical-level preflight checklist is both your first and most essential safeguard before hands-on operation.
| Inspection Category | Key Items | “Something Most People Don’t Know” (Expert Insight) |
|---|---|---|
| Personal Protection (PPE) | Safety shoes, safety glasses, cut-resistant gloves. | Choosing gloves by scenario: When operating control panels or performing precision measurements, wear thin, form-fitting technician gloves for tactile sensitivity. When manually handling or retrieving sheet metal with sharp edges, switch to gloves with higher slip resistance and cut protection. Golden rule: never wear loose or cotton-knit gloves that could get caught in rotating parts while the machine is running. |
| Environment Check | Clean, unobstructed, well-lit workspace. | Map your “oil stain zones”: Think like a detective—closely examine the floor around the machine for any new oil spots. A fresh oil mark is often the earliest sign of a potential hydraulic leak and should be reported immediately. In manual mode, operators move more frequently, and any slippery patch could result in a serious accident. |
| Machine Status (Static) | Emergency stop button, safety light curtain, hydraulic oil level/temperature. | Dig deeper in your E-stop test: Don’t just press it—know what happens next. Does it only cut power to the pump motor, or does it also lock all axes in position? Is reset as simple as twisting the button, or does it require an extra confirmation on the controller? The answer determines how fast you can respond in a real emergency. Light curtain “authorized bypass”: Understand when and how you may temporarily override the light curtain—only under approved and absolutely safe conditions—for advanced manual tasks such as die calibration. This is a prerequisite skill for high-level manual operation. |
| Machine Status (Dynamic) | Homing (reference positioning) procedure. | Listen to the “symphony of homing”: Experienced technicians often close their eyes and listen carefully as each axis returns to zero. Any unusual noise or hesitation may signal poor lubrication, foreign particles, or servo drift. The micron-level precision required in manual mode depends entirely on an impeccably accurate zero point. |
| Dies and Tooling | Clean, undamaged, securely fastened. | Upper die “micro-nod” test: In manual mode, gently tap the upper die tip from the side to check for any slight wobble or “nodding.” Any detectable movement means incomplete clamping, which under pressure could cause major angle deviations or expensive die damage. Lower die V-groove cleanliness obsession: Shine a strong flashlight into the V-groove to check for leftover metallic chips from the previous batch—they’re the hidden culprit behind mysterious surface dents on finished parts. |
3.2 Core Operating Procedure (Using a Common Controller as Example)
While controller interfaces vary across brands, the underlying “grammar” of manual operation is universal. The following workflow, based on logic from mainstream controllers such as Delem, illustrates this common framework.
Enter Manual Mode
- Action: On the controller’s main interface, locate and select the "Manual" or "Jog" mode option.
- Expert Tip: Once in manual mode, your screen transforms into an information-rich dashboard, showing the real-time absolute coordinates of all controllable axes (Y1, Y2, X, R, Z1, Z2). This readout is your key diagnostic and precision navigation tool.
Axis Selection and Control
- Action: Use the touchscreen or physical buttons to choose the axis you wish to move (e.g., the Y-axis for the ram, X-axis for the backgauge). The selected axis will usually highlight, indicating it’s ready to receive instructions.
- Expert Tip: Most advanced systems provide three jog modes—you’ll need to switch between them as intuitively as a driver changes gears:
- Jog/Step: Each press moves the selected axis by a predefined minimum increment (e.g., 0.01 mm). Think of it as your “sniper mode” for ultra-fine alignment.
- Continuous Jog: Hold the button down to move the axis continuously at the set speed; release to stop. Ideal for long-distance motion.
- Handwheel: Rotate the manual pulse generator to control both direction and speed of movement. This is a master technician’s favorite mode—it offers the most tactile, intuitive human–machine feedback, like sculpting metal with your fingertips.
The Core Trilogy: Positioning – Pressing Down – Fine Adjustment
Step 1: Precise Positioning of the Back Gauge (X-Axis)
- Action: Select the X-axis and use “continuous jog” or the “handwheel” to move it quickly close to the target position (for example, 50 mm). In the final stage, switch to “micro-adjust” mode and carefully watch the screen coordinates to stop precisely at the target number.
- Expert Tip: Don’t rush into bending immediately after positioning. Place a flat scrap piece against the back gauge, then manually lower the ram (Y-axis) slightly. Use a feeler gauge to check if the scrap and the punch tip are perfectly parallel at both ends. This simple check can reveal any misalignment between the back gauge and the upper die in advance—preventing conical (uneven) parts before they happen.
Step 2: Controlled Ram Descent (Y-Axis)
- Action: Select the Y-axis. Switch the speed to a safe “slow” or “setup” mode. Step on the foot pedal to let the ram descend smoothly. Just before it touches the sheet, release the pedal and switch to “micro-adjust” mode, allowing the punch tip to make feather-light contact with the material. The Y-axis coordinate displayed at this exact moment is the critical “contact point.”
- Expert Tip: The Mute Point is a crucial parameter for both efficiency and safety. It marks the position where the Y-axis automatically shifts from fast descent to slow pressing. In manual mode, you can precisely locate and set this point a few millimeters above the sheet. Doing so ensures absolute safety while minimizing unnecessary travel time.
Step 3: Artistic Fine-Tuning and Compensation of the Angle

- Action: Starting from the “contact point” coordinate, continue lowering the Y-axis in “micro-adjust” mode. After each 0.1 mm—or even 0.05 mm—of additional descent, measure the bend angle with an angle gauge. For example, if your target is 90°, and your first bend measures 91° (due to springback), it means the press depth is insufficient. Record the current Y-axis coordinate and then incrementally lower it until you achieve a precise 90° angle.
- Expert Tip: This is the essence of manual operation—establishing a direct, quantifiable relationship between the Y-axis depth and the final bending angle for a specific material, thickness, and V-die. Record this data carefully (for example: SPCC cold-rolled steel, 1.0 mm thick, V-die 8 mm, requires a Y-axis coordinate of 58.24 mm for a 90° bend). Over time, these records become your own priceless, experience-based process library—something no automated system can replicate.
3.3 Advanced Manual Bending Techniques for Different Materials
Every type of metal has its own “temperament.” Manual mode gives you the chance to understand and adapt to these unique characteristics—achieving flawless forms through experience and sensitivity.
| Material Type | Characteristics and Challenges | Advanced Manual Techniques |
|---|---|---|
| Low-carbon Steel (e.g., Q235) | Stable performance, minimal springback, excellent ductility. | Establish your “golden baseline”: before bending any new die or unfamiliar material, start by test-bending a piece of the low-carbon steel you know best. Use it to quickly locate an approximate Y-axis coordinate, then fine-tune for your target material’s traits—saving over 50% of your setup time. |
| Stainless Steel (e.g., 304) | Significant work hardening, 2–3× the springback of carbon steel, extremely tough. | Adopt the “step-press” technique: never press down hard all at once. In manual mode, use a “press-pause for half a second-press again” rhythm, repeating two or three times to reach full depth. This gives the internal stresses time to redistribute, reducing unpredictable springback. Listen to the sound—bending stainless should produce a dull, elastic hum. A sharp “click” indicates possible cracking—stop immediately. |
| Aluminum Alloy (e.g., 6061) | Soft texture, easily scratched; some hard grades (like T6) crack at small bend radii. | Remember the principles of “padding” and “gentleness”: for high-finish aluminum sheets, place a polyurethane pad or thick leather sheet over the V-die to prevent surface marks. For hard aluminum, try using a slightly larger V-opening and punch radius than theoretical, and press very slowly to greatly reduce cracking risk. |
| Mirror-finish / Brushed Sheet | Surface perfection is everything—any scratch is a defect. | Combine “scratch-free tooling” with ultra-slow control: use dies with rolling bearings or apply protective film on the sheet surface. Then, operate in ultra-slow manual mode so the punch contacts and presses so gently that no visible relative movement occurs between tool and sheet—physically preventing surface damage at its source. |
IV. Mastering Risk: The Ultimate Safety Protocols and Risk Mitigation for Manual Operation

Can CNC press brakes be operated manually? Manual mode grants operators exceptional flexibility and control—but with that power comes equal responsibility and risk. In automatic mode, safety is largely ensured by machine systems; in manual mode, it rests almost entirely on the operator’s mind, eyes, and hands. Understanding and managing these risks isn’t just essential training—it separates true craftsmen from ordinary operators, often at the line between life and death.
4.1 Root Causes: Why Is Manual Operation More Dangerous?
The risks of manual operation arise from a fundamental shift—the transfer of safety responsibility from the machine to the human. In automatic mode, the operator observes; in manual mode, the operator executes, decides, and serves as the sole safety barrier. This shift introduces four primary risk factors:
- Legitimate Bypass of Safety Systems: During manual tasks such as die calibration, first-part trials, or troubleshooting, operators often temporarily disable or “mute” protective devices like safety light curtains. Although this is part of standard procedure, it means the machine’s most critical “electronic barrier” is momentarily removed. In automatic mode, breaking that barrier triggers immediate stop; in manual mode, that automatic safeguard is no longer active.
- Loss of Predictability: Automated sequences follow fixed, repeatable scripts, letting operators anticipate every move. Manual operation, by contrast, is improvisational and nonlinear—fraught with uncertainty. The slide can descend at any moment, the backgauge can move unexpectedly. This unpredictability greatly increases the likelihood of injury through misjudgment or delayed reaction.
- Zero-distance Contact with Hazard Sources: Unlike safely observing automation from a distance, manual adjustments, measurements, or support of small parts force operators’ hands, heads, or upper bodies dangerously close to the Point of Operation—the zone where hundreds of tons of force are applied in an instant. The available reaction time and safety buffer shrink to near zero.
- Exponentially Increased Cognitive Load: In manual mode, an operator’s mind must act like a high-performance processor—simultaneously interpreting blueprints, making sequence decisions, controlling axis movements, observing material deformation, listening to machine sounds, and monitoring surroundings. This intense cognitive demand leads easily to distraction or fatigue, where even minor mistakes can escalate into serious accidents.
4.2 Identifying Key Risk Points
Recognizing where danger hides is the first step to avoiding it. The following are five critical risk zones during manual operation—areas that demand utmost respect and vigilance.
| Risk Point | Description and the “Fatal Moment” |
|---|---|
| Point of Operation | The most hazardous zone on the press brake—where the majority of crush and amputation incidents occur. Fatal Moment: In manual mode, while adjusting or supporting a small part or checking the bend angle up close, the operator’s fingers might inadvertently enter between the upper and lower dies. Any accidental tap on the foot pedal at that instant can result in catastrophic injury. |
| Backgauge System | The backgauge moves quickly, accurately, and almost silently. Fatal Moment: While the operator’s focus is fixed on the tooling and workpiece at the front, the backgauge—responding to a manual command—may suddenly move at high speed from the rear, creating multiple pinch and shear points that can easily trap or break an arm reaching behind or alongside the machine. |
| Foot Pedal | The foot pedal serves as the trigger connecting operator intent to machine action—and is also the control most prone to accidental activation. Fatal Moment: In manual operation, as the operator moves around frequently, a casually placed pedal may be stepped on by a passing colleague, a dropped tool, or even the operator themselves, unintentionally activating the ram at the worst possible moment. |
| Workpiece | The danger posed by the workpiece is often underestimated. Sharp Edges: The edges of a bent sheet can be razor-sharp, causing deep lacerations. Energy Release: Large or high-strength plates store substantial elastic energy during an incomplete bend. If the material slips or isn’t properly supported, it can spring back or whip out violently like a loaded spring or lever, inflicting serious impact injuries. |
| Tool Change | Manual mode is the only mode for die changes. The upper die—often weighing tens or even hundreds of kilograms—is held in place solely by hydraulic clamps. Fatal Moment: Improper handling or mechanical faults can cause the die to drop suddenly, crushing the operator’s hands or feet. Likewise, manually adjusting tool alignment with fingers between the upper and lower dies is an extremely high-risk action. |
4.3 Ten Golden Safety Rules (Mandatory Safety Checklist)
These ten principles go far beyond basic precautions like wearing PPE. They represent the mindset and practices deeply ingrained in the culture of elite technicians. Print them out, post them by your machine, and review them daily.
- Rule 1: Assume No Guardians When switching to manual mode, operate under the assumption that all electronic safety devices (light curtains, safety gates) have failed and you are the only and final line of defense. Never trust your safety to a sensor that could be bypassed.
- Rule 2: Handwheel is King, Slow is Fast During precision alignment or uncertain operations, always use the handwheel first. It provides the most direct tactile control and ensures minimal movement speed. If inching is necessary, always set the ram to its lowest speed or jog mode. Remember—in manual mode, speed chases accidents.
- Rule 3: The One-Hand Rule Whenever you need to get close to observe or make fine adjustments, form an unbreakable habit: keep your non-operating hand behind your back or in your pocket. This simple gesture physically prevents you from instinctively reaching into danger with both hands and also reduces the risk of electric current passing through your heart in the unlikely event of a shock.
- Rule 4: Eyes on the Tool, Feet off the Pedal When your eyes are focused on the die and workpiece, your feet must instinctively stay off the pedal. Only after ensuring complete safety around you and being ready for the next step should your foot return. Eyes and foot can never be active at the same time.
- Rule 5: Listen to the Machine Manual mode tends to be much quieter than automatic operation, giving you a valuable diagnostic window. Listen carefully to the sounds of hydraulic pumps, servo motors, and mechanical movements. Any abnormal noise—like a hiss (possible hydraulic leak) or a click (mechanical interference)—is the machine’s direct warning. Stop immediately and inspect.
- Rule 6: Secure the Pedal Never allow the foot pedal to “float freely” on the floor. Position it in a fixed location where it can’t be accidentally triggered, and keep its cable neatly arranged. Even if stepping away for just a few seconds, always place the pedal in a safe position—or better yet, unplug it entirely.
- Rule 7: Dance with Giants, Keep Your Distance When handling large sheets, remember that the workpiece itself can be a major hazard. Always stand outside the potential swing or spring-back area and maintain enough clearance to retreat quickly if something goes wrong. Never let yourself get trapped between the machine and the workpiece.
- Rule 8: Never Defy Gravity When installing or adjusting upper dies, never rely entirely on the hydraulic system to hold up a heavy tool. Always use physical safety supports—such as hardwood blocks or dedicated brackets—or lower the ram completely before working. Remember, gravity never fails.
- Rule 9: Authorized Bypass, Two-Person Verification Any temporary bypass of a safety device must be formally authorized and ideally supervised by a second qualified person—such as a shop supervisor or safety officer. This minimizes the risk of careless shortcuts or judgment errors, adding a human “safety lock” to your process.
- Rule 10: End in a Safe State The final manual operation of the day should always be lowering the upper die gently onto the lower die (or onto a wooden block), fully releasing hydraulic pressure, and switching off the main power. This leaves the machine in its most stable, lowest-energy, and safest condition—ready for tomorrow’s use. It’s the ultimate act of responsibility to yourself, your colleagues, and your equipment.

V. Quantitative Decision-Making: The Ultimate Cost-Benefit Comparison — Manual vs. Automatic
5.1 Quantitative Comparison: Efficiency, Precision, and Consistency
This table goes beyond simple qualitative descriptions—it is a data-driven summary grounded in industry-wide datasets and top-tier operational insights, making the contrasts between “manual” and “automatic” instantly clear.
| Comparison Dimension | Automatic Mode | Manual Mode | Core Insights & "Devil in the Details" |
|---|---|---|---|
| Single-Part Efficiency | ★★★★★ (Very high, 10–20 bends/min) | ★☆☆☆☆ (Very low, 1–3 bends/min) | Trap: These figures only hold true for long, continuous runs. In short batches, the programming and setup time fully offset the automation efficiency advantage. |
| Overall Cycle Efficiency | ★★☆☆☆ (Low, suited for small runs only) | ★★★★★ (High, ideal for prototypes or small batches) | Reality: For orders under 10 pieces, the total cycle time from receiving the drawing to producing the first part is often much shorter in manual mode. |
| Repeatable Accuracy | ★★★★★ (Very high, up to ±0.01mm) | ★★☆☆☆ (Moderate to low, depends on operator skill) | Key point: CNC’s precision strength lies in flawless replication—it can reproduce identical parts with exceptional fidelity from the first to the thousandth piece. |
| Adaptive Accuracy | ★☆☆☆☆ (Low, requires reprogramming) | ★★★★★ (Very high, depends on expert skill) | Upper limit: CNC ensures the lower bound of precision, but skilled operators can adjust in real time for material variations, achieving results finer than an unoptimized program could deliver. |
| Consistency | ★★★★★ (Perfect consistency) | ★☆☆☆☆ (Human variability) | Double-edged sword: CNC consistency is both a blessing and a curse — if a program error exists, it replicates that flaw across an entire batch. Manual inconsistency, by contrast, offers ongoing monitoring and immediate error correction. |
| Dependence on Technician | ★★☆☆☆ (Moderate, relies on programming/setup) | ★★★★★ (Very high, relies on experience and touch) | Value: In automatic mode, the operator acts as a “system maintainer”; in manual mode, they are a “value creator.” Human expertise becomes profoundly amplified here. |
5.2 A Different Perspective: When Manual Operation Actually Saves Money
Conventional wisdom suggests automation saves costs by reducing labor. But true cost-control experts understand that in certain high-expense scenarios, switching decisively to manual mode is the smarter—and often more economical—choice.
Scenario 1: Avoiding Programming Preparation Costs
- When it occurs: During prototype builds, customer sampling, or ultra-small-batch insert orders (fewer than 10 pieces).
- Why it saves money: Writing, simulating, optimizing, and verifying a moderately complex CNC program might take one to two hours of engineer or technician time—often more costly than having an experienced operator complete the part manually in 20 minutes. Here, manual mode eliminates the costly “software preparation overhead”, enabling agile, low-cost prototyping that turns new ideas rapidly into tangible results.
Scenario 2: Preventing Costly Scrap Losses
- When it occurs: When using a new mold, new material, or running an entirely new CNC program that hasn’t been fully validated.
- Why it saves money: Even a small programming error or incorrect material springback value in automatic mode can cause dozens or hundreds of expensive sheets—like mirror-finish stainless steel or brushed aluminum—to be scrapped instantly, resulting in thousands of dollars in loss. The most economical solution is to manually produce the first three parts for inspection (First Article Inspection). These manual adjustments help determine the correct parameters before locking them into the CNC program for mass production—essentially spending a few minutes of manual time to buy insurance against an entire batch’s potential waste.
Scenario 3: Avoiding Downtime Opportunity Costs
- When it occurs: When the CNC system suffers a non-critical fault (such as a faulty sensor signal or software freeze) that interrupts automatic cycles while the main drives remain functional.
- Why it saves money: Downtime is outrageously costly—not just idle equipment, but also delayed orders and customer risk. If a bending machine generates 1,000 RMB in value per hour and the service technician won’t arrive for four hours, that’s a 4,000 RMB loss. If a skilled operator uses manual mode for just one hour to produce 50 urgent parts, enabling on-time delivery, that recovers roughly 4,000 RMB in value—far exceeding the negligible labor cost.
Scenario 4: Avoiding Overinvestment Costs

- When it occurs: In small workshops or high-end custom fabrication studios primarily handling repair, customization, or low-volume production.
- Why it saves money: A fully featured premium CNC press brake represents a large capital outlay. If 90% of the workload involves simple, non-repetitive jobs, much of that automation power remains unused—tying up capital unnecessarily. A more efficient strategy is to purchase a simpler NC or entry-level CNC machine and reinvest the savings into hiring and training master technicians. Their manual expertise handles complex or customized tasks more flexibly—forming a smarter, asset-light business model.
5.3 Decision Matrix: A Simplified Guide for Choosing Manual vs. Automatic
With this matrix, operational decisions no longer need to rely on intuition—clarity replaces hesitation.
| Low Complexity / Standardized | High Complexity / Customized | |
|---|---|---|
| Low Volume (1–50 pcs) | Manual Mode (Agility Zone) Reason: Fastest total cycle, no programming required, lowest overall cost—ideal for rapid market response. | Manual Mode (Expert Zone) Reason: Relies on top technicians’ experience and insight to solve automation challenges, often the only feasible approach. |
| High Volume (>100 pcs) | Automatic Mode (Efficiency Zone) Reason: Superior repetitive efficiency and absolute consistency deliver the lowest unit cost—foundation of mass production. | Automatic Mode with Manual Fine-Tuning (Hybrid Zone) Reason: CNC ensures final productivity, but initial manual verification and parameter tuning prevent costly full-batch errors. |
Wildcard Beyond the Matrix: Emergency Situations
No matter which quadrant your task falls into, remember this: whenever an urgent order, equipment failure, or immediate troubleshooting arises, the manual mode can override all usual protocols—it is your ultimate trump card. This mode embodies the most precious and resilient safeguard of your production system—the final line of defense against all uncertainty.
VI. Summary and Action Roadmap
To advance, one must internalize that manual operation is not obsolete but a strategic, high-level skill for critical problem-solving and ensuring production resilience, especially when it proves more cost-effective. This philosophy mandates a pivotal shift in responsibility: for operators, it's an opportunity to become indispensable machine diagnosticians by building a personal process database (our Brochures provide essential technical data) and embodying safety protocols.
For management, it requires creating a system that values this human expertise by investing in training, establishing controlled expert channels, and implementing data-driven decision models—like mandatory first-article manual verification on advanced equipment like a press brake—to scientifically assign tasks and achieve optimal, lean production. If you're ready to optimize your production with this philosophy, contact us today.


