While the question, "Do machinists make press brake dies?" has a simple "yes" for an answer, this response overlooks the specialized craft behind high-quality tooling. A skilled machinist can certainly shape metal, but creating a press brake die—a tool that endures immense force while bending metal with micron-level accuracy—is a different challenge altogether.
This guide explores that challenge. We'll first distinguish between a Machinist and a master Tool & Die Maker, then detail the die's seven-step creation process, from design to final testing. Finally, we will provide a practical handbook for machinists, discuss the strategic "make-or-buy" decision, and outline a clear career path to becoming a tool and die master.
I. Dispelling Misconceptions: Defining the Machinist’s Role in Tooling Fabrication with Precision
In the grand symphony of manufacturing, every participant plays a distinct part. When we ask whether a machinist makes press brake tooling, it’s easy to fall into a common trap: confusing “capable of doing” with “dedicated to doing.” This chapter will cut through the haze, clearly positioning the machinist within this realm of precision manufacturing and providing a well-defined framework for understanding their true role.
1.1 Quick Answer: A Machinist Can—But That Doesn’t Mean They Should or Specialize
Yes, a highly skilled machinist possesses most of the core machining abilities needed to make press brake tooling. They can interpret complex engineering drawings, expertly operate lathes, mills, grinders, and CNC machining centers, transforming raw metal stock into precise geometric forms.
However, that’s only the beginning of the story.
Between “able to make” and “specialized in making” lies a gulf shaped by experience, depth of knowledge, and mindset. A machinist’s mission is typically focused on efficient production execution—following established drawings and programs to consistently produce parts within tolerance. In contrast, producing press brake tooling is fundamentally about high-precision tool creation, requiring the maker to be not only an operator but also a process planner, problem anticipator, and guardian of final accuracy.
Thus, the most accurate answer is: While machinists are vital contributors to tooling manufacture, high-precision press brake tooling is usually led by a more specialized role—the Tool & Die Maker.
1.2 Distinguishing Two Key Roles: Machinist vs. Tool & Die Maker
Although machinists and tool & die makers often work in the same shop and use similar equipment, their professional worlds differ profoundly. If machinists are elite soldiers in the regular forces, tool & die makers are special operations experts handling critical missions. Their distinctions span responsibilities, precision levels, skill breadth, and problem-solving approaches.
| Dimension | Machinist | Tool & Die Maker |
|---|---|---|
| Core Mission | Execution & Efficiency: Follow drawings and established processes to produce components quickly and consistently within tolerance. | Creation & Precision: Oversee the design, manufacture, tuning, and maintenance of complete molds, jigs, and other precision tools, ensuring optimal final product quality. |
| Precision Requirement | High, within standard tolerances: Typically works to ±0.05 mm or looser tolerances, sufficient for functional parts. | Extreme, micron-level artistry: Must achieve ±0.01 mm or finer—several times more exact than a human hair’s diameter (~0.07 mm). |
| Skill Breadth | Specialized in machining operations: Expert in manual and CNC machine tools, process planning, and cutting tool selection. | Cross-disciplinary mastery: In addition to all machinist skills, must excel in materials science, heat treatment, precision grinding, EDM, and tooling assembly/tuning. |
| Problem-Solving | Addresses “process” issues: Handles tool wear, vibration, programming errors to keep production smooth. | Tackles “root cause” issues: Anticipates and resolves physical phenomena like metal springback by refining tool design to ensure spec compliance. |
| Mindset | “How can I make this part as quickly and accurately as possible?” | “Will this tool perform flawlessly for tens of thousands of cycles in the future?” |
An unspoken industry truth is: A skilled machinist secures today’s production, while an exceptional tool & die maker defines tomorrow’s manufacturing capability. The journey from machinist to tool & die maker is a demanding but rewarding career path—one that requires years of deliberate practice and continuous cross-disciplinary learning.
1.3 What Is a Press Brake Tool—and Why Is It So Exceptional?
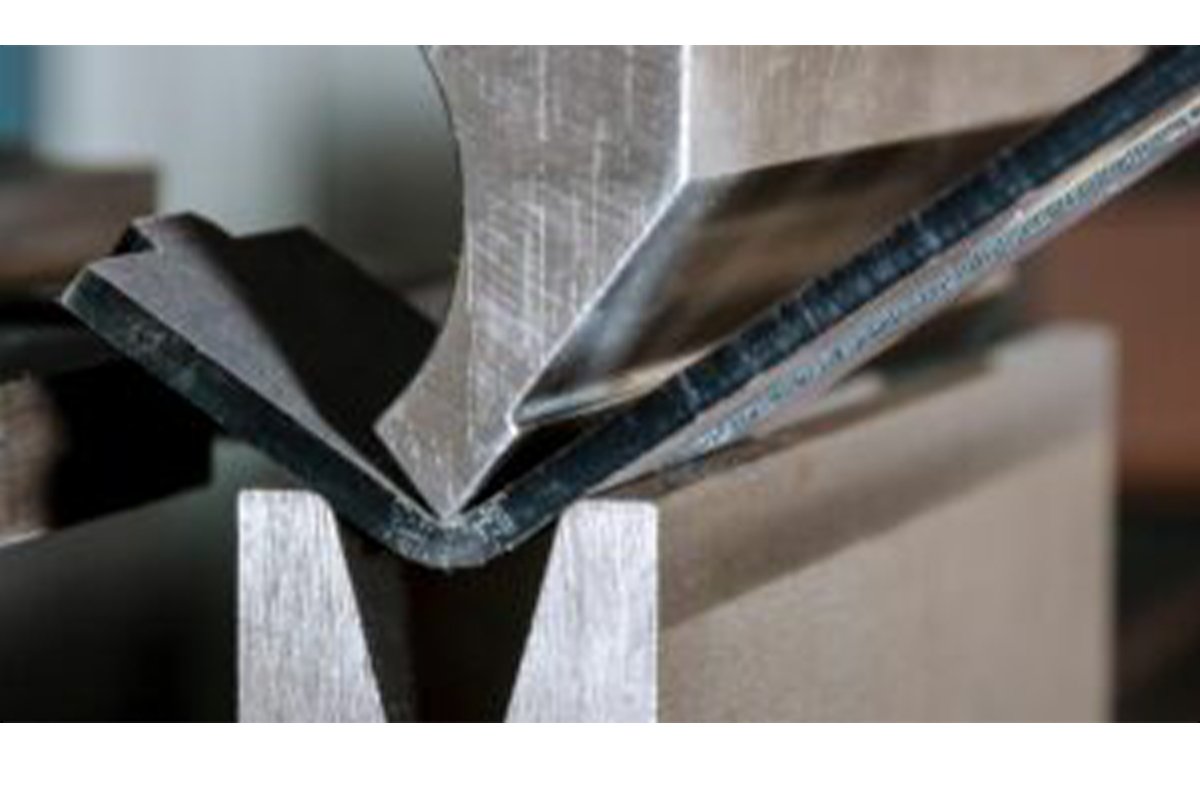
Press brake tooling is a matched set of critical implements mounted on a press brake to bend sheet metal into shape, consisting of an upper punch and a lower die. Its operating principle appears straightforward: immense force drives the punch to press the sheet into the die’s groove. Yet beneath this apparent simplicity lies an uncompromising demand for manufacturing excellence.
Its uniqueness—or “high entry barrier”—is defined by four key factors:
- 1. The Crucible of Material and Hardness: The tooling must endure repeated impacts ranging from several to hundreds of tons. This demands high-strength tool steels such as 42CrMo (akin to 4140) or Cr12MoV (similar to D2). Crucially, precise heat treatment—via high-frequency or laser hardening—must elevate the working surface hardness to HRC 47–60 or higher. This balance of toughness and wear resistance is a delicate art, seeking perfection between fire and ice.
- 2. Geometric Precision as the “Soul”: Every geometric parameter directly shapes the fate of the finished part. The punch tip radius and die V-width together define the sheet’s internal bend radius. A well-known rule of thumb: V-width is typically 6–12 times the sheet thickness. Even minute deviations can cause angle inaccuracies, surface damage, or cracking. For deeper understanding of die geometry, explore do machinists make press brake dies.
- 3. Conquering the Physical Reality of Springback: Metal is not clay—it has elasticity. Once bending force is removed, it partially returns toward its original shape, a phenomenon known as springback. An inferior tool naively designs for 90°, while a professional tool is engineered to 88° or sharper to offset springback, delivering a perfect 90° result. Achieving this requires deep knowledge of material mechanics and extensive empirical testing.
- 4. Mirror-Finish Surface Quality: The working surface finish directly influences product quality. A rough surface can leave permanent scratches on sensitive materials such as stainless steel or aluminum, rendering the product unusable. Thus, after heat treatment, tooling undergoes precision grinding and polishing until the work surface is as smooth as a mirror. For further technical insights into surface finish and die quality, visit ADH Machine Tool.
In short, a press brake tool is far from an ordinary metal part—it is the perfect convergence of mechanics, materials science, and precision engineering. This explains why its fabrication demands the “special forces” level expertise and holistic knowledge of a tool & die maker.
II. A Panoramic View: The Seven-Step Lifecycle from Concept to Completion of Press Brake Tooling
We now understand the unique nature of a press brake die. Let’s embark together on an extraordinary journey to witness how a cold block of steel is transformed, through a series of precise and intricate processes, into an industrial masterpiece that defines product accuracy. This is far more than simple metalworking—it is a grand expedition that fuses modern engineering, materials science, precision manufacturing, and traditional craftsmanship.
2.1 Step 1: Design & Engineering – The Blueprint of Ideas
This is where the die’s life begins—every physical form originates from a digital concept. The seeds of success or failure are sown at this stage. Based on the component’s drawings, engineers carefully weigh dozens of variables, including sheet type, thickness, target bend angle, and internal radius (R), to produce a meticulously planned design.
- Core Tools: Modern die design relies heavily on precise CAD modeling. At the highest level, it incorporates FEA (Finite Element Analysis) simulations. Before a die is ever made, engineers can virtually model how sheet metal will behave under pressure—its stress distribution, forming path, and exact springback prediction. This allows them to refine the design in advance and eliminate potential errors before manufacturing even begins.
- A Detail That Determines Success: Design is not freeform artistry; it must strictly adhere to DFM (Design for Manufacturability) principles. A theoretically perfect design that cannot be produced efficiently and economically is a complete failure. For example, skilled die engineers avoid deep grooves requiring extremely long, slender cutting tools, as these dramatically increase machining difficulty, cost, and scrap risk. To learn how professionals modify dies for better manufacturability, check out do machinists make press brake dies.
2.2 Step 2: Material Selection – The Foundation of Performance

If design is the die’s “soul,” then material is its “genetic makeup.” Material choice directly impacts service life, stability, and cost.
- Mainstream Choices: For most standard applications, 42CrMo (AISI 4140) chromium-molybdenum alloy steel is the undisputed favorite—high strength, excellent wear resistance, and outstanding cost-effectiveness. For extreme pressure or ultra-long service life (such as millions of bends), high-performance tool steels like Cr12MoV (AISI D2) and H13, or even costly tungsten carbide, are chosen without hesitation. Learn more about die materials in do machinists make press brake dies.
- The Hidden Art of Trade-offs: Material selection is not a case of “the harder, the better”—a common misconception. Hardness often inversely correlates with toughness. Overly hard and brittle materials are more prone to cracking or breaking under heavy impact. The engineer’s skill lies in finding the delicate balance between wear resistance (requiring higher hardness) and impact resistance (needing adequate toughness) for the specific application.
2.3 Step 3: Rough Machining – Shaping the Outline
At this stage, a heavy rectangular steel block is roughly shaped into the die’s general form. The aim is to quickly and efficiently remove large volumes of material, leaving allowance for later precision work. The steel is in a relatively soft, annealed state, making it easier to cut.
- Primary Methods: Large band saws, flame cutters, or high-powered CNC milling machines excel here, performing the “rough cut.” Typically, 0.25mm to 0.5mm of machining allowance is left for subsequent operations.
- Key Considerations: Even rough machining is far from brute-force labor. Incorrect cutting parameters or clamping methods can introduce significant residual stress into the material—like planting a ticking time bomb—that may cause unpredictable deformation during later heat treatment.
2.4 Step 4: Precision Machining – Sculpting the Soul
This is the stage where the die’s exact geometric form and dimensions take shape—a core step and one of the most technically demanding. Here, the machinist’s and toolmaker’s mastery is on full display.
- Core Techniques:
- CNC Milling and Turning: Used to produce die contours, mounting interfaces, and other non-critical working surfaces, with extremely high dimensional consistency.
- EDM (Electrical Discharge Machining): The go-to method for cutting hard materials and intricate internal shapes. Wire EDM, in particular, can achieve micron-level precision on any conductive material, regardless of hardness. For dies that are pre-hardened or unusually complex in shape, EDM is often the only viable option.
- Tolerance at the Extreme: High-precision dies require working surface tolerances within ±0.01mm—several times smaller than a human hair’s diameter. Only at this level of accuracy can thousands of bends be performed with every product maintaining identical angles.
2.5 Step 5: Heat Treatment – Forging the Strength
This is the epic transformation from “soft steel” to “hardened backbone,” the most mysterious and challenging step in the entire process. Without heat treatment, a die under the immense force of a press brake would be as fragile as clay.
- Core Process: The precisely machined die is heated in a computer-controlled vacuum furnace to a specific austenitizing temperature (e.g., 1020–1050°C for H13 steel), held long enough to ensure uniform internal structure, then rapidly cooled (quenched) using high-pressure gas or oil to achieve maximum hardness. Finally, multiple tempering cycles relieve quenching stress and fine-tune the hardness–toughness balance.
- A Major Challenge: Heat treatment inevitably causes slight dimensional changes and geometric distortion. Accurately predicting and controlling this deformation is the essence of top-tier heat treatment. Experienced manufacturers will reserve just the right amount of grinding allowance beforehand to compensate for such changes.
2.6 Step 6: Fine Grinding & Polishing – Elevating the Finish
After heat treatment, the die’s surface hardness is extremely high (typically HRC 47–60), making conventional cutting tools ineffective. At this point, precision grinding is the only method to further refine its dimensions and surface quality.
- Primary Equipment: High-precision surface grinders, optical profile grinders (PG), or CNC form grinders are used for the final dimensional adjustments. A highly skilled craftsman can tighten tolerances down to the micron level.
- The Ultimate Purpose of Surface Finish: A mirror-like working surface (surface roughness Ra as low as 0.2 μm) dramatically reduces friction with sheet material. This isn’t just about aesthetics—it’s essential when processing high-value materials like mirror-finish stainless steel or brushed aluminum, preventing any scratches and safeguarding yield while avoiding costly rejections.
2.7 Step 7: Quality Inspection & Trial Run – Validating the Value

This is the final checkpoint before the die leaves the workshop—the ultimate test of all the effort invested throughout its lifecycle.
- Inspection methods: State-of-the-art equipment such as Coordinate Measuring Machines (CMM), laser scanners, profilometers, and high-precision hardness testers act as the “eagle eyes” of quality control. They thoroughly check every aspect of the mold—dimensions, angles, straightness, parallelism, hardness, and surface roughness—ensuring each parameter meets the design specifications without exception.
- The true purpose of trial molding: Once the mold passes inspection, it is mounted onto the press brake for real-world bending tests using actual sheet material. This stage is not merely about confirming the mold can produce compliant parts; it’s the definitive test of whether its springback compensation is accurate under real operating conditions. When a part bent with an 88° die springs back precisely to a flawless 90° after the pressure is released, the mold’s journey from concept to completion has truly come full circle.
III. Machinist’s Field Guide: Mastering the Core Skills of Mold Making
Transitioning from an efficient part producer (Machinist) to a precise tool creator (Tool & Die Maker) is more than a skill upgrade—it’s a leap in mindset. While machinists excel at faithfully executing blueprints, mold makers focus on anticipating the future and creating processes that account for it. This chapter serves as your practical roadmap, turning abstract theory into tangible capabilities essential for producing high-precision press brake molds.
3.1 Essential Machinery and Precision Tool Checklist
“To do a job well, you must first sharpen your tools.” In the micrometer-level world of mold making, the accuracy of your equipment directly extends your capabilities. A high-quality set of machines and personal instruments forms the foundation of your journey toward mastery.
- Core workshop equipment: The backbone of production
- High-rigidity CNC machining center (Milling Center/Lathe): The undisputed workhorse of mold production. Its value lies not only in 3-axis or 5-axis complex machining capabilities but also in structural rigidity and thermal stability—both essential for hard milling and maintaining micrometer-level tolerances.
- Precision surface grinder: The final guardian of accuracy after heat treatment. A grinder equipped with a magnetic chuck, precision dresser, and micrometer-level feed control is key to achieving perfectly flat, parallel, and polished working surfaces.
- EDM (Electrical Discharge Machine) / Wire EDM: The “magic wand” for hardened steel. When traditional tooling fails against HRC 60 hardness, EDM removes material without contact, crafting intricate internal cavities and sharp corners with surgical precision.
- Vacuum heat treatment furnace: The heart that gives the mold its strength. In a non-oxidizing environment, it precisely controls heating, soaking, and cooling curves down to milliseconds, ensuring ideal hardness and toughness while minimizing deformation.
- Personal precision tools: The master’s portable arsenal
- Micrometer (Micron-level accuracy): Measuring in 0.001 mm increments, typically in ranges 0–25 mm and 25–50 mm. More than a measuring tool, it’s a confirmation instrument—the starting point for precision thinking and the ultimate authority in tolerance verification.
- High-precision digital calipers: Ideal for quick reference measurements, but never to be relied upon for final dimensional decisions.
- Dial test indicator: With 0.001 mm resolution, it is indispensable for aligning workpieces on a machine and verifying concentricity—your “eyes” for ensuring machining references are exact.
- Full set of gage blocks: The gold standard of measurement, used to calibrate all tools and set precise distances. A well-maintained set marks the boundary between amateur and professional.
- Honing stones: For manually removing minute burrs and repairing slight scratches—an irreplaceable tool for perfecting fine details beyond a machine’s reach.
- Coordinate Measuring Machine (CMM): Although a workshop asset, every mold maker should master its use. It provides an objective “health report” backed by indisputable data, confirming whether your work meets design intent.
3.2 CNC Programming and Machining Strategies
In mold making, CNC programming has evolved far beyond simple path generation—it’s an integrated art combining cutting physics, material science, and efficiency optimization.
- Beyond G-code: From operator to tactician Mastery of G and M codes is only the foundation; true expertise comes from understanding the physics behind them. For example, knowing that
G01commands linear interpolation is basic—but knowing how to fine-tune feed rate (F) and spindle speed (S) to actively manage cutting forces, temperature, and chip formation is what determines final surface quality and dimensional accuracy. - High-Speed Machining (HSM) philosophy: “Peel the onion” rather than “chop wood” HSM isn’t simply cranking up the spindle speed; its essence lies in maintaining consistent tool load. Using strategies like “small depth of cut, wide step-over, high feed rate” allows you to remove material layer by layer in a smooth, controlled manner. This approach:
- Greatly reduces cutting heat: Prevents surface burning and lowers internal stress within the material.
- Extends tool life: Avoids uneven loading that can cause impact damage or chipping.
- Improves surface finish: Leaves a uniform, fine machining texture.
Modern CAM software features such as “Adaptive Clearing” or “Trochoidal Milling” are powerful implementations of the HSM philosophy.
- Hard milling: The art of dancing on hardened steel Performing precision machining directly on steel hardened to HRC 55–62 is the ultimate test of machine, tooling, programming, and experience. It allows certain EDM or grinding operations to be replaced after heat treatment, dramatically improving efficiency. Success requires:
- Absolute rigidity: The machine, tool holder, and fixture must act as a single solid unit—any vibration is catastrophic.
- Specialized coated tools: Solid carbide end mills with TiAlN, AlCrN, or advanced coatings to withstand the high temperatures in the cutting zone.
- Precise cutting parameters: Typically minimal radial (ae) and axial (ap) depths of cut, paired with high spindle speeds and optimized feed rates.
3.3 The Art of Precision Grinding

Grinding is the “final mile” in mold manufacturing—the stage that gives it a mirror-like finish and micrometer-level accuracy.
- The Wisdom of Wheel Selection: For hardened tool steels such as 42CrMo or Cr12MoV, Cubic Boron Nitride (CBN) wheels are unquestionably the top choice. A crucial point from chemistry: the carbon in diamond wheels reacts at high temperatures with the iron in steel, leading to rapid wheel degradation. CBN, by contrast, is chemically stable, making it the ideal abrasive for ferrous metals.
- Heat Control Comes First: Grinding is an intense friction process, and uncontrolled heat can cause surface burns (softening due to annealing), microcracks, and ultimately ruin the mold. Three golden rules for heat management:
- Flood Cooling: Ensure a generous, clean coolant stream is directed at the grinding zone from the correct angle and with proper pressure. Its dual role is both “cooling” and “flushing” debris away.
- Light, Multiple Passes: Be patient—remove only a few microns of material per pass to prevent rapid heat buildup.
- Regular Wheel Dressing: A dull wheel generates heat through friction rather than cutting. Keeping the wheel sharp is essential for efficient, low-temperature grinding.
- The Secret of Spark-out: To achieve a mirror finish, perform several “finishing passes” after reaching final dimensions. Without increasing depth of cut, let the wheel traverse the workpiece surface several times until sparks vanish completely. This relieves residual machining stress and produces exceptional surface smoothness.
3.4 Common Machining Challenges and Proven Solutions
The journey to becoming a master mold maker is essentially a history of problem-solving. Below are classic challenges every professional encounters, along with battle-tested solutions.
| Challenges & Pain Points | Observed Symptoms | Root Causes & Solutions |
|---|---|---|
| Premature Tool "Failure" | In hard milling, costly carbide tools wear out or chip within minutes, causing runaway costs and inefficiency. | 1. Optimize toolpaths to avoid shocks: Switch to HSM strategies, replacing sharp corners with smooth arcs to maintain consistent tool load. 2. Reduce cutting speed (Vc): Lowering surface speed directly reduces cutting heat and extends tool life. 3. Improve system rigidity: Use shorter, thicker tool holders, minimize tool overhang, and ensure the workpiece is securely clamped. |
| Critical Heat Treatment Distortion | After hours of precision machining, molds come out of heat treatment out of tolerance, warped, or cracked—nullifying all prior effort. | 1. Allowance planning: Before heat treatment, leave sufficient and uniform grinding allowance based on material grade and mold shape (typically 0.1–0.2mm per side). 2. Add stress-relief annealing: Introduce an intermediate annealing step between rough and finish machining to fully release internal stresses. 3. Proper furnace loading and cooling: Support molds correctly in the furnace to prevent deformation from weight; use advanced processes like staged quenching or isothermal quenching to reduce thermal shock during cooling. |
| EDM "Snail-Speed" Efficiency | While EDM offers high precision, its slow pace can bottleneck production. | 1. Separate roughing and finishing: Use one or more sets of electrodes—the first for high-current roughing to remove over 95% of material quickly; then switch to fresh, undamaged electrodes for low-current finishing to ensure accuracy and surface quality. 2. Optimize flushing: Ensure dielectric fluid (kerosene or deionized water) effectively removes debris from the machining area. Poor flushing can cause unstable "carbon build-up discharges," potentially damaging both workpiece and electrodes. |
| Grinding Burn | Mold surfaces show dark, blue, or rainbow-colored spots after grinding. This is more than cosmetic—it signals changes in microstructure and reduced hardness. | 1. Choose "softer" or "more open" wheels: These allow dulled abrasives to shed more easily, exposing fresh sharp grains for self-sharpening. 2. Adjust grinding parameters: Reduce depth per pass while increasing table speed to disperse heat over time. 3. Maintain coolant performance: Regularly filter or replace coolant to ensure purity and flow; contaminated coolant loses much of its cooling efficiency. |
IV. Strategic Decision-Making: The Smart Balance Between In-house Production and Professional Outsourcing
Once you have a clear grasp of the full scope of press brake mold manufacturing, managers and senior technicians inevitably face a core strategic choice: “Do we make these molds ourselves, or contract them out?” This is far more than a simple cost calculation—it’s a battle of wits involving speed, quality, technical depth, risk control, and core competitiveness. A poor decision can lead to delays and cost overruns, while a wise choice maximizes resource efficiency and gives the company a competitive edge.
4.1 When Should Your In-house Machinists Take the Lead?
Handing mold manufacturing tasks to your in-house machining team can unlock exceptional agility and cost-effectiveness in certain scenarios. This doesn’t mean pushing them beyond their skill limits—it means seizing key opportunities when internal production is the smartest move.
- Scenario 1: When speed and immediate response are top priorities
- Typical Cases: Rapid prototyping, frequent design iterations during product development, urgent mold repairs, and fine-tuning.
- Strategic Insight: An internal team can deliver “instant communication, instant modification, instant verification” in a seamless loop. A design tweak requested in the morning might be produced and trial-fitted by afternoon. This extreme agility dramatically shortens the concept-to-production cycle, helping the company seize market opportunities ahead of competitors. Outsourcing, with its inherent communication delays, logistics, and queue times, simply cannot match this speed.
- Scenario 2: When molds are relatively simple and the opportunity cost is low
- Typical Cases: Producing generic V-dies, standard flattening molds, simple positioning jigs, or minor modifications to existing standard molds (e.g., adding relief grooves).
- Strategic Insight: If your CNC equipment or experienced machinists have idle capacity, assigning them these non-core, low-complexity molds is an efficient way to utilize resources. Essentially, you’re converting sunk costs (equipment depreciation, staff salaries) into direct productivity. The cost structure is highly transparent—just materials and actual labor—eliminating the supplier profit margins, management overhead, and business costs inevitably built into outsourced orders.
- Scenario 3: When intellectual property and process secrets demand strict confidentiality
- Typical Cases: Molds tied to your next-generation flagship products, or those incorporating groundbreaking bending processes—designs that are, in themselves, trade secrets.
- Strategic Insight: Mold design blueprints—especially those incorporating non-standard geometries to compensate for specific material springback—represent the distilled outcome of a company’s R&D investment. They form a true process moat protecting your competitive edge. Entrusting such core data to a third party, no matter how rigorous the confidentiality agreement, inherently raises the risk of technical leakage. In-house production is the only way to keep these “crown jewels” that determine your future competitiveness safely under your direct control.
- Scenario 4: When routine repairs and maintenance are essential to ensure uninterrupted production
- Typical Application: Routine wear-and-tear repairs to molds during use (such as regrinding cutting edges) or emergency fixes for minor damage caused by accidental impacts.
- Strategic Insight: A production line shutting down due to a seemingly trivial chipping of a mold’s cutting edge can incur downtime costs far exceeding the mold’s value. An in-house team with rapid repair capabilities can minimize downtime and production losses to the greatest extent. They can even carry out urgent fixes overnight or on weekends, offering a “24/7 on-demand response” that external contractors struggle to match—an indispensable lifeline for sustaining high-volume production.

4.2 When Should You Turn to a Professional Tool & Die Manufacturer?
While the advantages of in-house production are clear, forcing a “do-it-yourself” approach can, in certain cases, be uneconomical or even disastrous, potentially dragging down the entire project. Recognizing the limits of your capabilities and knowing when to leverage external expertise is a higher form of wisdom. In these situations, engaging a professional tool and die shop is the only right choice.
- Scenario 1: When molds are highly complex and demand extreme precision
- Typical Application: Complex upper dies requiring multiple bending angles in a single forming operation; non-standard lower dies with intricate curves to compensate for springback; ultra-wear-resistant molds for processing high-strength steel sheets (such as Hardox); large or structurally intricate progressive dies.
- Strategic Insight: The core value of professional mold makers lies in their accumulated tacit knowledge—skills beyond what’s written in manuals, shaped by countless trial-and-error iterations. They “know” the exact springback for a specific grade of stainless steel bent at 120°, and they “understand” how to fine-tune heat treatment cooling curves to prevent deformation in specific mold geometries. These expertise barriers, built over thousands of practical attempts, cannot be surmounted by an ordinary machine shop in the short term.
- Scenario 2: When lacking specialized equipment or technical expertise
- Typical Application: Extra-long molds (over 3 meters) requiring gantry machining centers to ensure straightness; precision hole systems that can only be produced with a jig grinder; molds needing special surface coatings (such as TiN, DLC) to withstand extreme operating conditions.
- Strategic Insight: Acquiring and maintaining such advanced equipment demands substantial upfront capital expenditure and continuous specialist upkeep. For infrequent needs, outsourcing essentially becomes a form of capability leasing, giving you immediate access to cutting-edge technology and equipment without bearing the high costs, depreciation risks, or lengthy talent development cycles associated with ownership.
- Scenario 3: When internal capacity is maxed out, or large-scale, predictable deliveries are required
- Typical Application: Supplying dozens or even hundreds of new molds for a brand-new high-volume production line; projects with strict, non-negotiable delivery deadlines.
- Strategic Insight: One of the key advantages of professional mold makers is their scalable production capability and mature project management systems. They can produce multiple complex molds in parallel and, drawing on extensive historical data, offer delivery commitments far more reliable than internal estimates. Outsourcing this work allows your valuable in-house technical team to focus on core objectives—product development and process optimization—avoiding overstretching resources and losing efficiency.
- Scenario 4: When risk diversification and leveraging external supply chain networks are necessary
- Typical Application: Molds requiring rare or specially sourced imported tool steels; projects involving multiple complex stages such as heat treatment and surface finishing that demand external collaboration.
- Strategic Insight: A seasoned outsourcing partner is far more than a machining workshop—they are a hub in a proven supply chain network. Behind them lies a stable ecosystem of raw material suppliers, heat treatment specialists, and surface engineering experts. When you face material shortages or technical bottlenecks, their robust supply chain integration can deliver solutions. What you’re buying is not just the mold itself, but an entire, well-established industrial collaboration system—a critical form of risk mitigation.
V. Career Advancement: Roadmap from Skilled Machinist to Master Tool & Die Maker
The journey from an efficient machinist to a highly respected master tool and die maker is not merely a career step-up—it is a profound transformation from “precise executor” to “process innovator.” This path demands that you elevate experience into wisdom and forge skill into intuition. At its challenging end lies not only top-tier financial rewards but also an irreplaceable position as an industry expert. With many veteran craftsmen retiring and leaving a vast skills gap, this advancement path offers you unprecedented opportunities.
5.1 Bridging the Skills Gap: Knowledge Modules You Must Master
Becoming a master tool and die maker requires a leap in thinking—from asking “how do I make it?” to understanding “why must it be designed and manufactured this way?” To achieve this, you need to systematically build four key knowledge modules, connecting isolated skills into a powerful, integrated knowledge network.
- Advanced Metallurgy & Heat Treatment
- Cognitive Upgrade: Evolve from simply “knowing which steel to use” to “understanding why this steel is chosen and how it transforms under fire and ice.”
- Core Knowledge: Develop deep insight into how alloying elements in different tool steels (such as A2, D2, 42CrMo) influence hardness, toughness, and wear resistance. Master the full thermal treatment processes—quenching, tempering, annealing, carburizing—so you can, like a seasoned chef controlling heat, accurately predict and proactively manage dimensional changes and stresses caused by heat treatment. This is no longer about consulting a manual—it’s about anticipating outcomes based on fundamental principles.
- Mastery of GD&T & Advanced Metrology
- Cognitive Upgrade: Shift from using calipers and micrometers merely to “measure dimensions” to employing the language of GD&T to “define and verify functional performance.”
- Core Knowledge: The mold blueprint is the ultimate stage for applying GD&T (Geometric Dimensioning and Tolerancing). You must be able to read and apply it as fluently as a native language. Just as important is mastering precision instruments such as coordinate measuring machines (CMMs), optical comparators, and profilometers to quantify and verify geometric tolerances measured in microns (μm). Here, measurement is not just a task—it is a deliberate, highly refined science.
- Integrated CAD/CAM & Design Thinking
- Mindset Shift: Evolve from a CNC operator who simply executes programs into a hybrid role—part designer, part process strategist.
- Core Knowledge: You should not only be proficient in CAD software (such as SolidWorks or AutoCAD) to analyze and even refine mold designs, but also approach every line and surface with a clear understanding of its functional purpose. In CAM software, your goal will no longer be just generating a collision-free toolpath. Instead, you will strategically craft high-speed machining (HSM) paths tailored for extreme scenarios like hard milling or thin-wall machining—paths that manage cutting forces, control heat buildup, and ultimately deliver optimal surface finishes.
- Forming Process & Physics
- Mindset Shift: This is the “final mile” from skilled craftsman to true master—the leap from knowing what happens to understanding why it happens.
- Core Knowledge: You must deeply grasp how sheet metal behaves under intense pressure—its plastic flow, elongation, work hardening, and, most critically, springback. These are no longer abstract textbook formulas but essential physical intuition you apply when choosing V-die openings or setting bending angles. You’ll learn how to design precise pre-compensations to counteract the metal’s “temper,” ensuring that once released, the part holds its intended angle perfectly.

5.2 Recommended Training & Certification Resources
Depth of theory must be paired with breadth of hands-on experience. Here are key pathways to help you bridge that gap:
- Gold Standard: Apprenticeship
- This is the most traditional—and irreplaceable—route to becoming a master toolmaker. A formal 4–5 year apprenticeship places you under the mentorship of seasoned experts, rotating through all critical roles: design, programming, machining, heat treatment, assembly, and trial runs. This immersive “learn by doing” environment, combined with the transfer of tacit, experience-based knowledge, offers a wealth of insight no classroom can match.
- Accredited Certifications & Online Courses
- Technical College Certificate: Many community colleges and technical institutes offer specialized toolmaking certificate programs. These cover everything from blueprint reading and CNC programming to mold troubleshooting, providing an excellent foundation for building a structured knowledge base.
- Industry Association Certifications: Seek credentials from respected bodies such as the Precision Metalforming Association (PMA) or the National Tooling and Machining Association (NTMA). These certifications carry significant weight within the industry and serve as strong proof of your professional competence.
- Online Training Platforms: Professional portals like ToolingU-SME or TPC Training offer a wide array of specialized moldmaking courses. These are ideal for working machinists to make productive use of fragmented time, enabling systematic skill advancement and knowledge updates.
5.3 Looking Ahead: Emerging Technologies Driving Moldmaking Transformation
The mold master of the future must be both guardian of traditional craftsmanship and visionary adopter of cutting-edge technologies. Mastering the following will position you to thrive in the decade ahead.
- Additive Manufacturing / 3D Printing: Breaking the Rules
- Game-Changer: Conformal Cooling Channels. Conventional methods can only drill straight cooling lines into a mold, resulting in uneven and inefficient temperature control. Metal 3D printing enables the creation of intricate, vein-like cooling networks that follow the contours of complex cavities. This can multiply cooling efficiency, dramatically shorten injection molding or die-casting cycles, and significantly improve product quality—rewriting the very rules of mold design.
- Hybrid Manufacturing: Combining additive (“building up”) and subtractive (“cutting down”) processes is set to become mainstream. Picture this: repairing a worn, high-value mold by first adding new metal layers via laser cladding, then precision machining them to final dimensions. This approach achieves cost-effective restoration and extends the mold’s lifecycle.
- Simulation-Driven Design: Seeing the Future
- In the past, predicting springback, wrinkling, or cracking relied heavily on veteran intuition. Today, advanced FEA (Finite Element Analysis) software can virtually replicate the entire stamping process before a single cut of steel is made. Engineers can visualize stress distribution, material flow, and springback levels, allowing them to iterate and optimize designs upfront—transforming the old “trial and error” approach into precise “first-time-right” execution.
- Industry 4.0 & Smart Tooling: Giving Molds a Voice
- Tomorrow’s molds will not be silent blocks of steel—they will be intelligent assets. By embedding miniature IoT sensors to monitor temperature, pressure, and vibration, managers can track mold health in real time and implement predictive maintenance before failure occurs. The vast production data collected can be analyzed by AI to fine-tune future mold designs, creating a self-improving “design–manufacture–use–optimize” feedback loop.
The journey from machinist to mold master is the ultimate test of precision, intelligence, and patience. Every step forward builds a professional fortress few can surpass, cementing your position as a leader in precision manufacturing.
VI. Conclusion
In summary, the question "do machinist make press brake dies?" reveals a critical distinction between general machining and a specialized craft. While a machinist has the foundational skills, we've shown that creating a high-performance die for a press brake is the domain of the Tool & Die Maker, whose expertise spans advanced materials, design, and precision manufacturing.
From the seven-step creation process to the strategic make-or-buy decision, the journey to a perfect die requires deep, specialized knowledge. When you need tooling that goes beyond the basics, expertise is non-negotiable. Whether you require a custom design or need to solve a complex forming challenge, ADH has the specialized knowledge to deliver.
For a comprehensive look at our offerings, feel free to browse our Brochures. Contact us today to consult with our tooling experts and enhance your production capabilities.


