How to make press brake videos that transform novice operators into safety-conscious experts requires more than just filming a machine in action—it demands a strategic shift from passive demonstration to active education.
In an industry where hidden forces like springback and micro-deflections determine the difference between a perfect 90-degree bend and a scrap part, your content must peel back the layers of the "black box" manufacturing process.
This guide unveils a tiered knowledge transfer system, engineering video content that not only visualizes the invisible physics of metal forming but also establishes your brand as the definitive authority on precision and safety.
I. Strategic Positioning: Building a Layered Knowledge Transfer System
1.1 Redefining the Value Proposition of “Press Brake Videos”
In today’s digital media landscape, a search for “press brake operation” typically yields two extremes: dry, instruction-manual-style demonstrations from equipment manufacturers, or flashy, context-free short videos.
For learners who genuinely wish to master this craft, neither approach addresses their real needs. Our goal, therefore, is not merely to produce a series of videos, but to create a “Video-Based Press Brake Academy.” This will be a comprehensive knowledge system designed to bridge the gaps between internal corporate training, customer education, and the transmission of advanced technical expertise.
Traditional training videos often stop at the “how to operate” level—pressing buttons to move the ram. To create world-class content, we must go deeper into the “why we operate” dimension. Each video unit should uncover the physical and engineering logic behind every mechanical action.
For example, instead of just showing how to set an angle, explain the physics of springback; instead of simply demonstrating die changes, clarify the safety distance calculations based on the ANSI B11.3 standard.
Our key differentiator lies in translating the engineer’s implicit knowledge into the operator’s explicit skills. Concepts typically confined to the engineering office—such as bend allowance equations, flat pattern calculations, and die line adjustments—will be transformed into intuitive visual language.
This shift in value proposition elevates your videos from practical guides to professional training materials that cultivate process-oriented thinking, helping viewers evolve from mere machine operators to true metal forming technicians.
1.2 User-Profile-Driven Layered Content Architecture
To effectively serve learners at different stages, a one-size-fits-all content strategy won’t work. Based on deep industry insight, we’ll establish a three-level L1–L3 learning framework, where each level corresponds to specific learning outcomes and mindset development goals—forming a complete skill progression pathway.
L1 – Foundational Level: Safety & Basics — From “Fear” to “Respect”
For beginners, the greatest psychological barrier when facing a hundred-ton press is fear. A qualified L1 video should not simply list steps—it must integrate terminology, control logic, and key safety standards (such as OSHA regulations) in a way that builds both understanding and confidence.
- Core Objective: Eliminate ignorance-based fear and establish respect grounded in understanding.
- Content Strategy: Produce controlled “error demonstrations” to vividly show the consequences of reaching into the die area or neglecting safety distances, reinforcing psychological safety boundaries. Break down a “safe bending cycle” into micro-actions—stance, pre-start checks, dry run tests—helping viewers develop muscle memory through visual storytelling. Clearly distinguish between mechanical, hydraulic, and electro-hydraulic servo systems, showing which habits are universal and which must adapt to the machine type.
L2 – Intermediate Level: Precision & Process — From “Able to Bend” to “Reliable and Consistent”
Once operators move beyond the beginner stage, their main challenges shift from basic operation to achieving accuracy and efficiency—an area most tutorials ignore, despite being the true proving ground of skill.
- Core Objective: Correct angle deviations, boost productivity, and master complex process flows.
- Content Strategy: L2 videos should emphasize the consequences of process choices. Use comparison experiments to show how different bending sequences affect assembly difficulty and welding distortion, explaining why process engineers insist on seemingly cumbersome steps. Simplify engineering concepts—like V-die selection rules and tonnage limit calculations—into practical “shop-floor heuristics” that help operators prevent costly errors such as tool breakage before machine failure, ensuring stable and efficient production.
L3 – Expert Level: Programming & Troubleshooting — From “Operation” to “Thinking”
This level defines the pinnacle of professional authority. L3 content targets advanced technicians who aspire to think like engineers.
- Core Objective: Master programming logic, systematic troubleshooting, and the reconciliation of design drawings with real-world conditions.
- Content Strategy: Move beyond simple function demos and adopt a “troubleshooting log” narrative, reconstructing an expert’s full diagnostic process—from investigating inconsistent bend angles in long parts to examining batch variations, frame deflection, compensation curves, and backgauge errors. This detective-style teaching reveals authentic expert reasoning. Additionally, this level should explore “drawing management,” demonstrating how seasoned technicians adjust for missing springback data or unrealistic tolerances, thereby building mutual trust between engineers and operators.

| Level | Theme | Core Objective | Content Strategy |
|---|---|---|---|
| L1 – Foundational Level Safety & Basics | From “Fear” to “Respect” | Eliminate ignorance-based fear and establish respect grounded in understanding. | • Error Demonstrations: Vividly show consequences of unsafe actions (e.g., reaching into die area) to reinforce safety boundaries. • Micro-Actions: Break down the “safe bending cycle” (stance, checks, dry runs) to build muscle memory. • System Distinction: Clarify differences between mechanical, hydraulic, and servo systems. |
| L2 – Intermediate Level Precision & Process | From “Able to Bend” to “Reliable and Consistent” | Correct angle deviations, boost productivity, and master complex process flows. | • Process Consequences: Use comparison experiments to show how bending sequences affect assembly and welding. • Shop-Floor Heuristics: Simplify engineering concepts (V-die selection, tonnage limits) into practical rules to prevent tool breakage and ensure stability. |
| L3 – Expert Level Programming & Troubleshooting | From “Operation” to “Thinking” | Master programming logic, systematic troubleshooting, and reconcile design drawings with real-world conditions. | • Troubleshooting Log: Adopt a detective-style narrative to diagnose complex issues (deflection, compensation curves, backgauge errors). • Drawing Management: Demonstrate adjustments for missing springback data or unrealistic tolerances to build engineer-operator trust. |
II. Content Engineering: Designing Hard-Core Technical Scripts (Core Curriculum)
If the camera is your weapon, then the script is your strategic map. When producing world-class press brake operation videos, never start shooting without a plan. We must construct a progressive knowledge delivery system that translates complex mechanical principles into visual language. The following three core modules outline how to transform tacit expert knowledge into explicit, teachable video assets.
2.1 Module One: The Zero-Accident Safety Barrier (Essential Content)
This module’s goal is to transform safety training from dull compliance recitations into a profound respect for physical energy. The video should not merely tell viewers “what not to do,” but show them “what happens if you do.”
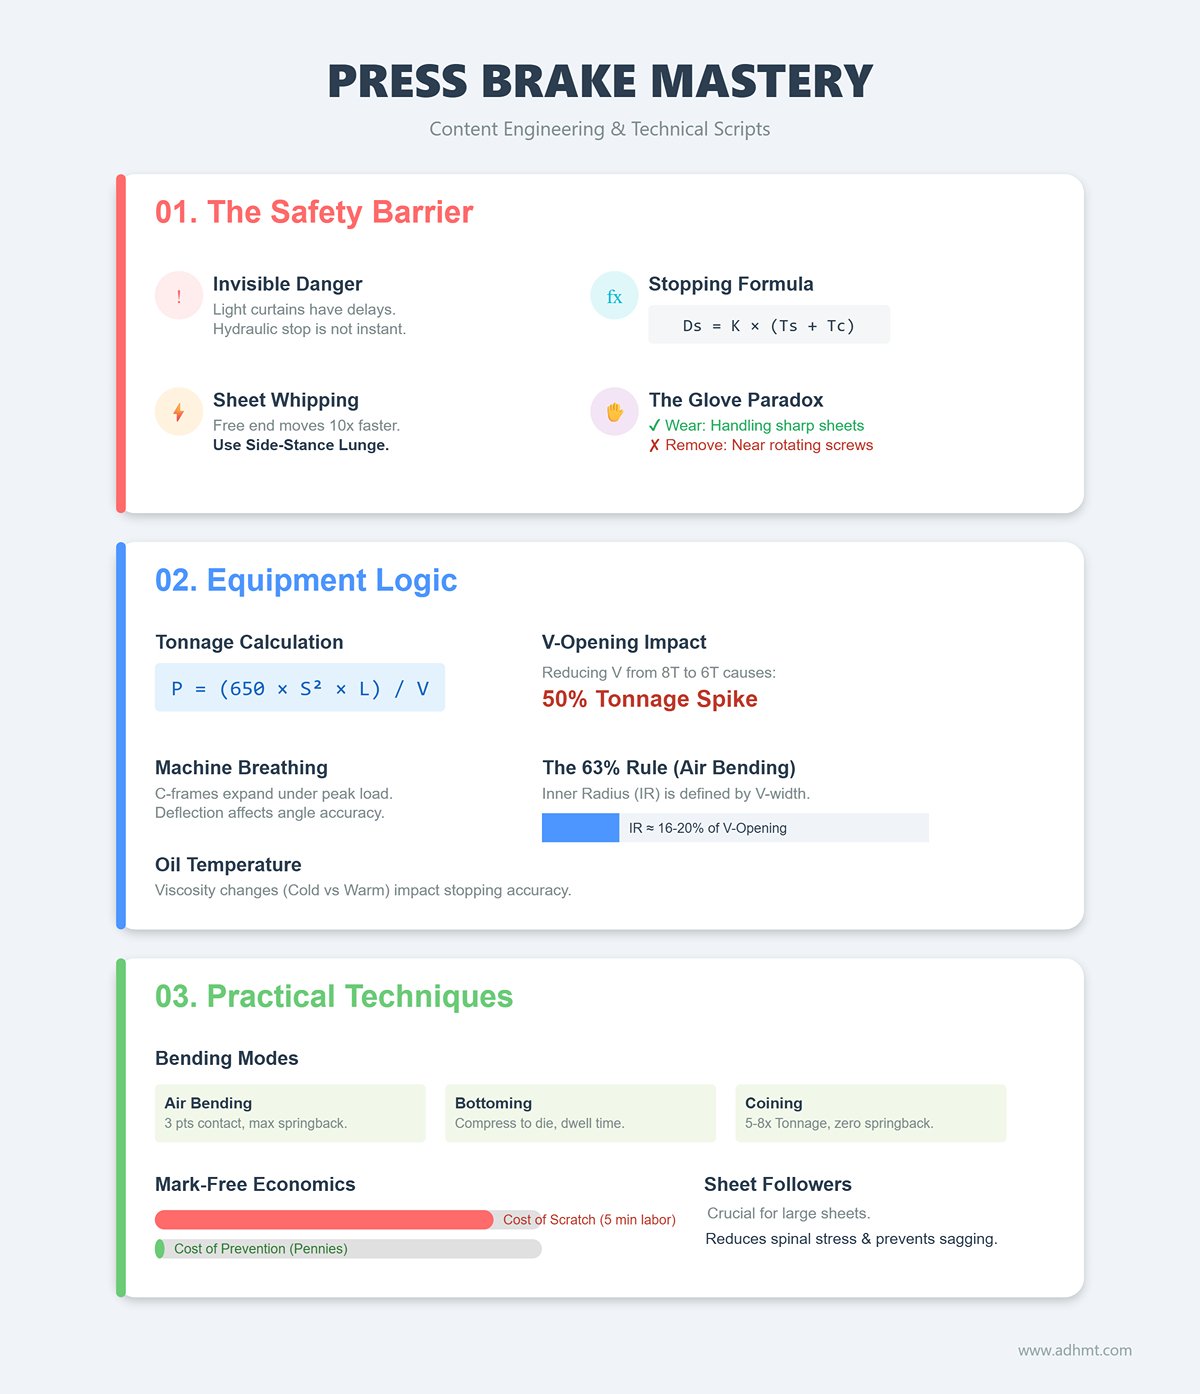
- The Invisible ‘Stopping Distance’ and Muting Point: Most operators mistakenly assume that light curtains provide instant protection, overlooking the hydraulic system’s inherent delay. The script must visualize this tiny yet deadly time gap.
- Filming Plan: Design a “life-or-death boundary” experiment demonstrating the exact moment when the light curtain must mute before the die contacts the sheet. Use a standard test block to verify system response: if muting occurs too early, fingers can still enter the danger zone; too late, and the machine will trigger an emergency stop.
- Formula Visualization: Dynamically display the stopping distance formula
Ds = K × (Ts + Tc)on screen. Using high-speed footage, capture the ram’s residual movement after the light curtain activates, helping viewers grasp why high-speed machines require greater safety distances between the light curtain and the die.
- The Physics of Sheet Whipping: During long-sheet bending, the free end can move up to ten times faster than the ram—a force powerful enough to cause serious injury.
- Filming Plan: Create a contrasting setup. First, use a dummy model positioned head-on to demonstrate the severe impact of an uncontrolled sheet whip (a controlled destructive test that leaves a strong safety impression). Then shift to the correct procedure: the operator adopts a side-stance lunge, guiding the sheet’s motion to dissipate kinetic energy safely and prevent joint strain.
- The Glove Paradox — one of the most common cognitive mistakes made by beginners. The video must clearly define when gloves should be worn and when they must be removed.
- Filming plan: Capture two contrasting scenes. Scene A (Handling sharp sheet metal): gloves are mandatory. Use close-up shots to show how the glove edges shield hands from razor-sharp burrs. Scene B (Fine adjustment behind the back gauge): gloves must be removed. Through animation or macro footage, reveal how rotating screws and clamping points can catch glove fibers and peel skin like a sausage casing. The visceral impact of this demonstration will imprint a lasting safety reflex in the viewer’s mind.
2.2 Module Two: The Underlying Logic of Equipment and Tooling
This module translates the vague “master’s intuition” into precise engineering formulas, helping operators understand the machine’s unique behavior.
- Machines Breathe (Deflection & Breathing) — a press brake is not a rigid body. Under load, it experiences microscopic deflection, which is the root cause of mid-length angle deviations in long parts.
- Filming plan: Mount a dial indicator on the throat of the C-frame. At peak tonnage, zoom in on the needle’s movement to visualize the frame’s subtle expansion — the machine’s “breathing.”
- Tonnage Formula in Action: Display the formula
P = (650 × S² × L) / Von-screen. Demonstrate live how reducing the V-opening from 8 times the sheet thickness (8T) to 6 times (6T) causes a 50% spike in tonnage demand. Pair this with an animated simulation of die cracking to illustrate why incorrect V-selection destroys tooling.
- The Hidden Relationship Between Bottom Dead Center (BDC) and Oil Temperature
- Filming plan: Compare data between a cold morning startup and a warm afternoon run. Show how, at the same Y-axis coordinate (e.g., Y = 100.05 mm), variations in hydraulic oil viscosity affect stopping accuracy. This naturally introduces the importance of closed-loop systems (linear encoders) and explains how modern machines correct such physical discrepancies.
- The 63% Rule of V-Openings — a concept that overturns 90% of industry assumptions: in air bending, the inner radius (IR) is determined primarily by the V-opening width, not the punch radius.
- Filming plan: Conduct a controlled experiment. Use punches with R1 and R5 tips to bend the same V16 opening. Measurements reveal nearly identical inner radii (roughly 16–20% of the V-width). This demonstration breaks the false intuition that “a sharper punch makes a smaller radius.”
2.3 Module Three: Practical Techniques and Common Challenges
This is the hands-on section addressing the ultimate question: “Why can’t I bend accurately?” It focuses on controlling the neutral axis and optimizing the bending process.
- Microscopic Differences Among Three Bending Modes — use macro lenses to reveal metal flow invisible to the naked eye.
- Air Bending: Show how the sheet contacts only the punch and the two shoulders of the V-die — three points with the sheet suspended, resulting in minimal force but maximum springback.
- Bottoming: Capture the moment the punch compresses the sheet against the die bottom, emphasizing how dwell time is crucial for achieving a stable angle.
- Coining: The “highlight moment.” Use close-ups to show the punch tip piercing the neutral layer and altering the metal’s crystalline memory. Explain why this high-tonnage process (5–8× greater load) eliminates springback completely.
- The Cost Equation of Mark-Free Bending
- Filming plan: Conduct a side-by-side test. On the left, ordinary tape (tears instantly); in the middle, canvas; on the right, professional urethane film. Insert a cost analysis showing that polishing a single scratch takes 5 minutes of labor, while a protective film costs mere pennies — quantifying the economic value of process improvement.
- Ergonomics of Sheet Followers
- Filming plan: Use red-line visual effects to highlight spinal stress during solo large-sheet operation, triggering a red alert. Contrast this with the relaxed posture when using a sheet follower arm. Emphasize that the follower isn’t just for reducing effort — it prevents reverse bending caused by sheet sagging, ensuring flatness and dimensional integrity.
Through these three meticulously structured modules, your video evolves from a simple tutorial into a comprehensive, physics- and engineering-based training guide — setting a new benchmark for industry content.
III. Visual Engineering: Industrial-Grade Filmmaking Techniques
In industrial education, video quality is not just about aesthetics — it’s about information fidelity. With precision equipment like press brakes, unclear visuals can lead to misunderstanding or even unsafe actions. Our goal is not mere documentation, but an engineered translation of mechanical forces into a visually comprehensible language through light, motion, and sound design.
3.1 Cinematic Language and Composition Strategies
A great instructional video must go beyond the observer’s viewpoint, creating a strong link between tactile experience and data — enabling viewers to develop muscle-memory empathy through the screen.
First-Person Immersion (The Operator’s Eye) — traditional third-person angles often feel detached. To convey authentic operational sensation, incorporate POV (first-person) perspectives.
- Stabilization setup: Avoid standard head straps that produce dizzying motion. Use a mouth mount or a helmet rig with a chin rest instead. The human neck acts as a natural gimbal, and this angle aligns perfectly with the operator’s hand zone — not the awkward overhead view.
- Key capture moment: From the POV angle, focus on the instant when both hands guide the sheet into contact with the back gauge. Viewers should clearly see the fingertip micro-adjustments and sense the subtle feedback when the sheet meets the stop — the crucial moment experts use to verify positioning.
Macro Side Shots: Visualizing the Deformation Zone — the press brake’s true beauty lies in the metal’s plastic transformation, a process too subtle for the naked eye.
- Camera setup: Use a 90mm or 100mm macro lens positioned safely at the side of the ram, focusing on the die tip and sheet cross-section.
- Visual logic: Frame only the contact point between die and sheet. Employ high-frame-rate close-ups to capture how the outer surface brightens under tension while the inner side compresses and distorts. This delivers textbook-level clarity for explaining phenomena like springback and coining.
Data Split Screen: Building Logical Connectivity (The Data Link) — mechanical motion alone cannot convey control logic. Use a 60/40 split-screen composition to seamlessly integrate live mechanical action with simultaneous CNC controller data.
- Main Frame (60%): Show a macro close-up of the physical bending process in action.
- Secondary Frame (40%): Display the simultaneously recorded CNC controller screen.
- Educational Value: As the ram slows down into the working feed speed, viewers can observe the Y-axis values on the screen shift from rapid jumps to micron-level increments. This real-time sync between visuals and data helps the audience instantly grasp how the “fast descent–slow press–pressure hold” rhythm manifests in numerical terms—transforming intuitive understanding into data-driven insight.
3.2 Light and Shadow Control in Industrial Settings
Metalworking environments are filled with reflections that drive photographers crazy. To make the metal texture appear as smooth as silk, you must eliminate the so-called “dead glare.”
Fighting Metallic Glare (The Glare Killer) Stainless steel and aluminum sheets produce direct, non-polarized reflections, rendering ordinary CPL filters ineffective. To achieve a premium visual effect, use the cross-polarization technique:
- Light Source Side: Attach a polarizing film in front of the LED light to convert it into polarized light.
- Lens Side: Rotate the CPL filter on the lens until it is perpendicular (90°) to the light’s polarization direction.
- Result: This physical method magically removes harsh highlights from the metal surface, preserving only the original texture and the stress marks created during bending—this is the core secret of high-end industrial photography.
Lighting the Cavity When the upper die descends, it often blocks the overhead light, plunging the most critical bending point (the V-groove bottom) into darkness.
- Solution: Use high-CRI magnetic mini LED light bars.
- Lighting Technique: Magnetically attach the light bar to the side of the lower die or backgauge finger, using a raking light angle. This not only illuminates every detail inside the V-groove but also uses side-light shadows to reveal tiny surface flaws or orange-peel textures, making every teaching detail vividly clear.
3.3 Designing the Auditory Experience
Sound is the invisible medium that conveys both power and precision. Our goal is to transform the factory’s noise into a form of narrative-driven “industrial ASMR.”
Sound Layering
- Noise Floor Cleanup: The continuous hum of the hydraulic pump—typically under 500Hz—masks key sounds and causes listener fatigue. In post-production, use spectral repair tools to reduce this low-frequency rumble, freeing up space for voice narration and eliminating the need for shouting over the background noise.
Enhanced Key Sound Effects (Foley) Precise operations have their own unique auditory fingerprints. Capture these with a shotgun microphone and boost them by 3–5dB in post:
- Positioning Signal: The crisp “ding” when the sheet hits the backgauge finger—an auditory cue confirming alignment.
- Force Release: The deep “creak” of metal lattice structures fracturing during thick-plate bending—this is where the machine’s tonnage power truly comes alive.
- Hydraulic Breath: The subtle “hiss” when the hydraulic valve opens at the moment of pressing.
Through meticulous refinement of both visual and auditory layers, your video will transcend being a mere instructional record—it will become an immersive sensory experience of strength, precision, and physics, setting your professionalism a generation ahead of competitors.
IV. Teaching Method Optimization: Post-Production and Information Enhancement
If shooting is about gathering raw materials, then post-production is the process of refining those materials into knowledge. In industrial training videos, editing should not only ensure visual smoothness but also facilitate cognitive understanding.
By leveraging post-production techniques, we can transform the tacit “intuition” and “experience” of veteran operators into visible data and logic—helping viewers not just see the operation, but truly understand the principle behind it.
4.1 Visualizing the Invisible
Many experienced operators rely on an almost indescribable “feel” when bending. This feel is actually a subconscious calculation of physical variables such as pressure, springback, and friction. A great instructional video should use visual effects (VFX) to make this hidden knowledge visible, letting beginners perceive the forces at play.
Data Overlays: Building an Iron-Man-Style HUD Interface Don’t simply place key parameters in a corner of the screen—that forces the viewer’s eyes to jump between operation and data, breaking concentration. Instead, use motion tracking in After Effects to anchor data panels directly onto moving elements like the ram or backgauge, binding data and motion together physically.
- Live Tonnage Bar: Design a gradient bar (green to red) beside the die that rises in sync with the ram’s descent. When pressure nears the die’s limit (e.g. 80 Tons/m), trigger a flashing red alert. This visually teaches operators why you can’t use a small V-die for thick sheets—because you literally see the red line maxing out.
- Ghost Line for Springback Prediction: The perfect tool for explaining “overbending.” At full press, draw a dashed line showing where the sheet will spring back once the ram lifts. This visualization instantly clarifies why bending to 92° results in a perfect 90° part.
Mechanical Insight: Giving Viewers X-Ray Vision Use vector animation overlays to reveal the internal stress within the metal:
- Force Vector Visualization: Add color-coded arrows over macro footage—thick red arrows pointing downward to represent compression, and yellow arrows radiating outward from the V-groove edges to represent lateral forces. This vividly explains why short-edge parts can slip into the groove and get scrapped—the audience can literally see the lateral forces going out of control.
- Pinch Point Warnings: Safety training shouldn’t rely on lectures alone. Highlight danger zones (like between the backgauge and sheet) with semi-transparent red overlays. When a finger enters the zone during demonstration, pair it with a subtle cracking sound—this dual visual-audio cue leaves a muscle-memory-level impression of caution.
Error Analysis Mode (The “What If” Mode) When demonstrating common mistakes, shift the color tone instantly to black-and-white or cool blue (in a forensic CSI style) to signal analysis mode. Replay the moment of “sheet bump against backgauge causing slight misalignment” at 10% speed, using a magnifier effect to highlight the barely visible 0.5mm gap. The narration explains: “That tiny vibration right there caused the final angle error.” This reverse-learning approach is far more valuable than just showing perfect operations—it teaches viewers how to troubleshoot like experts.
4.2 Structured Editing Logic
Industrial videos should never feel like mindless footage dumps. To sustain attention and reinforce memory, we must apply a cognitively coherent “flow” editing logic that modularizes content.
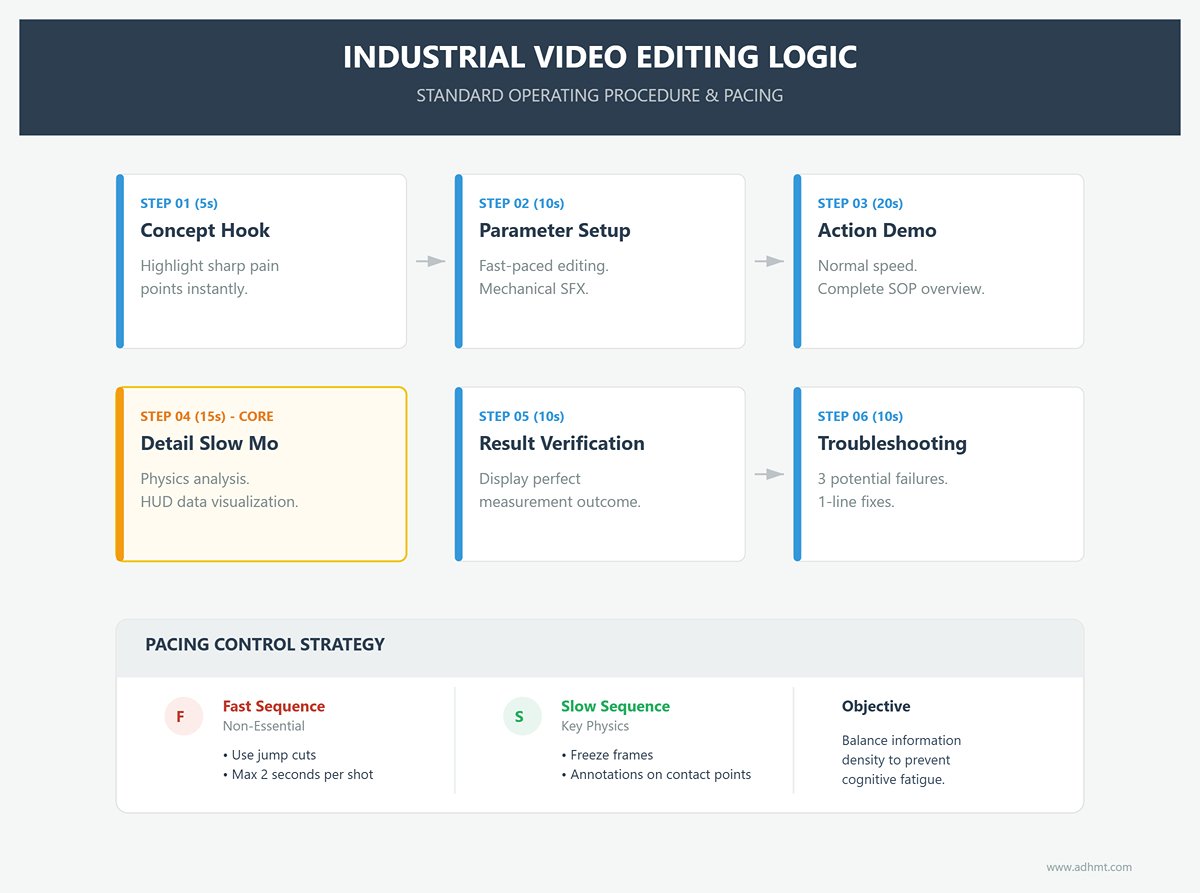
Standard Process Loop (The Loop) A perfect instructional cycle should follow six distinct, well-paced steps:
- Concept Hook (5 seconds): Start with a sharp pain point—something like “Why does your 90° bend always end up at 92°?”—to grab attention instantly.
- Parameter Setup (10 seconds): Use fast-paced editing. Flash through parameter inputs, die installation, and back gauge adjustments, paired with mechanical sound effects (clicks, beeps) to create a professional, high-efficiency atmosphere.
- Action Demonstration (20 seconds): Return to normal speed to show the complete standard operating procedure once, giving viewers a full picture of the process.
- Detail Slow Motion (15 seconds): Enter “Super Slow Mo” mode. Focus on the critical moment when the die meets the sheet, and overlay HUD data to analyze the physics in depth. This is the knowledge core of the video.
- Result Verification (10 seconds): Display the perfect outcome measured with an angle gauge to create a sense of positive feedback.
- Troubleshooting (10 seconds): Quickly list three potential causes of failure—such as dirty material, die misalignment, or insufficient dwell time—and give a brief “one-line fix” for each.
Pacing Control (The Rhythm): Great editing breathes—it expands and contracts naturally. Always follow the principle of blending fast and slow sequences.
- Fast (Cut on Action): For non-essential actions like carrying sheets or walking, use jump cuts to compress time to the extreme—no shot should exceed two seconds. Don’t waste viewers’ attention on low-value footage.
- Slow (Linger on Detail): For key physical processes—like the moment the ram contacts the sheet—allow ample time, even using freeze frames with annotations if necessary.
- Purpose: This pacing strategy helps viewers’ brains switch rapidly between absorbing dense information and processing underlying principles. It prevents both boredom and cognitive fatigue, keeping them in an optimal learning state.
With this post-production framework, your videos will have the magical effect of being “instantly clear, easily learned, and flawlessly executed.” They become more than documentation—they’re cognitive engineering systems, setting the true standard for top-tier industrial training videos.
V. Value-Added System: Building a Holistic Learning Ecosystem
If the video content is the 'bait' that attracts users, the value-added system is the 'anchor' that keeps them. In technical industries, real transformation doesn’t happen during those few minutes of viewing—it happens when users return to the workshop, face a tough problem, and discover that your tools can save the day. We’re not building a simple playlist; we’re creating an ‘external brain’ and a ‘lifeguard’ that lives in the operator’s pocket.
5.1 Companion Resource Development (The Conversion Key)
To turn viewers from “I’ve seen your video” into “I can’t work without your tools,” the key is to develop a set of hands-on utility kits (The Operator’s EDC – Everyday Carry) that solve real-world pain points. These resources must be highly practical and seamlessly fit into daily factory operations.
- Digital Upgrade of the Ultimate Bending Parameter Chart (The Master Chart): Traditional paper charts are cumbersome and limited, especially for special materials. Don’t just offer a static PDF—create a simple Excel or Google Sheets calculator. Users enter sheet thickness (T) and tensile strength; the sheet automatically highlights the optimal V-die width, inside radius (IR), and precise required tonnage (P). Most importantly, include ‘expert notes’. For example, for Hardox 450 wear-resistant steel, add: “Multiply standard tonnage by 1.5 and allow 5–7° for springback compensation.” Dynamic, experience-based tools like this are far more valuable than textbook tables.
- Aviation-Grade ‘Startup Survival Checklist’ (Pilot’s Checklist): Elevate the operator’s mindset from ‘worker’ to ‘pilot’. Model it after aviation checklists—a visual long-format chart that can be saved on a phone or laminated by the machine. Go beyond basic tasks like ‘check oil level’—include advanced safety and calibration checks. For instance, “Muting Point Test”—confirm the light curtain truly stops before fingers are at risk; or “Back Gauge R-Axis Zero Calibration”—ensure the first positioning is dead accurate. When operators follow this checklist, they’re not just ensuring safety; they’re demonstrating undeniable professional mastery.
- Error Code Video Index Library (The Error Code Library): When a screen flashes
Error 105: Y-axis positioning error, no one wants to flip through hundreds of manual pages. This is a perfect traffic entry point. Create an online Wiki or Notion page listing all common error codes. The key is precision landing: each code links not just to text, but to an exact timestamped video segment (e.g.,Error 105 → jump to 04:25). The user clicks and instantly sees how to clean the encoder scale or reset the servo drive. This ‘first-aid’ content builds powerful user dependency.
5.2 Interaction and Community
To build influence in a niche industrial field, you need to identify truly skilled, ambitious users—the ‘high-value audience’—and create a professional enclave for them.
- Challenge Missions: Gamified Skill Validation (The Weekly Bend): Launch challenges that turn passive viewing into active practice, satisfying technicians’ deep sense of professional pride.
- Level 1 Challenge: “Paper-Thin Precision” – Ask viewers to film their machine’s ‘dead-point accuracy’: can they stop the ram just tight enough to grip a sheet of A4 paper (about 0.1mm) so it slides but doesn’t tear? It’s a perfect demonstration of control finesse.
- Level 3 Challenge: “The Impossible Box” – Post a flat pattern drawing that seems geometrically impossible, and challenge participants to fabricate it flawlessly by optimizing the bending sequence.
Create a Hall of Fame to showcase and critique outstanding submissions. For skilled technicians, peer recognition often holds more appeal than any material reward.
- Q&A Column: The Doctor Is In — Instead of wasting time on inefficient text replies, transition to video-based troubleshooting. Pin a call for submissions in the comments: “Tell me about the most expensive material you’ve ever ruined.” From there, select representative high-level challenges — such as “uncontrollable titanium alloy springback” or “Hardox 450 cracking issues” — and produce 3–5 minute videos under the series title
Re: Your Question. The strategic value of this approach lies in its long-tail SEO effect: when someone searches “titanium bending springback” on Google in the future, your video will emerge as the most authoritative result online. You’re not just solving one person’s problem — you’re building a knowledge base for the entire industry. Through this value-creation system, you evolve from a mere content creator into an indispensable mentor and partner in the professional operator’s journey, establishing an unbreakable brand moat.
VI. Conclusion
Creating high-quality press brake videos is more than a technical demonstration; it is a strategic campaign of cognitive reframing. By shifting from the L1 basic training that eliminates novice fear to the L3 expert guidance that empowers engineers with complex troubleshooting, we transform hidden internal technical assets into a visible brand moat.
Through "Hardcore Script Design" that quantifies physical processes, "Visual Engineering" that makes invisible forces tangible, and "Pedagogical Optimization" using data visualization, we go beyond showing users "how" to teaching them the underlying logic of "why."
This extreme control over detail and deep deconstruction of principles fundamentally alters how customers perceive the brand—elevating it from a mere equipment supplier to a trusted technical partner. In this content-driven era, every precise shot and rigorous parameter deduction crowns your enterprise with authority. The time has come to pick up the lens and redefine the visual language of industrial manufacturing through a professional perspective.
If you are ready to elevate your production line to an expert level or are facing unyielding pain points in complex bending processes, ADH Machine Tool is ready to provide support. To learn more or discuss your specific project needs, feel free to contact us.


