Introduction: Unlocking Your Machine’s “Hidden” Money-Making Potential
The first time you press the “start” button on a laser cutter and watch the beam dance elegantly across the material is pure magic. But as you move from hobbyist to a professional taking on real orders, a harsh truth emerges: most laser cutters ship with functional, generic parts—not the top-tier components that let you deliver exceptional, premium-quality products.
Many users fall into the trap of believing that the only way to improve cutting quality or engraving precision is to buy a more powerful, more expensive machine. In reality, what often limits your capacity to take on jobs—and your profit margins—isn’t the laser tube’s raw power, but weak points in the optical path and auxiliary systems. Upgrading accessories is all about getting more for less—a $50 lens designed for a specific scenario can have a bigger, more immediate impact on acrylic cut verticality or tiny font clarity than investing $2,000 in a laser tube upgrade.
This guide aims to remove any fear or uncertainty around accessory upgrades—helping you strategically optimize your hardware so your machine evolves from an average “fabrication tool” into a high-efficiency “money printer.” If you’re considering a full upgrade, it’s worth exploring industrial‑grade options such as the Single Table Fiber Laser Cutting Machine for precision and reliability.
From Hobbyist to Professional-Grade Delivery
Why can a competitor with the exact same machine produce crystal-clear acrylic edges while yours are jagged, scorched rejects? The difference often comes down to choosing the right “weapon” for the job.
- Balancing Precision and Speed: The stock 2.0-inch lens is the “jack of all trades,” but it struggles to cut thick boards over 10mm and lacks the finesse for engraving micro text as small as 6pt. Knowing when to swap long and short focal lenses based on the project is a fundamental skill for professionals.
- Expanding Your Service Scope: Without a rotary axis, you’re limited to flat materials; without an air assist system running at the right pressure, you can’t safely work with flammable woods. Accessories aren’t mere add-ons—they’re force multipliers that expand your business capabilities. To better handle both sheet and pipe materials, explore the Dual-use Fiber Laser Cutting Machine With Cover, which integrates flexibility with advanced safety features.
Facing Compatibility Challenges: Breaking the “Factory Only” Myth
The biggest psychological barrier to upgrading for most users is compatibility anxiety: “Will this third-party part fit my Thunder Nova or xTool P2?” “Will it end up as expensive scrap metal?”
Here’s an industry open secret: photons have no brand loyalty, and optical physics doesn’t care about the logo on your machine.
- Generic (DIY or Custom-Built Machines): Usually adhere strictly to industrial standards (e.g., 20mm mirrors / 18mm lenses), making them the most upgrade-friendly systems.
- Thunder Laser / Omtech Polar and similar brands: Often a mix of industrial-standard interfaces and custom designs. While they may use proprietary connectors, the core optical components are typically standard.
- xTool / Glowforge and other consumer-grade models: These do feature more non-standard dimensions (like integrated modules or special lenses), but still have considerable room for optimization.
Expert Tip: As you read this guide, try to set aside brand loyalty—even temporarily—and trust your caliper’s measurements. The core parameters are always diameter, focal length, and thread specs. If the physical dimensions match, the optical path will work. We’ll show you how to measure and choose like an engineer.
For more detailed performance data and machine configurations, you can download our latest brochures featuring technical specifications and recommended upgrade paths.
What This Guide Covers
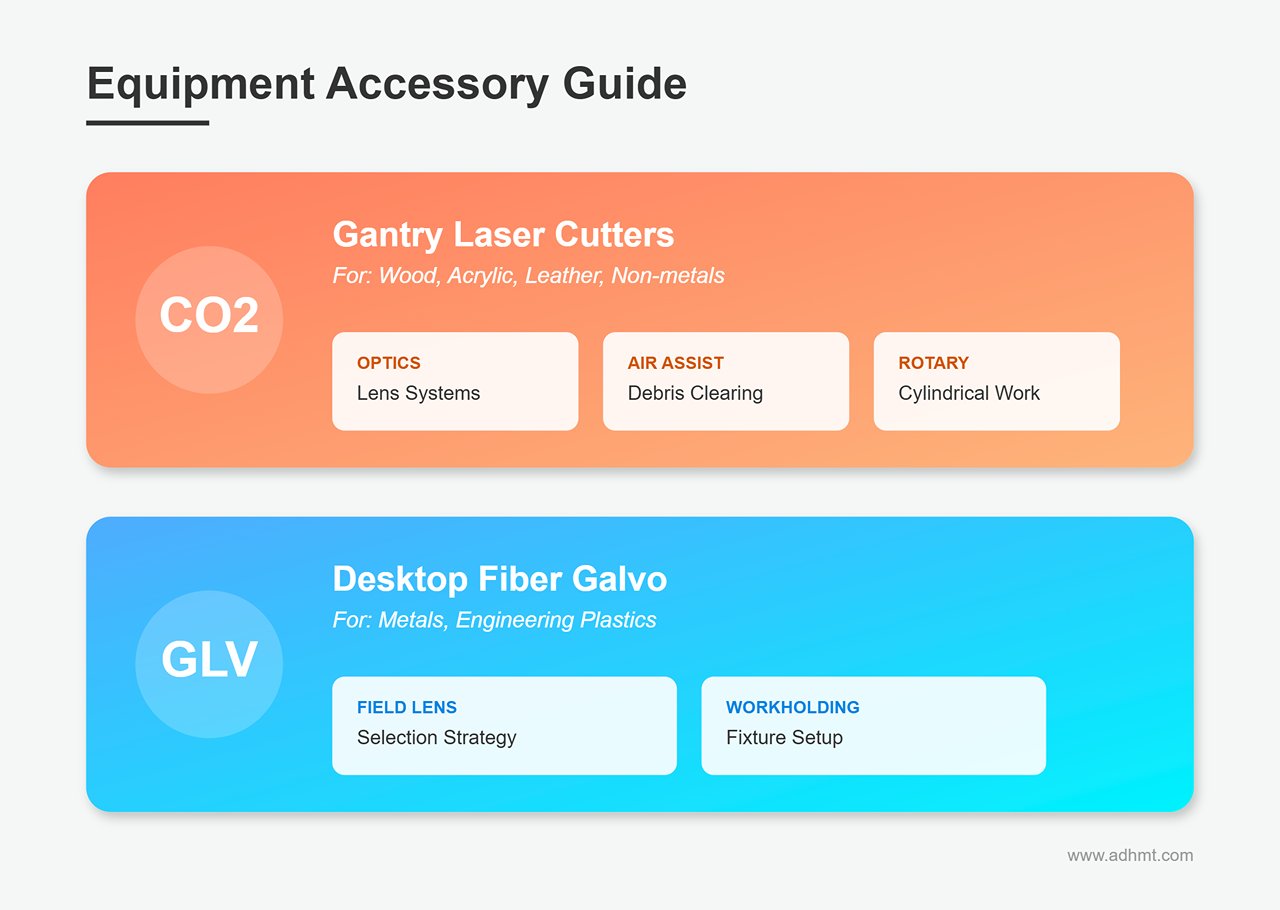
To ensure both authority and practical value, we focus on the core accessory ecosystems of two major equipment categories:
- CO2 Gantry Laser Cutters: Ideal for processing wood, acrylic, leather, and other non-metal materials. We’ll dive deep into lens optics, air assist systems, and rotary axis setups.
- Desktop Fiber Galvo Marking Machines: Precision tools for engraving metals and engineering plastics. We’ll focus on field lens selection and workholding fixture strategies.
Whether your goal is to raise your product’s selling price or solve frustrating cutting quality issues, the following sections will provide a detailed, actionable upgrade roadmap. Let’s start uncovering the true, hidden value of your machine.
Ⅰ. Optical System Upgrades: Lenses and Mirrors
If the laser tube is your machine’s “engine,” then the optical system is its “transmission.” Many users chasing more cutting power mistakenly think upgrading to a higher wattage tube is the answer, ignoring optical path efficiency. The harsh reality: a poorly configured optical setup can make a 100W machine perform worse than a perfectly tuned 60W system.
Upgrading lenses and mirrors is essentially about reshaping the laser’s energy profile. By adjusting focal length, material choice, and optical design, you can concentrate energy far more precisely—yielding multiples of performance gains for specific tasks.
Understanding Focal Lengths: Reject the “One Lens Fits All” Mentality
Most laser cutters ship with a 2.0-inch (50.8mm) lens. It’s a compromise—good enough for everyday engraving and cuts under 5mm thick, but never the best choice for specialist work. Just as a professional chef wouldn’t use the same knife for every ingredient, you should choose the right “blade” based on material thickness and required detail.
- 1.5-inch / 38.1mm (High-Resolution Engraver)
- Key Strength: Produces an ultra-fine spot (about 0.003 inches), crucial for achieving 600+ DPI retina-level engraving. If you produce rubber stamps or highly detailed photo etchings, this is a must-have.
- Trade-Off: Exceptionally shallow depth of field—just 1–2mm. Your material must be perfectly flat; even slight surface unevenness will shift the focus and blur the image.
- 2.5-inch / 63.5mm (Cutting Sweet Spot)
- Expert Favorite: A “secret weapon” for many seasoned operators. It offers a longer depth of field compared to 2.0-inch lenses, yet keeps beam divergence minimal.
- Practical Value: When cutting 6–10mm acrylic or wood, it maintains a tight beam deep into the material, significantly improving cut verticality and reducing bevel. A longer focal length also keeps the lens farther from debris, extending its lifespan.
- 4.0-inch / 101.6mm (Deep-Cut Heavy Hitter)
- Common Misconception: Many think longer focal lengths cut deeper purely because of focal distance, but in truth it’s the exceptionally long depth of field that enables thick material penetration.
- Best Use Cases: Cutting 20mm+ foam or thick acrylic while ensuring perfectly vertical edges—no top-wide, bottom-narrow “V” profiles.
- Performance Trade-off: The beam spot becomes significantly larger, reducing energy density. To cut the same thickness, you may need to slow down or increase power. As a result, this setup is unsuitable for fine engraving work.
Material Science & Lens Design: More Than Just a Piece of Glass
The lens’s color and geometry determine its durability and focusing efficiency. Don’t focus solely on price—pay attention to the materials used.
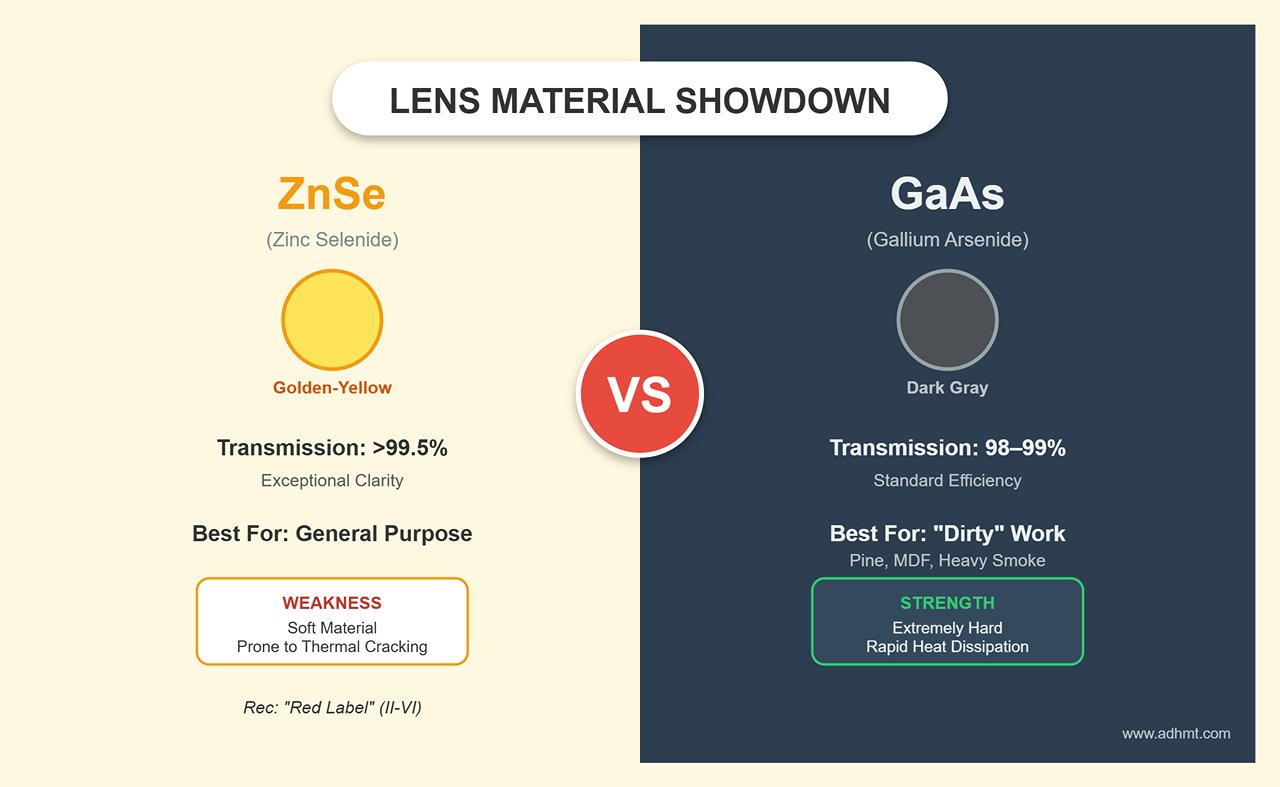
Material Choices: ZnSe vs. GaAs
- ZnSe (Zinc Selenide): The classic golden-yellow lens. High-quality CVD ZnSe offers exceptional light transmission (>99.5%) and suits most applications. However, it’s relatively soft and prone to cracking if surface contaminants cause localized heating. Opt for “Red Label” lenses from U.S.-based II-VI (Two-Six); though they cost about twice as much, their coatings last far longer.
- GaAs (Gallium Arsenide): Distinguished by its dark gray, “tank-grade” appearance. While transmission is slightly lower (about 98–99%), its thermal conductivity is superb and it’s extremely hard. If you often cut “dirty” materials like pine or MDF that emit heavy resin-laden smoke, GaAs lenses rapidly dissipate heat, reducing the risk of overheating and fracturing. In harsh conditions, it’s the most cost-effective choice.
Lens Shapes: Maximizing Meniscus Performance
- Plano-Convex: Flat on one side, convex on the other—affordable and versatile. However, at short focal lengths, spherical aberration can produce an imperfect focus point.
- Meniscus: Convex on one side, concave on the other. This design corrects spherical aberration, compressing the beam spot further. At the same power, Meniscus lenses deliver higher energy density, often boosting cutting speed by 5–10% and producing finer kerfs. For small-power machines seeking peak performance, this is one of the best-value upgrades.
Beam Delivery Components: Every Mirror Is a Checkpoint
The laser beam travels through three separate reflections before reaching the material surface—each reflection introduces potential energy loss.
- Si (Gold-Coated Silicon) Mirrors: Offer the highest reflectivity (>99.6%) and are lightweight, enabling fast movement of the laser head. However, the gold coating is delicate—minor scratches from improper cleaning can render it unusable, making it best suited for experienced users who maintain them properly.
- Mo (Molybdenum) Mirrors: Made from solid polished molybdenum without coatings. These are virtually “scratch-proof”—even if dust fuses to the surface, vigorous cleaning won’t damage them. The trade-off is lower reflectivity (~98%); across three mirrors, this can cause 5–10% total power loss, and at high power, thermal lens effects (focus drift) may occur. Ideal for beginners or tough environments.
- Beam Combiners: The Hidden Cost: Adding a red-dot pointer to an invisible CO2 beam may seem convenient, but the combiner—a semi-reflective mirror—introduces 2–8% power loss. If your machine is under 60W, it’s strongly recommended to remove the combiner and use an externally mounted, off-axis red pointer to preserve valuable laser energy.
Fiber Laser Focus: The Physics Trap of F-Theta Field Lenses
For users of desktop fiber markers (like the xTool F1 Ultra) or industrial fiber machines, upgrading your field lens comes with a major energy density pitfall.
Many are eager to expand the working area from the default 100×100 mm to 300×300 mm. But physics dictates that beam spot size increases with the square of the focal length. Tripling the workspace means your focused beam area will expand dramatically—energy density can plummet to one-ninth or worse.
Expert Warning: Unless your fiber laser power exceeds 60W, avoid field lenses over 200 mm. Otherwise, settings that once cut through metal easily will produce only faint surface marks. In fiber work, you often can’t have both range and depth.
II. Laser Nozzles
Laser nozzles are essential accessories that greatly influence both efficiency and quality in cutting. They channel the beam and help expel molten material during processing. Different nozzle designs suit specific applications:
- Single-layer Nozzles: Simple in design and typically used for thin materials. They provide a direct beam path and good control over the cut.
- Double-layer Nozzles: More complex, designed for thicker materials. They enable better gas flow management, improving cooling in the cut zone and reducing risk of deformation.

III. Safety Accessories
1. Protective Eyewear
Protective eyewear is a non-negotiable safety item for anyone operating laser cutters. The intense light and potential reflections can cause severe eye damage, including blindness. Wearing the right eyewear is critical to safeguarding your vision.
Different types of laser eyewear exist for specific machines:
- Laser Safety Glasses: Designed to block specific wavelengths emitted by lasers. You must ensure they match your laser type—CO2, fiber, or diode—as each emits different wavelengths.
- Goggles: For environments needing full coverage, laser safety goggles offer additional protection by sealing off more of the eye area.
2. Laser Safety Curtains & Shields
Laser safety curtains and shields are widely used to protect operators and bystanders. They confine the laser beam within a designated space, preventing accidental exposure to laser radiation.
- Laser Safety Curtains: Flexible barriers made from materials that absorb or block laser radiation. Often used to establish safe zones around laser equipment, especially in open or shared spaces.
- Laser Safety Shields: Rigid enclosures that fully contain the laser cutting area. These provide the highest level of protection by ensuring no radiation escapes, safeguarding both operators and surroundings.
3. Fume Extractors
Laser cutting and engraving often generate fumes and particulates that can be harmful if inhaled. Fume extractors are crucial for maintaining safe air quality in the workspace.
- Why Air Quality Matters: Fumes from materials like plastics, metals, or treated wood can pose health risks, including respiratory issues and long-term illnesses. A fume extractor captures and filters hazardous airborne substances, ensuring a safer working environment.
- Types of Extraction Systems: Options range from portable units to large centralized systems. Your choice depends on operation scale and material type. Key features to assess include filtration technology (such as HEPA filters) and airflow capacity.
III. Material Handling & Expansion: Rotary Axes & Worktables
Upgrading accessories isn’t just about making your machine “easier to use”—it can determine whether your setup is limited to cutting cheap plywood or capable of producing $50 custom insulated tumblers. If the optical system defines your technical ceiling, then the material-handling system defines the scope of your business opportunities.
Rotary Attachments: The Golden Key to Custom Drinkware
In laser engraving, the rotary axis is widely regarded as a “profit multiplier,” but it’s also one of the trickiest areas for newcomers. Choosing the wrong type not only wastes money—it can result in costly production errors.
The Great Debate: Roller vs. Chuck
- Roller: Commonly included in entry-level kits, rollers offer lightning-fast setup and work well for uniform items like standard wine bottles. However, they suffer from a critical flaw—friction drive. Lightweight items such as empty soda cans often slip, causing misaligned engravings. Mugs with handles can’t rotate a full 360° at all, and tapered tumblers require complex leveling rigs to prevent image distortion.
- Chuck — The Professional’s Choice: For anyone serious about turning engraving into a business, a chuck-style rotary is the only professional-grade option. It locks objects securely with mechanical jaws, eliminating slippage altogether. With interchangeable jaws, you can grip everything from ring interiors to baseball bats and irregular shapes. RotoBoss is considered the heavy-duty benchmark in the industry, renowned for its rock-solid stability that solves the vibration issues common with budget models, while PiBurn is a high-precision favorite among advanced users.
Installation Basics: Avoiding Electrical Pitfalls
Don’t assume that “if the plug fits, it works.” Electrical compatibility impacts not only functionality but also the safety of your machine’s control board.
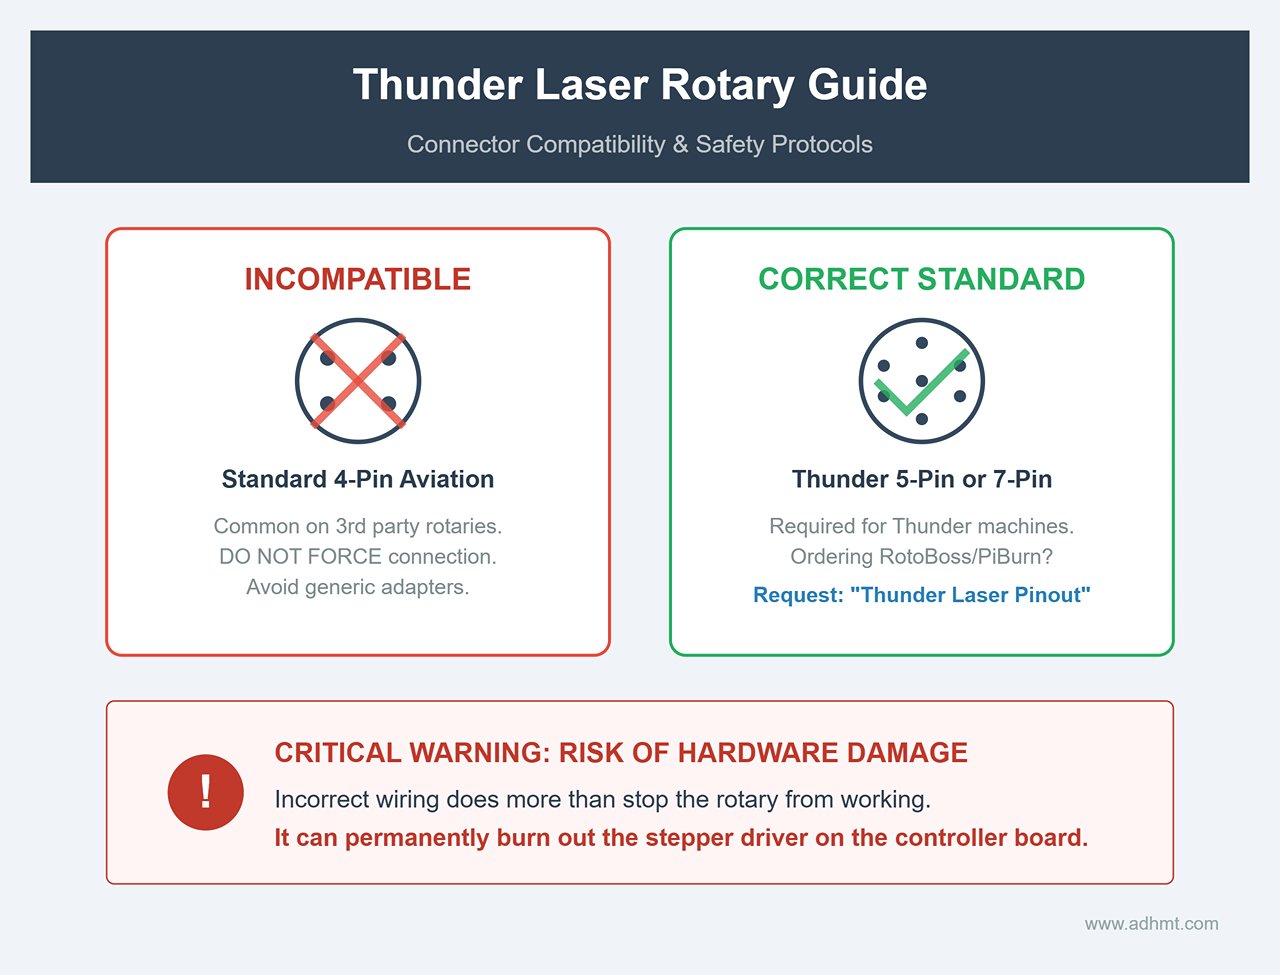
- Connector Standards: Industrial machines like Thunder or Omtech typically use GX16-4 aviation connectors (16 mm diameter), while compact or DIY models often use GX12-4 (12 mm diameter). Always verify connector type before buying a third-party rotary, or you may face tricky rewiring or soldering work.
- Motor Phasing: Standard NEMA 17/23 stepper motors are usually 2-phase, 4-wire. If your machine’s rotary port has 3 or 5 pins, it’s likely non-standard, and careless wiring could burn out the driver.
- Pro Tip: High-level users often connect their rotary to a dedicated U-axis (or A-axis). This means you don’t have to unplug your Y-axis motor or repeatedly change step settings—just enable “Rotary” in LightBurn, select the axis, and enjoy true plug-and-play convenience.
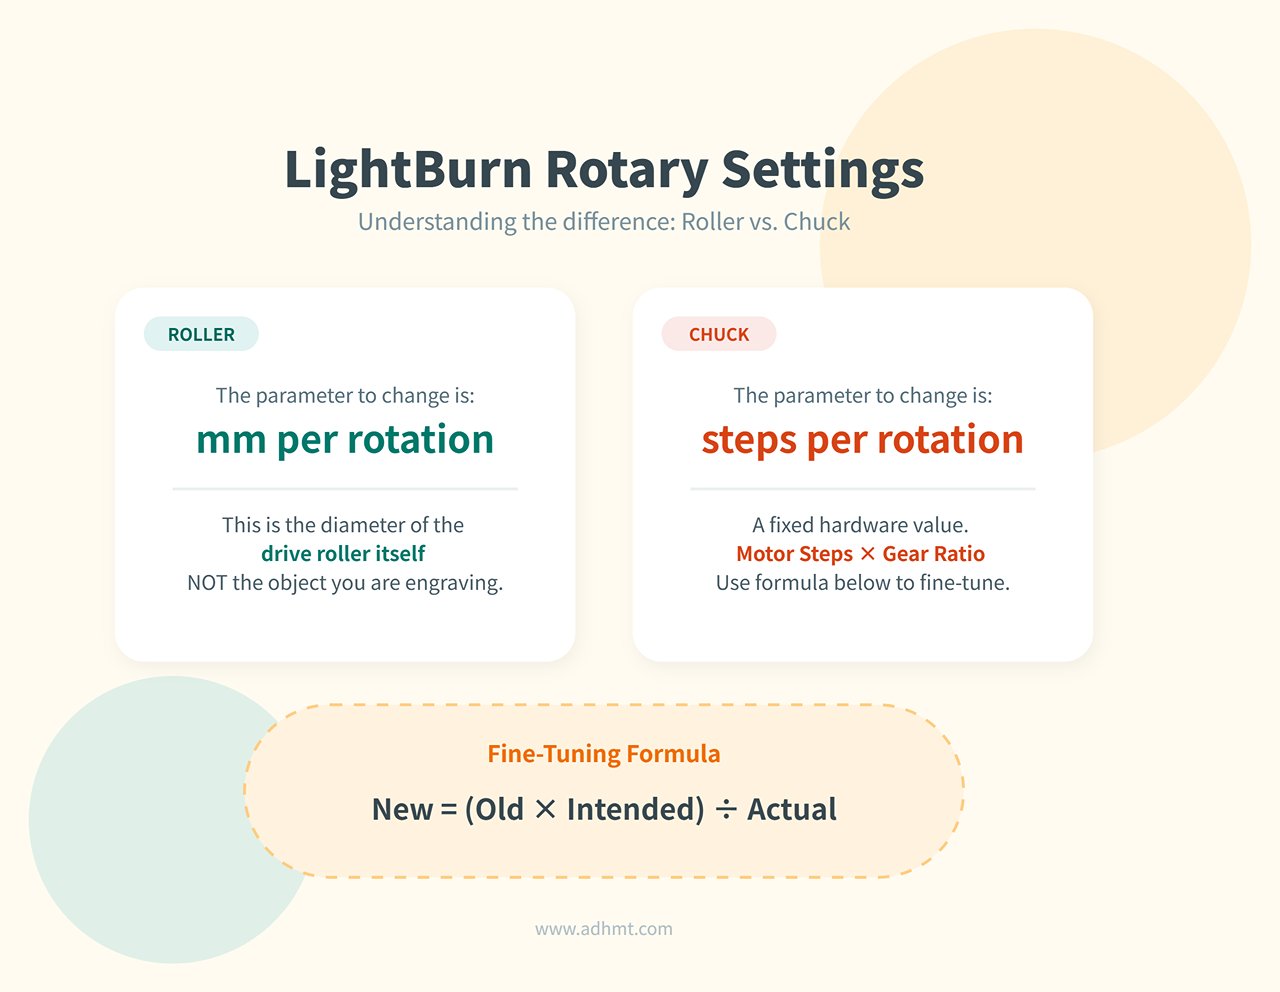
Software Setup: Debunking LightBurn’s “Steps” Myth
- Roller Setup: The key setting is
mm per rotation, referring to the diameter of the drive roller, not the cup you’re engraving. LightBurn uses this value automatically to calculate motion. - Chuck Setup: The critical factor here is “steps per rotation,” a fixed value determined by motor microstepping and gear ratios. If a full rotation doesn’t close perfectly, fine-tune using the formula below:
- New steps = (Old steps × Intended travel distance) ÷ Actual travel distance
Specialized Work Beds: The Art of Preventing Backside Burn Marks
If you’ve ever cut acrylic only to find a flawless front surface and an ugly grid of burn marks or cloudy spots on the back, you’ve experienced “flashback”—caused when the laser pierces the material and reflects off the metal bed. The solution lies in minimizing contact points.
- Honeycomb Tables: The most common default option, great for supporting small, intricate pieces. Unfortunately, they’re also the “dirtiest”—dense metal grids create countless reflection points that easily cause backside burns, and the cells are notoriously hard to clean. Accumulated grease and debris are a major fire hazard.
- Knife Blade Tables: Standard on industrial machines. With contact limited to narrow support lines, they drastically reduce reflection areas, let debris fall away, and handle large sheet goods with ease.
- Pin Tables — The Perfectionist’s Secret Weapon: For crystal-clear acrylic edges, nothing beats this setup. Magnetic standoffs elevate the workpiece for zero-contact cutting, eliminating flashback entirely. You can even 3D-print mounts with strong magnets to create this industrial-level feature at minimal cost.
Risers & Z-Height Extensions
If you need to engrave rotary setups over 100 mm tall or work on thick wooden boxes, risers become essential. But they bring two significant issues you can’t afford to overlook.
- Stability Warning: On frame-style machines like xTool or Ortur, every added riser section reduces overall rigidity. Recheck and level the frame after installation—otherwise, even slight wobble during high-speed scanning can distort motion on the X/Y axes, turning straight lines into waves.
- Critical Safety Risk: Light Leaks: Most desktop lasers’ safety covers are designed for stock height. Raising the frame leaves significant gaps at the base, allowing powerful beams to escape and reflect off your work surface. In an instant, your machine jumps from relatively safe Class 1 to highly dangerous Class 4. Always install laser-blocking skirts or use a fully enclosed barrier to seal these gaps—never gamble with safety.
Ⅳ. Performance Enhancers: Air, Cooling, and Focus
If optics are the “eyes” of a laser cutter, then air assist, cooling, and automation systems are its “lungs,” “heart,” and “nervous system.” The efficiency of these components determines whether your machine can sustain long, demanding production runs and maintain consistent quality over time.
Air Assist Systems: Clearing Cut Lines and Suppressing Flames
Many users don’t realize there are two completely different air‑assist strategies: extinguishing flames during engraving and clearing kerf debris during cutting. The stock “fish-tank” pump included with most machines delivers only 3–5 PSI, which is virtually useless for serious cutting work.
- Stock Pump vs. Shop Compressor
- Hard requirement: To cut 6 mm plywood cleanly without heavy charring, you need a steady 25–30 PSI of air pressure.
- Physics behind it: High-pressure air does far more than feed oxygen. It acts like an invisible air knife, using kinetic force to blast molten resin and carbonized dust out through the bottom of the kerf. This narrows the cut width and prevents heat buildup that causes scorched edges.
- Upgrade path: Adding a true air compressor is a transformational step. For home or studio setups, a quiet oil‑free compressor (such as California Air Tools) is strongly recommended—typically around 60 dB, far quieter than traditional piston units.
- Nozzle dynamics: balancing speed and airflow
- Small-diameter nozzles (cutting): Usually 1.5–2.0 mm. By Bernoulli’s principle, smaller openings produce faster airflow. This high‑velocity jet clears debris instantly and prevents flare-ups—essential for achieving clean, golden‑colored cut edges.
- Large-diameter nozzles (engraving): Larger than 3 mm. Strong airflow during engraving can blow sticky dust back onto the surface, creating ghost marks or haze. Large nozzles produce a gentle protective curtain that keeps smoke away from the lens rather than ejecting material.

- Filtration: essential protection for your optics
- The silent killer: Compressors generate large amounts of condensation and trace oil mist. If this mixture reaches the focusing lens, the laser’s heat can instantly bake it onto the glass—permanently damaging an expensive optic.
- Non‑negotiable: Install a coalescing filter or oil‑water separator in the air line. This small, inexpensive component protects optics worth hundreds of dollars.
Laser Cooling Systems: Protecting Your Core Asset
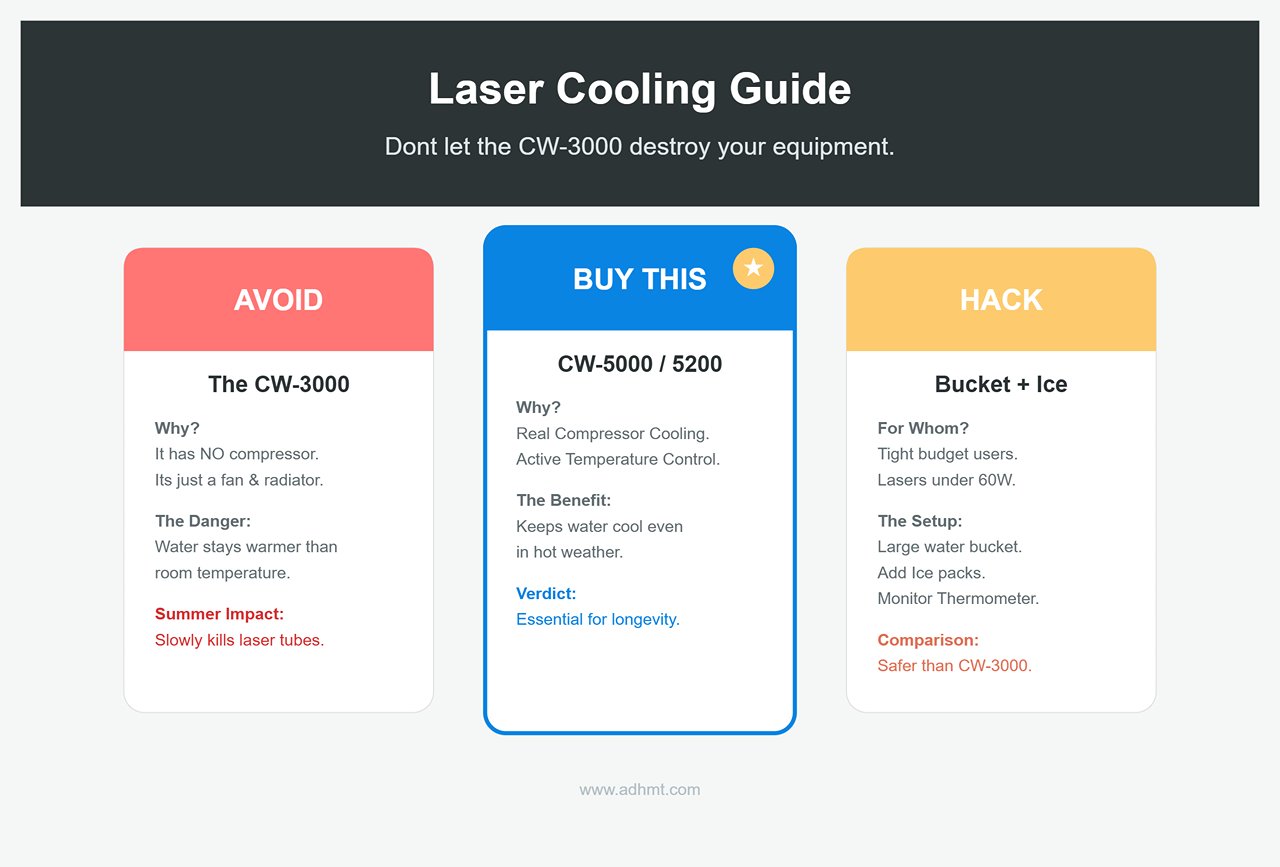
A CO₂ glass tube’s lifespan drops sharply as operating temperature rises. One hour at 30°C can cause as much wear as one hundred hours at 20°C.
- CW‑3000: the trap of passive cooling
- Reality check: A common beginner pitfall. Despite looking like a chiller, the CW‑3000 contains no compressor. It is simply a fan‑cooled reservoir.
- Limitations: It can only cool water down to room temperature. If your workshop reaches 35°C in summer, so will your coolant—dangerously high for 80W+ tubes. Suitable only for low‑power (<50W) systems or cold climates.
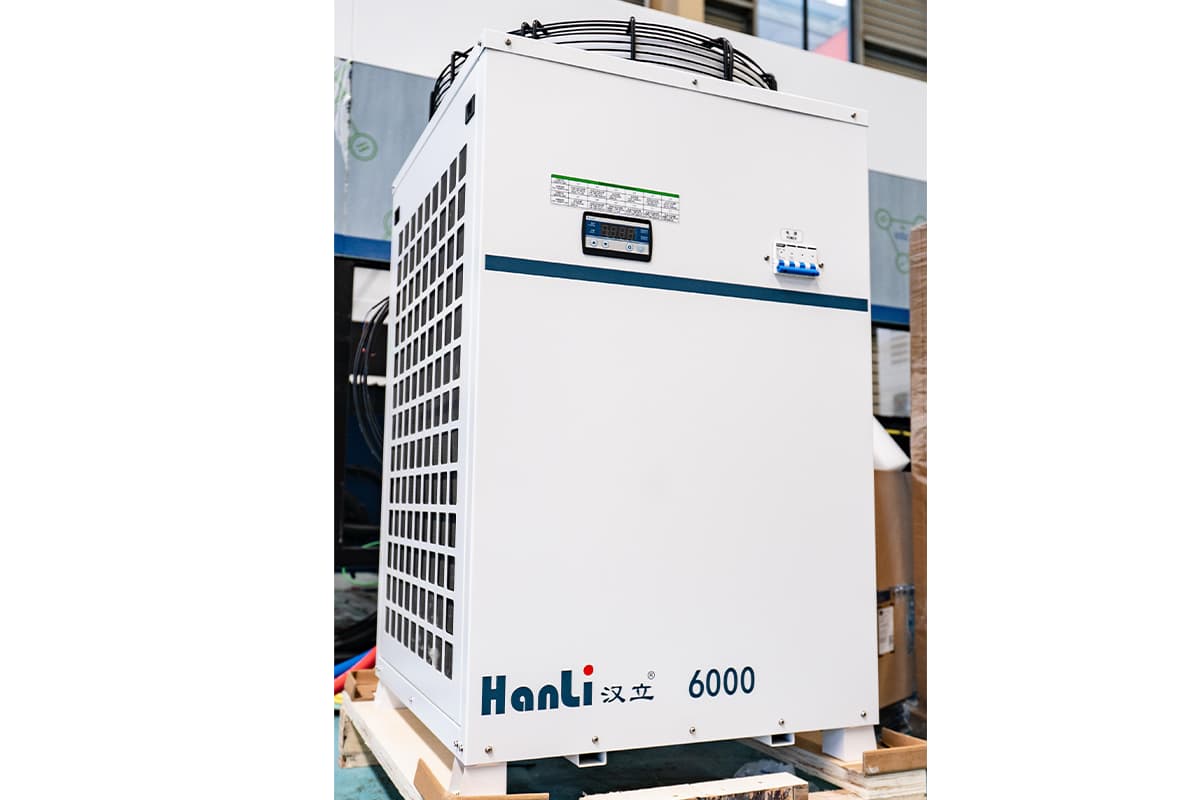
- CW‑5000/5200: the industry‑standard active chillers
- Core capability: These are true active chillers with built‑in refrigeration compressors. They maintain a rock‑solid 18–22°C coolant temperature regardless of ambient heat, stabilizing laser output and extending tube life by thousands of hours.
- Counterfeit warning: Look‑alike knockoffs are common. Stick with reputable brands like S&A and verify cooling capacity. For commercial users, this is essential insurance.
- Visual Flow Indicators
- Cheap insurance: Built‑in water‑flow sensors can fail or become jammed with debris, risking catastrophic tube burnout. A simple spinner‑style flow indicator in the return line gives immediate, physical confirmation that water is moving.
Automation & Sensors: Technology That Saves Time
- Auto‑Focus Kits
- Motorized Z‑axis vs. contact probes: Full motorized autofocus sounds appealing, but for users working with warped material, pen‑style touch probes are typically more reliable. They detect height through physical contact, unaffected by surface color or transparency.
- Expert insight: Many veteran users remove unreliable autofocus kits entirely and return to manual focusing blocks. Mechanical certainty beats the risk of a mis‑triggered probe crashing the laser head into the workpiece.
- Camera Systems (LightBurn / ThunderCAM)
- A workflow revolution: One of LightBurn’s most powerful features. A calibrated wide‑angle camera (120°–140°) mounted inside the lid gives you a live view of the workspace directly within the software.
- How it works: Drop an irregular scrap piece onto the bed → capture the image → drag and drop your design into the open area on-screen. Alignment accuracy is typically within 1 mm. This eliminates wasted material and tedious coordinate measuring—hugely valuable for small‑batch makers.
V. Machine‑Specific Compatibility Guide
Once you decide to upgrade, few things are more frustrating than unboxing a $500 accessory only to discover the connector doesn’t match your machine. The laser industry lacks USB‑style standardization; brands differ widely in interface types, optical dimensions, and firmware constraints.
This chapter cuts through brand barriers and gives you a clear, frustration‑free guide to compatibility. You’ll learn which components truly require OEM parts and which ones can be safely—and affordably—replaced with high‑quality third‑party alternatives.
Thunder Laser (Nova, Odin, Bolt)
Thunder Laser sits between industrial and consumer‑grade machines. Its ecosystem is generally open, but there are a few electrical quirks that can catch you off guard.
- Lens kits: escaping the OEM premium
- Nova/Odin series: This is one of the biggest cost‑saving opportunities. Although Thunder sells attractive anodized lens modules, the optical core is simply a standard 20mm lens. As long as you have the proper removal tool (usually a retaining‑ring wrench), you can purchase 20mm CVD ZnSe lenses from industrial suppliers such as American Photonics or Cloudray and install them directly in the original housing. You’ll typically save 40%–60% and gain access to specialty focal lengths like 1.5 inches or 4.0 inches.
- Bolt (RF‑tube models): Bolt uses a unique RF‑based optical pathway. While the lens itself may follow standard sizing, the assembly is usually sealed to keep dust out. Unless you have advanced skills and a clean workspace, Bolt users should stick to OEM or Bolt‑specific pre‑sealed lens units. Poor sealing can let smoke contaminate the optical cavity and potentially damage the expensive RF tube.
- Rotary attachments: connector pitfalls
- Thunder machines do not use the common 4‑pin aviation connector found on many third‑party rotaries. Instead, they rely on 7‑pin or 5‑pin interfaces. If you’re ordering a RotoBoss or PiBurn rotary, make sure to request the “Thunder Laser pinout” when placing your order.
- Critical warning: Never force a standard 4‑pin connector into a Thunder Laser port, and avoid generic adapter cables. Incorrect wiring can do more than stop the rotary from working—it can permanently burn out the stepper driver on the controller board.
- Smart camera integration
- The Thunder Bolt comes with a deeply integrated LightBurn camera. Nova users, however, typically have a pre‑designated mounting spot near the gas struts on the lid. It’s an ideal location for a LightBurn 8MP wide‑angle camera (120° or wider). When installing, carefully route the USB cable to ensure it doesn’t snag on the X‑axis gantry during rapid movement.
xTool & Desktop Diode/CO2 (P2, D1, M1)
xTool has built an Apple‑like closed ecosystem—beautifully designed and easy to use, but one that raises the barrier for third‑party accessories.
- xTool P2 lens secrets
- OEM replacements are pricey, but once you open the P2 lens module you’ll find a standard 20mm diameter, 50.8mm (2‑inch) focal‑length plano‑convex lens.
- Cost‑saving tip: Thickness is the key. The P2’s retaining ring is extremely picky and typically supports lenses between 2.0mm and 2.5mm thick. As long as a third‑party lens matches all three parameters, it will drop in perfectly—at about one‑third the OEM cost. Note: The P2 lens ring is very tight. Use a suction tool or rubber finger cots when handling lenses, and never touch the coating with bare fingers.
- Ecosystem add‑ons: official vs. DIY
- Fire Safety Set: xTool’s fire‑suppression kit relies on CO2 discharge. Important warning: It must be used with a fully enclosed housing. On an open‑frame machine like the D1 Pro, CO2 dissipates instantly and cannot displace oxygen effectively. If you plan to run any fire‑suppression accessory on an open system, build or buy an enclosure with proper ventilation first.
- Risers: For P2 owners using the Conveyor Feeder, the OEM Riser Base is essentially mandatory. DIY blocks may raise the machine, but they do not provide the straight‑through track alignment or sealed environment the feeder requires, leading to smoke leakage and tracking issues.
- Rigidity issues with expansion kits
- On frame‑style diode machines such as the D1, the official extension kit doubles the work area but noticeably reduces torsional rigidity. After upgrading, reduce idle speed and acceleration to avoid vibration‑induced ripple lines during fast engraving.
Generic CO2 / Ruida‑Based Systems
These machines—often called “red‑and‑black” or “blue‑and‑white” lasers—are a paradise for DIY modifiers. Almost anything can be upgraded, but you’ll need a solid engineering mindset to do it safely.
- Optical mount standards: 20mm vs. 25mm
- Most 60W–100W generic machines ship with 25mm mirror mounts and 20mm lens tubes. If your older machine still uses 20mm mirrors, upgrading the entire optical mount system to 25mm is highly recommended.
- Why upgrade? Larger mirrors offer a bigger “sweet spot.” As the beam travels long distances and begins to diverge slightly, a 25mm mirror can still capture it cleanly, while a 20mm mirror risks clipping the edge and generating dangerous scattered heat.
- Rotary wiring: Y‑axis switching
- Generic machines usually lack a dedicated U‑axis port, so the rotary must borrow the Y‑axis driver. The classic solution is installing a DPDT (double‑pole, double‑throw) switch.
- How it works: Route the Y‑axis stepper output into the center terminals of the switch. One side connects to the original Y‑axis motor; the other side connects to a new aviation connector mounted on the chassis for the rotary. Flip the switch to instantly alternate between flat‑bed mode and rotary mode—no more opening the side panel and swapping wires by hand.
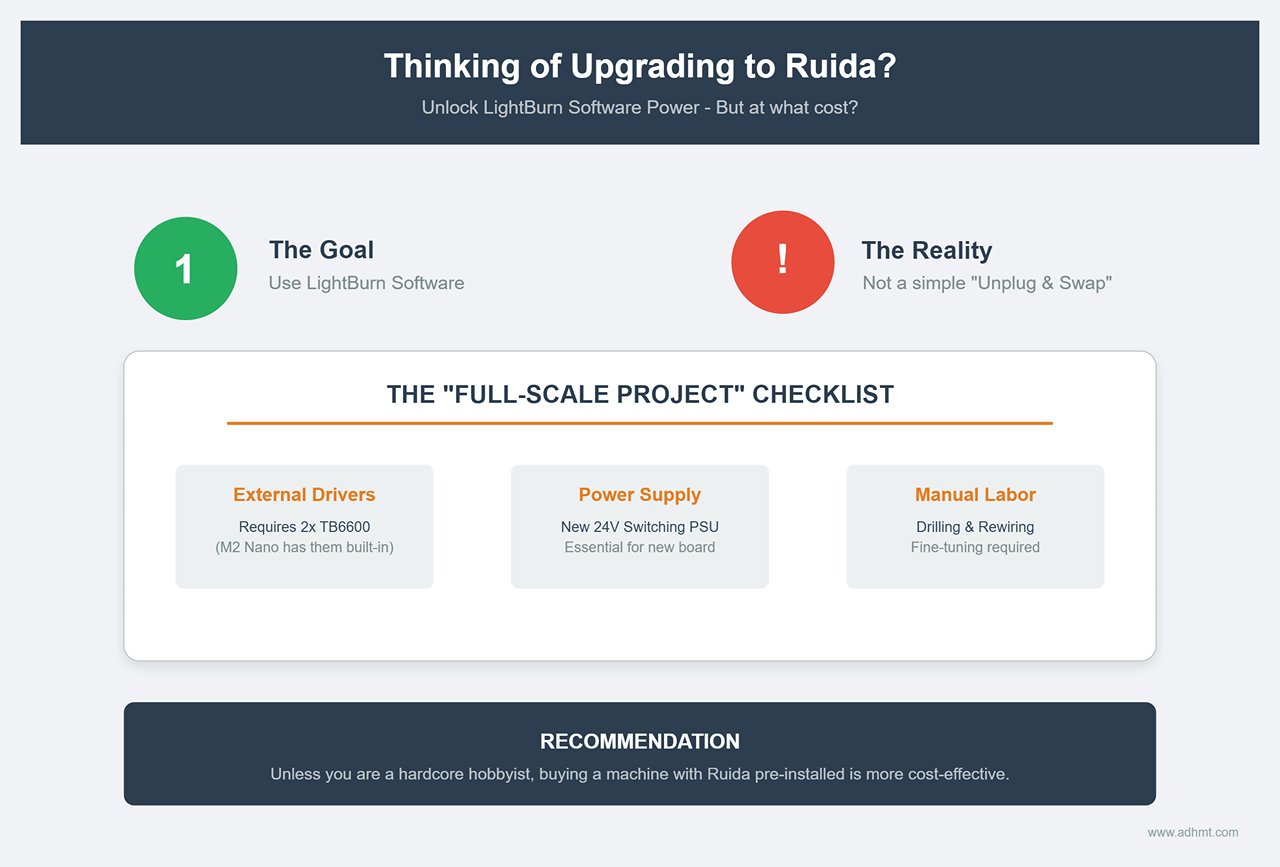
- Complete Mainboard Overhaul (M2 Nano to Ruida)
- Many K40 laser owners dream of upgrading to a Ruida controller so they can use powerful software like LightBurn.
- Important Warning: This upgrade is far from a simple “unplug and swap.” The factory M2 Nano board integrates its own stepper drivers, while the Ruida controller is strictly a control unit. Upgrading means purchasing two external stepper drivers (e.g., TB6600) and a 24V switching power supply. It’s a full-scale project involving rewiring, drilling, and fine-tuning. Unless you’re a hardcore hobbyist, buying a machine already equipped with a Ruida system is often more cost-effective.
Ⅵ. Safety & Environment: Upgrades You Cannot Compromise On
Before we talk about boosting cutting speed or engraving precision, we must address a heavier subject: survival. Laser machining is essentially a process of “controlled combustion” and “material vaporization.” This produces two dangerous by-products — toxic fumes and fire hazards — that, if ignored, can cause anything from long-term health damage to burning your workshop down.
Entry-level machines (especially open-frame diode lasers or budget K40 units) are often stripped of essential safety features to save costs. This section will guide you through building a professional-grade safety defense, protecting not just your equipment but also the health of you and your family.
Fume Extraction and Filtration: How Much Are Your Lungs Worth?
Laser cutting fumes are more than an unpleasant smell — they’re a toxic cocktail containing fine particulate matter (PM2.5), volatile organic compounds (VOCs), benzene, and formaldehyde. Cutting certain materials, like leather (which can emit cyanide), PVC (which releases corrosive chlorine gas and should never be cut), or specific engineering plastics, requires a zero-leak approach.
Direct Venting: The Best Bang-for-Buck Industrial Upgrade
For most home workshops or small studios, venting fumes directly outdoors is the most effective and affordable solution.
- Fan Upgrade: Ditch the noisy, weak “fish tank fan” your machine came with. Invest in a mixed-flow inline duct fan instead.
- Recommended Models: AC Infinity Cloudline S6 or S8 — ultra-quiet (ideal for home use) and bundled with smart controllers.
- CFM Rule of Thumb: Aim to replace the air inside the machine at least four times per minute. For mid-sized machines like the Thunder Nova 35 or xTool P2, 350–400 CFM is a solid baseline. If your duct run exceeds 3 meters or has multiple 90° bends, go straight to an 8-inch (S8) fan to overcome airflow resistance.
- Seal Kits: Extraction isn’t just about pulling air — it’s about preventing leaks. Many machines (especially K40s or DIY enclosures) are poorly sealed. Apply inexpensive automotive weather stripping along lid gaps and intake edges to create negative pressure inside the chassis, ensuring all fumes exit through the duct instead of leaking into the room.
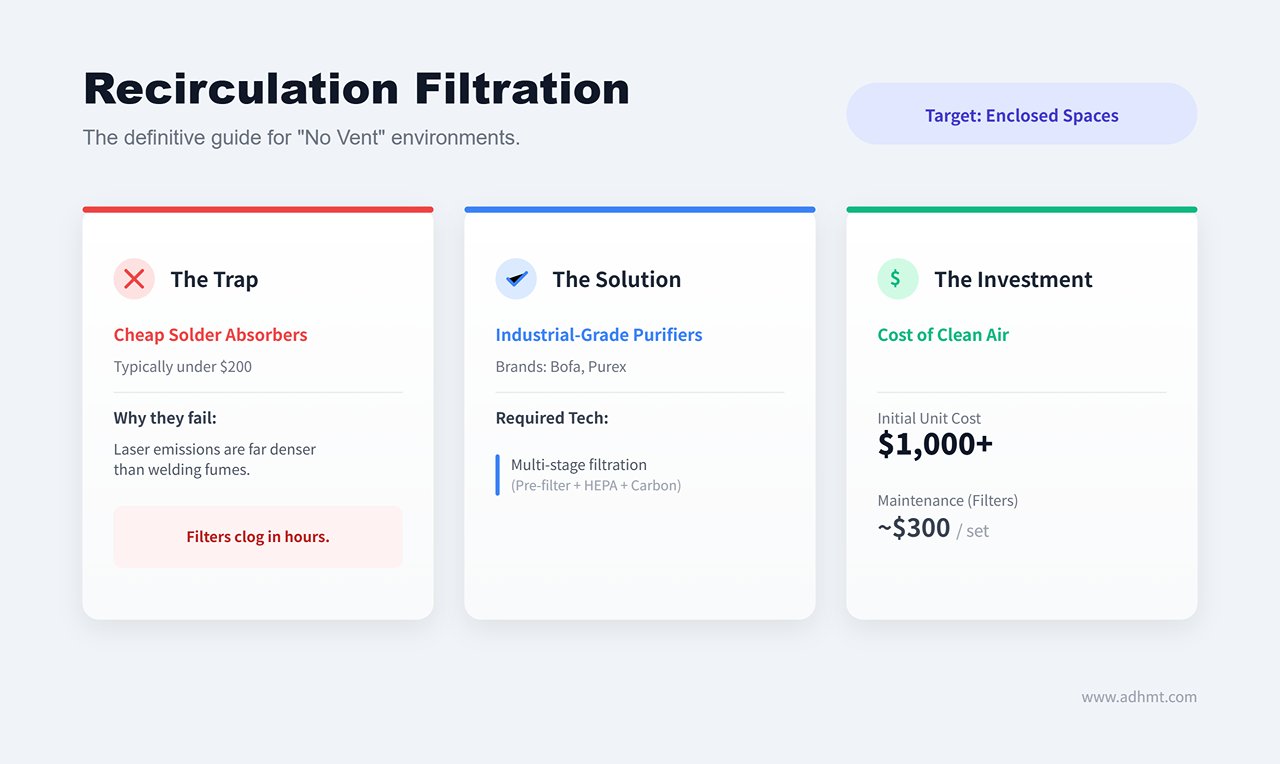
Recirculation Filtration: An Expensive Compromise
If you’re in an enclosed apartment or commercial space where outdoor venting isn’t possible, an industrial-grade fume purifier is your only option.
- Harsh Reality: Avoid the $200 “solder fume absorbers” sold on Amazon. Laser-cutting emissions are dozens of times more concentrated than welding fumes, and those filters will clog in mere hours.
- Professional Picks: Look to brands like Bofa (e.g., AD Oracle) or Purex, which offer multi-stage filtration (pre-filter, HEPA, massive activated carbon). Expect to pay $1,000+ for the unit and as much as $300 for a replacement filter set — the unavoidable “rent” for breathing clean indoor air.
Fire Safety: Don’t Let Your Investment Go Up in Smoke
When a laser is operating, focal point temperatures reach thousands of degrees. If air assist fails or material accumulates, flames can erupt within seconds.
The Fire Extinguisher Choice: Dry Chemical vs. CO₂
This is the single most critical recommendation in this guide: Never keep a standard household ABC dry chemical extinguisher near your laser.
- Devastating Consequences: While effective at putting out flames, dry chemical powder is intensely corrosive and adhesive. It will irreversibly infiltrate your linear rails, stepper motors, and circuit boards. The fire may be out, but chemical damage will leave your machine beyond repair.
- The Only Recommendation: CO₂ fire extinguisher. It releases cold, inert gas, leaving no residue and causing no harm to delicate optics or mechanical components. Although pricier, it’s the only truly safe way to protect your machine.
Automated Defense Systems
- Smart Power Cutoff: Don’t gamble with luck. Use a smart outlet linked to a flame sensor. Upon detecting open flame, the system should instantly cut power to the laser and air pump (to avoid feeding oxygen), while keeping the exhaust fan running to clear smoke and prevent damage to costly lenses.
Eye Protection / PPE: You Only Get One Pair of Eyes
Laser-induced retinal injuries are irreversible and often happen in an instant, without pain or awareness — until dark spots appear in your vision.
The Wavelength Trap
Different laser types require entirely different protective eyewear, and mixing them is extremely dangerous.
- CO₂ Laser (10,600nm): At this long wavelength, standard transparent polycarbonate — like your machine’s clear lid or regular safety glasses — naturally blocks the beam. But when performing open-beam alignment, you must wear goggles rated OD 5+ @ 10600nm.
- Fiber/Diode Laser (1064nm / 450nm): This is the danger zone. These wavelengths easily penetrate transparent plastics and can reach the retina. 1064nm fiber lasers pose particular risk, as their invisible beam reflections are especially insidious.
Avoid “Generic” Bargain Gear
- Serious Warning: Never buy those $10 “universal laser safety glasses” from online marketplaces like Taobao or Amazon. They’re usually just tinted plastic with no verified protective rating.
- Selection Criteria: Choose only certified professional brands such as Eagle Pair or Thorlabs. Check the engraving on the temples for technical specifications, specifically the OD value (Optical Density).
- OD 4+: Blocks 99.99% of laser energy.
- OD 6+: Blocks 99.9999% of laser energy (ideal for fiber laser systems).
- Remember: A quality pair typically costs between $50 and $100. Think of it as insurance for your eyesight—this is not where you cut corners.
Ⅶ. Troubleshooting Common Accessory Issues
Once you add upgrades like a rotary axis, swap in a high-performance lens, or hook up an industrial-grade air compressor, the mechanical complexity of your system can increase exponentially. These enhancements often reveal subtle flaws that the stock machine masked—or introduce new physical variables altogether. Many users instinctively blame the hardware when issues arise, but in reality, 90% of problems stem from misunderstanding the underlying physics or overlooking installation details.
This chapter skips the beginner-level manual and dives into the underlying optical, mechanical, and fluid dynamics principles, offering an expert-level diagnostic approach to unravel stubborn, unresolved issues.
Optics & Cut Quality
If your cut edges are no longer perpendicular or engraved lines appear blurry, don’t rush to adjust the current—start by examining your optical path.
1. Blurry Cut Lines: Lens Orientation & Spherical Aberration
Most beginners know the rule about installing the lens with the convex side facing up—but few understand why. It’s not arbitrary; it’s to counteract spherical aberration.
- Physics in Play: With a plano-convex lens, placing the convex side upward allows parallel laser beams to be gently bent before entering the high-refractive-index medium (ZnSe). This ensures the beams converge into an extremely small focal point upon exiting. Reverse the lens (convex side down) and the refraction becomes harsher, producing halos around the focus, shortening the depth of field, and reducing energy density by 30–50%.
- Diagnostic Tip: Perform a “spot test” by firing short pulses at low power onto thermal paper or black tape.
- Normal: A crisp, sharply defined dot.
- Abnormal: A dot with a fuzzy halo or irregular shape. This usually points to a reversed lens or micro-scale damage to its coating.
2. Power Loss: From Scattering to Mode Failure
Power drop is one of the most alarming issues in laser machining. Before splurging on a costly new laser tube, rule out these hidden culprits:
- Mirror Scatter: Even mirrors that appear clean can have minute ablation spots causing diffuse reflection, which bleeds energy before it reaches the lens.
- Laser Tube Mode Failure (TEM): A healthy tube outputs in the TEM00 mode—a perfect solid Gaussian beam. Failing tubes may still show normal current but produce a TEM01 profile, appearing as a donut shape or split into two distinct points.
- Hardcore Test Method: Place a firebrick or thick acrylic block in front of the first mirror and fire a short burst at high power (use extreme caution). A deep, conical burn marks a healthy tube; hollow rings or split burns mean the tube is effectively dead—regardless of current meter readings.
3. The Vicious Cycle of Thermal Runaway
ZnSe (zinc selenide) lenses have a critical weakness: thermal runaway. Even a small smudge—oil or dust—can absorb laser energy, heating that spot. With ZnSe, the hotter it gets, the more infrared it absorbs, creating an irreversible feedback loop that leads to yellowing, coating delamination, or even catastrophic fracture.
- Maintenance Red Flag: Never clean a lens while mounted in a plastic holder with acetone. Acetone dissolves adhesives or the mount itself, then flows onto the lens, creating a permanent cloudy film. For stubborn deposits, use polymer peel-off cleaners like First Contact Polymer for atomic-level cleaning.
Rotary Mishaps
Rotary engraving isn’t “plug-and-play”—it’s a delicate balance of friction and geometry.
1. Slippage & Weighting
When using a roller-style rotary to engrave lightweight objects like empty cans or glassware, you may see ghosting or stretching in the image. This is because the motor’s acceleration overcomes the friction between roller and object—the roller turns, but the workpiece doesn’t.
- Solutions:
- Add Physical Weight: Place a fabric bag filled with steel shot or a heavy metal rod inside the cup to increase downward force and static friction.
- Boost Grip: Wrap the metal rollers with vet wrap (Vet Tape/Coban). Its high friction coefficient and residue-free removal can completely eliminate slippage.
- Fine-Tune Settings: In LightBurn or your controller, lower the rotary’s acceleration and jerk settings. Excessive jerk can spike the starting torque beyond friction limits, causing missed steps.
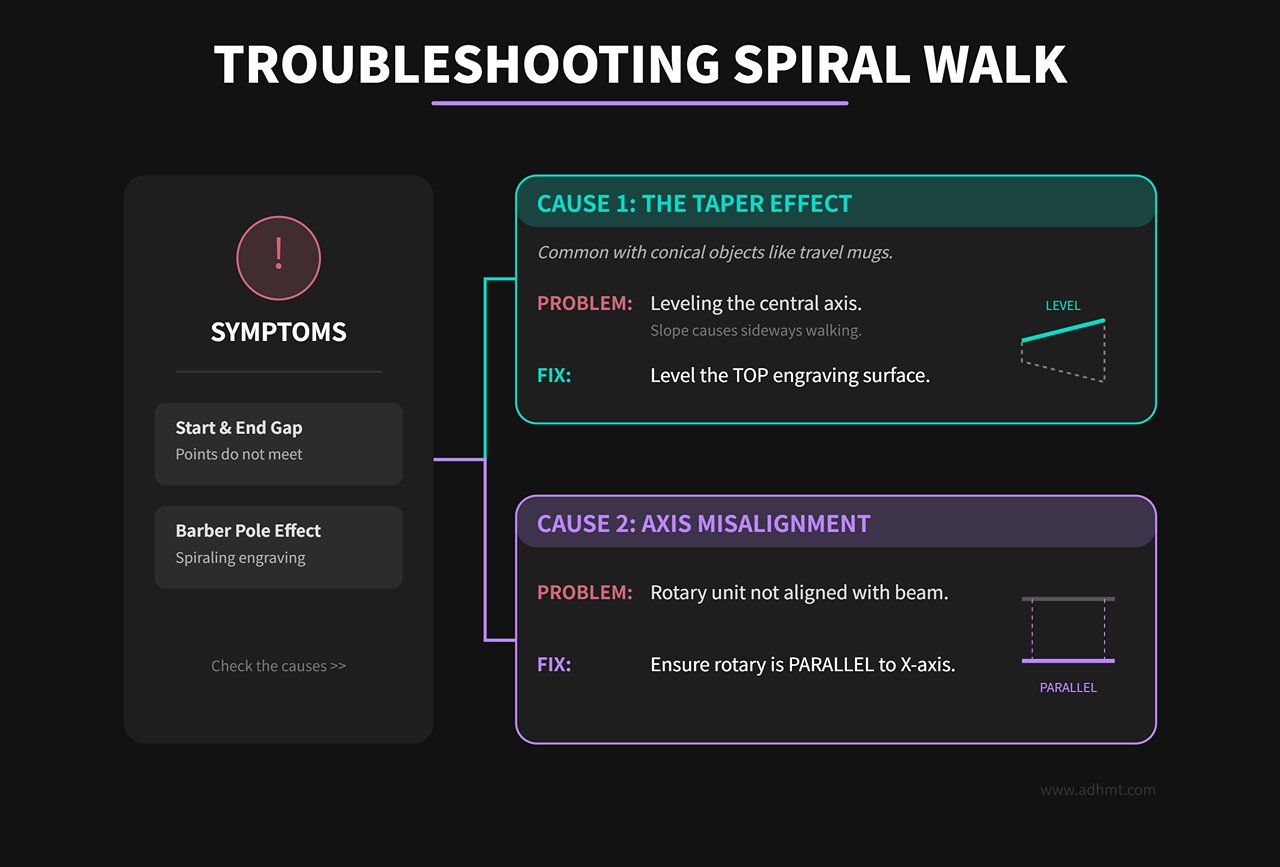
2. Spiral Walk
If your design’s start and end points don’t meet, or the engraving appears in a spiral like a barber pole, you’re looking at alignment issues.
- Taper Effect: Many travel mugs are conical. If the central axis is level, the surface is actually sloped. As the laser moves along the X-axis, focal distance changes, and during rotation, the mug may “walk” toward the narrow end, screwing itself out of place. Adjust the rotary’s height ends so the surface at the top engraving line is perfectly level—don’t aim for a level central axis.
- Axis Misalignment: The rotary unit must be perfectly parallel to the machine’s X-axis beam. Even a one-degree deviation can cause sideways drift during rotation, distorting the design.
3. Mathematical Correction for Image Distortion
If your input diameter is correct yet the output is stretched or squished, your stepper motor’s microstepping configuration is likely off.
- Rectangle Test Method: Don’t blindly trust diameter calculations. Instead, draw a long, narrow rectangle in your software whose length equals the object’s circumference (for example, 200 mm), and engrave it to check accuracy.
- Calibration Formula:
New pulse count per revolution = (Old pulse count × Theoretical length) / Measured length. This is the most accurate way to fine-tune your system. - Backlash Elimination: If the circle doesn’t close properly, belt or gear play is usually to blame. Pro tip: Before the actual engraving layer, add a faint 0.1% power line slightly ahead of the design’s starting point. Let the rotary axis “idle” briefly to take up the mechanical slack before engraving begins.
Air Assist Troubleshooting
The air assist system is far more than just a “blower”—it involves complex thermodynamic and fluid dynamic behavior.
1. Moisture in the Line and Thermal Shock
Even with a moisture separator installed at the compressor outlet, many users still experience cracked lenses. The reason? As air travels through several meters of hose, it cools, causing moisture to condense again by the time it reaches the laser head.
- The Hidden Killer: When a high-power laser beam passes through a lens, the glass can get extremely hot. If even a tiny droplet of cool condensate hits the inner surface, the sudden temperature difference can cause thermal shock, cracking the coating or even shattering the lens itself.
- Your Final Line of Defense: Always install a secondary high-precision moisture separator right before the machine’s air inlet. This small investment—just a few dozen dollars—can save your expensive optical system from irreversible damage.
2. Cutting Drift and Aerodynamic Lift
When cutting light materials like paper, fabric, or thin wood, too much air pressure can actually make things worse.
- Coanda Effect: As fast-moving air flows across a lightweight surface, Bernoulli’s principle creates a low-pressure zone, effectively “sucking” the material upward. The sheet may lift and drift under turbulence, causing misaligned cuts.
- Solution: Use honeycomb pins or clamps to hold the material firmly in place. For lightweight or flammable materials, keep air pressure between 5–10 PSI—just enough to prevent ignition. Avoid the 30+ PSI levels used for thick wood cuts.
3. Nozzle Fluid Dynamics
Why do cuts from the same 60W laser look glass-smooth on someone else’s acrylic, but yours show ripple marks?
- Turbulent vs. Laminar Flow: Standard cylindrical nozzles tend to produce turbulence at the air outlet, which disrupts molten material inside the cut.
- Advanced Upgrade: Try a supersonic (Laval) nozzle or a flow-optimized laminar nozzle. These focus the airflow into a tight, needle-like jet that penetrates deep into the kerf, dramatically improving edge smoothness and vertical precision for thicker cuts.
Ⅷ. Buying Roadmap: Turning Every Dollar Into Profit
In the crowded accessories market, beginners often fall into two traps: buying cheap, low-quality parts that end up damaging their machines, or overspending on high-end gear they don’t yet need.
Upgrades shouldn’t be impulsive purchases—they’re strategic investments aligned with your business growth. We divide the upgrade path into three stages to guide you from survival and protection, through profit expansion, and finally to maximum efficiency.
Tier 1: Survival & Essentials (First 3 Months) — Eliminate Critical Risks
In the early phase of machine operation, your priority isn’t adding features—it’s keeping the machine alive. This stage’s investments protect you from catastrophic failures that could halt production entirely.
- Fire Safety Truth: Say No to Dry Powder
- Common Mistake: Many sellers include or recommend household ABC dry chemical extinguishers.
- Hidden Danger: While they can put out flames, the fine powder is highly corrosive and adhesive—it seeps into linear rails, circuits, and optical mounts. Even if the fire doesn’t destroy your machine, chemical corrosion eventually will.
- Expert Recommendation: Get a Halotron (halocarbon replacement) or Clean Agent extinguisher. Though they cost 3–4 times more, they’re non-conductive, residue-free, and completely safe for equipment. CO₂ types are also clean, but their extremely low discharge temperature (−78°C) can cause thermal shock and crack a hot glass laser tube—making halocarbon units the safer choice.
- Lubrication & Maintenance: WD-40 Is Poison
- Myth: Using WD-40 to silence bearings or rails. WD-40 is primarily a solvent, not a lubricant—it dissolves protective grease, accelerating wear.
- Proper Practice: Use white lithium grease instead. For industrial rails like Hiwin, don’t just smear it on the surface where it’ll collect dust—inject it through the slider’s grease fitting (Zerk fitting) so it reaches the ball bearings inside.
- Temperature Control: Exposing the CW-3000 Myth
- Warning: Despite appearances, the CW-3000 isn’t a real chiller—it has no compressor, only a radiator and fan. Its water temperature will always stay above ambient. Using it in summer, when temps hit 30°C, slowly kills your laser tube.
- Upgrade Required: Only the CW-5000/5200 series have true compressor-based cooling. If you’re on a tight budget and running under 60W, even a “bucket + ice + thermometer” setup is safer than trusting a CW-3000.

Tier 2: Profit Boosters (3–6 Months) — Gear That Wins You Orders
Once orders start coming in—especially custom jobs—these accessories become decisive in whether you can deliver premium results and command higher pricing.
- Rotary Attachment: Your Ticket to High Margins
- Business Logic: This is the fastest payback accessory. Personalized tumblers (like Stanley or Yeti) are among the highest-demand products on the market right now.
- Selection Tip: For standard tumblers, a roller type offers the best value. But if you want to engrave mugs with handles, baseball bats, or rings, go straight for a chuck-style rotary. Though heavy-duty models like RotoBoss cost more, their rock-solid grip prevents costly misalignment or slippage.
- Air Compressor System: The Catalyst for Cutting Transformation
- Technical Threshold: If you want to cut through basswood panels thicker than 6 mm without leaving burnt black edges, the stock 5 PSI air pump simply won’t cut it. You’ll need a consistent 25–40 PSI airflow to achieve a clean edge.
- Hidden Costs: Once you hook up an air compressor—preferably an ultra-quiet oil-free model like those from California Air Tools—you must install a secondary oil–water separator at the air inlet. High-pressure air can propel condensed moisture from the tank straight toward your lens like a water jet; without filtration, lens damage is inevitable.
- Long-Focus Lens (4.0 in.): The Heavy-Duty Cutter’s Choice
- Physical Principle: Choosing a 4.0‑inch lens isn’t just about focusing distance—it extends the Rayleigh length, meaning the laser beam maintains a narrower, straighter waist around the focal point.
- Application Example: Using a 2.0‑inch lens to cut 10 mm acrylic often leaves a slanted edge; a 4.0‑inch lens produces edges that are perfectly vertical and knife‑sharp—an essential tool for making signage and display stands.
Tier 3: Efficiency & Comfort (1 year +) — The Luxury of Scaled Production
When your machine runs more than four hours a day or your job queue is packed, trading money for time becomes the only logical move.
- Camera System: Precision Positioning, Not Measuring
- Core Value: Its real purpose is to help you make the most of leftover material—by dragging your design onto scrap pieces, you reduce waste and speed up layout.
- Limitation: Don’t expect millimeter‑level alignment accuracy. Lid wobble introduces tiny angular deviations each time the lid closes, which the camera will exaggerate. Before buying, make sure your gas struts and hinges are rock solid.
- Fume Extractor: The Cost of Clean Air
- Cost Warning: Professional‑grade units like BOFA or Filtrabox deliver outstanding results—but at a price. Tar from wood cutting quickly clogs the pre‑filter, and the activated‑carbon layer lasts only 3–6 months under heavy use. Replacement cartridges run $200–$400 per set.
- Alternative: Where local regulations and environment allow, venting fumes directly outdoors through a high‑power inline fan is still the most efficient and cost‑effective option. A purifier should be your fallback when direct exhaust isn’t feasible.
ROI Reality Check (The Real ROI)
Let’s take one of the most popular businesses—custom laser‑engraved tumblers—to calculate how your accessory investment truly pays off.
Investment Scenario: Purchase a mid‑ to high‑end roller rotary attachment with supporting fixtures (total investment around $350).
| Cost Breakdown (per item) | Amount | Notes |
|---|---|---|
| Blank tumbler cost | $6.00 | Wholesale price including shipping |
| Consumables & operation | $0.80 | Cleaning alcohol, tape, power, laser‑tube depreciation |
| Labor cost | $3.50 | ~10 minutes (loading, focusing, packaging) at $20/hour |
| Total cost per item | $10.30 | |
| Market average price | $25.00 | Typical retail for custom name/logo tumblers |
| Net profit per item | $14.70 |
Break‑Even Point: $ (\frac{\text{$350 (Investment)}}{\text{$14.70 (Profit per unit)}}) ≈ 24 tumblers
Conclusion: That number is impressive. With just one small group order—say, branded gifts for a real‑estate agency or wedding favors—the rotary attachment effectively pays for itself.
That’s why the rotary is our top Tier 2 recommendation—it’s a genuine productivity upgrade rather than a mere accessory. When you evaluate every add‑on through an ROI lens, price stops being the obstacle; value becomes the only metric that matters.
Conclusion & Next Steps: Building a Zero‑Guesswork Accessory Strategy
At this point, we’ve deconstructed every layer of the laser‑cutter accessory ecosystem—from microscopic lens coatings to the macro‑scale aerodynamics of exhaust systems. You should now see that upgrading components isn’t about impulsive shopping—it’s a systematic engineering approach that transforms a standard off‑the‑shelf machine into a precision tool tailored to your business goals.
Before you check out and finalize your purchase, let’s take one last strategic pause. This isn’t just a wrap‑up—it’s the final safety checkpoint that carries you from “hesitation to buy” to “ready to plug and produce.” If you’re planning to take your production capacity to the next level, explore the Single Table Fiber Laser Cutting Machine or the Dual-use Fiber Laser Cutting Machine With Cover for professional-grade efficiency.
Re‑aligning Business Goals: Are You an Engraver or a Cutter?
There’s no such thing as the universally “best” accessory—only the one that best fits your workflow. Take a step back and ensure your budget targets the tools that directly serve your main profit stream:
- If your focus is high‑margin personalized engraving (tumblers, gifts): Your top investments should be a rotary attachment and a 1.5‑inch short‑focus lens.
- ROI Insight: A chuck‑style rotary can recoup its cost within just 25‑tumbler orders.
- Technical Pitfall: Watch out for Trocen (AWC) controllers. Unlike Ruida units, older Trocen systems poorly support LightBurn’s “Power Scale” feature, leading to harsh results when engraving grayscale photos or gradient logos. If photo engraving is key to your business, confirm grayscale capability—or choose a Ruida controller instead.
- If your focus is engineering‑grade cutting (signage, acrylic displays): Prioritize a 4.0‑inch long‑focus lens, an air compressor over 30 PSI, and a reliable chiller.
- ROI Insight: A crystal‑clear acrylic edge eliminates hours of manual flame‑polishing labor.
- Technical Pitfall: The chiller alarm wiring is a common failure point. Many users plug in a CW‑5200 and stop there—but you must connect the H1–H3 alarm output (normally‑closed contacts) on the chiller to pins 1 & 5 of the CN5 port on your Ruida controller. That connection ensures the laser shuts down automatically if the coolant flow stops—otherwise, you risk burning out a laser tube worth thousands of dollars.
The Definitive Compatibility Checklist
Before you click “Pay,” take a minute to grab both your calipers and your phone, then walk through this checklist for a final hands‑on confirmation. Sixty seconds of double‑checking can eliminate nearly all potential compatibility headaches.
| Risk Anchor | Verification Steps and Standards | Consequences of Neglect | Expert Fix |
|---|---|---|---|
| Controller Identification | Power on and check the display: RDC644x (Ruida) / AWC (Trocen) / GRBL (GCode) | Rotary axis won’t be recognized; LightBurn functions limited | Ruida offers the best compatibility; Trocen requires special firmware; GRBL needs baud rate confirmation. |
| Voltage Match | Check the nameplate: 110V (US) vs. 220V (EU/China) | Burned transformer or laser tube failure from undervoltage | Never cross‑voltage purchase chillers or fans; if unavoidable, use a step‑up/step‑down converter. |
| Rotary Axis Motor | Use a multimeter to test resistance: 2‑phase 4‑wire (2–5Ω/phase) vs. 3‑phase 6‑wire | Fried mainboard stepper driver module | Connect only A+/A‑/B+/B‑ wires; insulate and ignore common wires. Different phase types mean 3‑phase motors need dedicated drivers. |
| Plug Configuration | Count aviation plug pins: GX16‑4 (standard) vs. GX16‑2/3/5 (specific machines) | Incompatible plug fit or short circuits | Don’t gamble on “forcing it in.” Request a pinout diagram before buying, or get a solder‑free adapter. |
| Lens Size | Measure diameter with calipers: 18mm / 20mm / 25mm | Lens won’t seat or may fall out | Prefer slightly smaller lenses (can be shimmed); oversize lenses need a new tube. Check edge thickness (ET) to ensure the retaining ring can lock properly. |
Next Steps: Leverage Available Resources
Don’t tackle every obstacle alone. The laser‑cutting sphere hosts one of the most vibrant and technically informed DIY communities in existence. Tapping into these networks can dramatically streamline your upgrade journey.
1. Secure Authoritative Diagrams
Never put your trust in vague product descriptions on Amazon.
- LightBurn Official Documentation: Visit docs.lightburnsoftware.com and search for “Laser ID” or “Rotary Setup.” You’ll find wiring definitions for nearly all mainstream controllers. Tip: Save the page as a PDF and post it near your machine for quick reference.
- Rabbit Laser Library: Search “rabbitlaserusa manuals.” This archive contains circuit diagrams for almost every industrial model using Ruida or Leetro controllers—an invaluable resource for technically advanced users.
2. Join Targeted Support Communities
Frame your questions well, and you can receive expert‑level answers within 24 hours.
- Question template (copy and use):
- Machine Model: [e.g., OMTech AF2028‑100W]
- Controller Model: [e.g., Ruida RDC6445G]
- Issue: [e.g., Image stretches by 2× along the Y‑axis when using rotary]
- Attempts Made: [e.g., Changed pulses per rotation from 5000 to 10000]
- Attachments: [Include clear close‑up photos of controller wiring terminals]
- Recommended communities:LightBurn Official Forum (Ruida section):
- Highest technical value, with direct participation from the developers themselves.
- Reddit r/lasercutting: Rapid response pace; ideal for general mechanical and physical troubleshooting.
VII. FAQs
Q1: What are the best accessories for improving cut quality?
Improving cut quality often involves optimizing several aspects of the laser cutting process, including the choice of accessories:
- High-Quality Lenses: Using high-quality, clean laser lenses ensures that the laser beam is properly focused, resulting in cleaner cuts. Regular maintenance and replacement of lenses are crucial for maintaining optimal performance.
- Appropriate Nozzles: Selecting the right type of nozzle for the material and cutting task can significantly improve cut quality. Double-layer nozzles, for instance, are often better for thicker materials as they provide better gas flow and reduce the risk of material burns.
- Proper Cooling Systems: Effective cooling systems, such as water chillers, help maintain a stable temperature for the laser tube, preventing overheating and ensuring consistent performance.
- Stable Cutting Beds: Using the appropriate cutting bed, such as a honeycomb grid, can reduce back reflections and ensure smoother cuts, especially for delicate materials.
Q2: How do you maintain your laser cutting machine accessories?
Regular maintenance is essential for keeping your laser cutting machine and its accessories in top condition. Here are some general tips:
- Lenses and Mirrors: Regularly clean lenses and mirrors with appropriate cleaning solutions and soft cloths to prevent dust and debris buildup, which can scatter the laser beam and reduce efficiency.
- Nozzles: Inspect nozzles regularly for signs of wear or clogging. Clean or replace them as needed to maintain optimal gas flow and cutting quality.
- Cooling Systems: Check the water levels and cleanliness of water in chillers, and ensure that fans or other cooling mechanisms are functioning properly. Regular maintenance helps prevent overheating and extends the lifespan of the laser tube.
- Fume Extractors: Replace filters in fume extractors regularly to maintain efficient air quality management. Ensure that the extraction system is properly sealed and free from blockages.
Final Thoughts
Upgrading your laser‑cutter’s hardware is about applying reliable physical principles to counter the unpredictable variables of manufacturing. Once the right lens is in place, the airflow is clean, and the rotary axis is rock‑solid, you cease being just an operator—you become a creator who commands the full production workflow.
This checklist and guide are your blueprint for achieving professional‑grade outcomes. Download it, verify your machine’s specifications, and move forward with total confidence. Build the laser setup that will work relentlessly to generate value for you—then contact us for expert assistance as you expand your production capabilities.


